Table of Contents
Advertisement
Quick Links
Explorer® MX-HD Basic and Plus Mobile DVR
Install and Setup Guide
Use this guide to install and configure the Seon Explorer MX-HD DVR. The DVR requires configuration
as part of the install process.
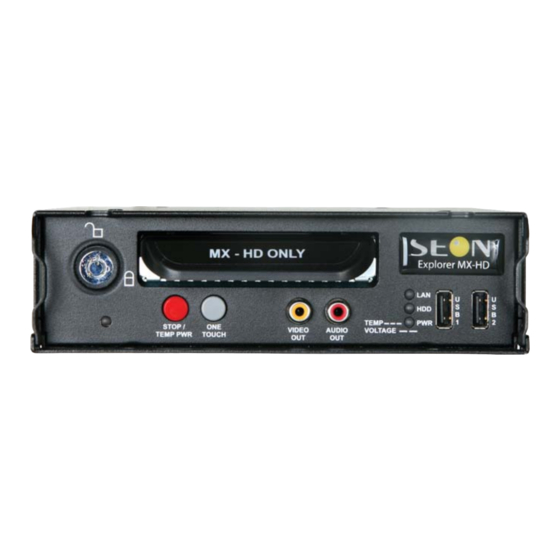
The Explorer MX-HD DVR is secured with a locking front cover and a cable cover. Two cable grommets
(and two knockouts) on the cable cover allow for wiring to enter from the left side, right side, or back of
the unit. The DVR can be installed horizontally or vertically.
*700-0159*
700-0159 R003
1
Advertisement
Table of Contents

Subscribe to Our Youtube Channel
Related Manuals for SEON Explorer


Summary of Contents for SEON Explorer
- Page 1 The Explorer MX-HD DVR is secured with a locking front cover and a cable cover. Two cable grommets (and two knockouts) on the cable cover allow for wiring to enter from the left side, right side, or back of the unit.
-
Page 2: Table Of Contents
Explorer MX-HD Install and Setup Guide Guide Contents Tools and Equipment, on page 2 MX-HD Basic System Package Contents (typical), on page 3 MX-HD Plus System Package Contents (typical), on page 4 Installation Diagrams, on page 5 Installation Best Practices, on page 7... -
Page 3: Mx-Hd Basic System Package Contents (Typical)
Explorer MX-HD Install and Setup Guide MX-HD Basic System Package Contents (typical) The contents of a typical Basic installation package are listed below. The actual contents of your installation package may vary, depending on the options selected. Explorer MX-HD DVR with locking... -
Page 4: Mx-Hd Plus System Package Contents (Typical)
Explorer MX-HD Install and Setup Guide MX-HD Plus System Package Contents (typical) The additional items for a typical Plus installation package are shown below. The actual contents of your installation package may vary, depending on the options selected. Smart-Link™ module for signal interfaces Smart-Link-to-DVR connection harness... -
Page 5: Installation Diagrams
Explorer MX-HD Install and Setup Guide Installation Diagrams To install the typical MX-HD Basic system, see Figure 1. To install the typical MX-HD Plus system, see Figure 2. Explorer® MX-HD Typical Basic System Setup Peripherals Seon System Vehicle Electrical Interface... - Page 6 To DVR CONTROL Input *1 For ease of installation and better speed tracking, Seon recommends using a GPS receiver. *2 The portable video monitor can be used from the front or back panel DVR connectors. *3 The Diagnostic Indicator/Alarm Button and RGY Illuminator Display are not interchangeable, a different Smart-Link unit is required to use either one.
-
Page 7: Installation Best Practices
Route the wiring and cables away from sharp edges that might damage the insulation. Avoid sharp bends in the cable. Contact Seon before attaching the DVR to other equipment in the vehicle. The MX-HD DVR is secured with a security front cover and a cable cover. Two cable grommets (and two knockouts) on the cable cover allow wiring to enter from the left side, right side, or back of the unit. -
Page 8: Dvr And Component Installation
Explorer MX-HD Install and Setup Guide DVR and Component Installation DVR Installation The DVR typically ships with the locking front cover on and the mounting plate and cable cover off. To install the MX-HD DVR: 1 Select an appropriate mounting location and orientation, either horizontal or vertical but not upside down. -
Page 9: Camera Installation
The Seon CHW HD camera requires power over Ethernet and that power is supplied by the Seon POE Injector or Switch. See the Seon POE Injector Installation Guide 700-0166 or the Seon POE Switch Installation Guide 700-0193 for details on connecting the POE to the camera and DVR. - Page 10 Explorer MX-HD Install and Setup Guide MX-HD Basic: Alarm Button Installation To install the alarm button: 1 Mount the alarm button into a ½" hole and attach to the alarm input harness using the micro-fit connectors. 2 Attach the black wire of the alarm button to the black wire of the alarm input harness.
- Page 11 Explorer MX-HD Install and Setup Guide Wake on Alarm Feature Wiring (Optional) CAUTION The Wake on Alarm starts booting up the DVR when an alarm is detected. The DVR takes about 1 minute to boot up before it can begin recording. It cannot instantly capture the alarm event.
- Page 12 Explorer MX-HD Install and Setup Guide Figure 6 Configuring Alarm 1 for Wake on Alarm To wire the Wake on Alarm feature with a Diagnostic Button: Important: If you are using the Diagnostic Button and cable, and require the Wake on Alarm feature, the Diagnostic Button cable must be rewired as shown in Figure 7.
-
Page 13: Other Accessories
Portable video monitor – for more information, see the product documentation. • Smart-Reach Wireless Network – contact your sales representative at Seon Design for wireless network options. • CAN Network – contact your sales representative at Seon Design to discuss the CAN interface. 700-0159 R003... -
Page 14: Hardware Installation Final Checklist
Explorer MX-HD Install and Setup Guide Hardware Installation Final Checklist Harnesses (camera, recorder, and accessories) Check that the cables and the harnesses are properly secured. Check that sharp metal edges are not touching the cables or harnesses. Check that the connections are solid (no shorts). -
Page 15: Dvr Menu Access
These steps cover configuration in the DVR OSD. Configuration can be done in the DVR OSD with a monitor and USB mouse or remotely with vMax Web in Internet Explorer 8 or 9 (32 bit version only). On power-up, with a monitor and USB mouse connected to the DVR, the Seon Explorer MX-HD splash screen appears briefly before the DVR enters live view. - Page 16 Explorer MX-HD Install and Setup Guide During recording and live viewing, the screen information is dynamic and can include the overlay text items shown in Figure 9. The high definition camera does not display on the analog camera output from the DVR to the monitor.
- Page 17 Explorer MX-HD Install and Setup Guide 2 In the Configuration menu, click Time/Date. Figure 11 Configuration Main Menu Note : To enter data in OSD fields, click with the mouse to display a keyboard. Use the on screen popup keyboard to select letters or numbers to input to fields. Examples are shown in Figure 12.
- Page 18 Explorer MX-HD Install and Setup Guide 4 In the Configuration menu, click Titles/Display. 5 In the Titles and Display menu, enter vehicle ID and camera output labels to display on overlay and menus. Main Title: Enter the bus number. Main Title Display: Leave On to display.
- Page 19 Explorer MX-HD Install and Setup Guide 9 In the Diagnostic Display menu, select options to display as overlays in the play view. The diagnostic display options are a customer preference. Leave all these settings On. Internal Temperature Display: For temperature measurement display, leave on default F for Fahrenheit (USA) or choose C for Celsius (Canada).
- Page 20 Explorer MX-HD Install and Setup Guide 12 In the Recording Settings menu, click Camera. This example has four interior cameras with microphones. New titles will display here as well as in the play view overlays. Speed: Leave the channel speed at default settings unless you have special requirements.
- Page 21 Explorer MX-HD Install and Setup Guide 15 In the Recording Settings menu, click HD Camera. Leave the camera settings at defaults unless you have special requirements. Do not adjust the Advanced Settings unless specifically instructed to do so. Click Back Figure 20 HD Camera Settings Menu 16 In the Configuration menu, click Alarm/Signal.
- Page 22 Explorer MX-HD Install and Setup Guide 18 In the Alarms and Signals menu, click Alarms. CAUTION: Select Menu Options for Each Alarm From the Alarm drop down list, when any alarm (ALM 1, ALM 2, ALM 3, or ALM 4) is selected, ALL of the settings on the Alarm Settings menu must be configured for that alarm.
- Page 23 Explorer MX-HD Install and Setup Guide 20 In the Alarms and Signals menu, click GPS. GPS Display: If a GPS receiver is installed, select On to display the coordinates on the play view overlay. GPS Time: Select On to have the play view overlay time set by the GPS.
- Page 24 CAUTION: DVR Password Security The default password is 11111111. For security purposes, Seon recommends that the user default login and system settings passwords should be changed. Seon is not responsible if the password is lost or forgotten. 23 In the Configuration menu, click System and in System Settings menu, configure as follows.
- Page 25 Explorer MX-HD Install and Setup Guide 24 In the System Settings menus click Program Update and in the Program Update menu, store the DVR configuration as a file to upload to other DVRs. Select USB Device as the file saving destination.
-
Page 26: Vmax Web Laptop Configuration
Explorer MX-HD Install and Setup Guide vMax Web Laptop Configuration ® ® The MX-HD DVR can be managed via the vMax Web internet portal. Microsoft Internet Explorer or higher 32 bit version is required. Make sure the DVR and other system components are already installed and configured in order to access the DVR via vMax Web. - Page 27 Explorer MX-HD Install and Setup Guide The Local Area Connection Properties window appears. Figure 30 Local Area Connection Properties window 27 In the Local Area Connection Properties window, select the current Internet Protocol Version, (in Windows XP select Internet Protocol (TCP/IPv4)), and then click Properties.
- Page 28 Explorer MX-HD Install and Setup Guide Connecting the DVR to the Laptop To connect the DVR to the laptop: 1 Connect one end of the Ethernet cable to a network port on the laptop. Connect the other end to a network port on the DVR.
- Page 29 Explorer MX-HD Install and Setup Guide 4 Open Internet Explorer, and in the address bar, type in the DVR default IP address: http://169.254.1.1. 5 Press Enter. The Login Screen appears as shown in Figure 34. Figure 34 Login Screen 6 At the login prompt, enter the following credentials to access the internet browser user interface. The user name is case sensitive.
-
Page 30: Dvr Configuration Uploads
Explorer MX-HD Install and Setup Guide DVR Configuration Uploads A configuration file is uploaded to a DVR when the DVR is first installed or when settings need to be changed on multiple DVRs in a fleet. Configuration files can be uploaded at the DVR with a USB drive or over the network using vMax Web or vMax Commander applications. - Page 31 Explorer MX-HD Install and Setup Guide 6 In the System Settings menu click Program Update. Figure 36 System Settings Menu 7 From the Load Configuration menu, select the file to upload. Figure 37 Program Update Menu Select File Important: The Load Configuration drop down list displays alphabetically the first ten configuration files on the USB memory device.
- Page 32 Explorer MX-HD Install and Setup Guide Figure 38 Program Update Menu Include Network 9 Click Load. Figure 39 Program Update Menu Load 10 In the Confirmation window, click Yes to proceed or No to cancel. Figure 40 Confirm Configuration Load...
- Page 33 Explorer MX-HD Install and Setup Guide 11 Click Back in the Program Update and then System Settings menus to save and exit the menus. Figure 41 Click Back to Save Configuration 12 From the Configuration menu, click Title/Display, and in the Titles and Display menu, update the text in the Main_Title field.
-
Page 34: Uploading Configuration Files To Dvr Via Vmax Web
CAUTION: DVR Password Security The default password is 11111111. For security purposes, Seon recommends that the user default login and system settings passwords should be changed. Seon is not responsible if the password is lost or for- gotten. 6 Click OK. - Page 35 Explorer MX-HD Install and Setup Guide 7 Select the Configuration tab. 8 On the Configuration tab, click the System icon. Figure 45 vMax Web System Settings 9 In the Program Update Settings area, the default (cleared) Include Network Settings check box setting keeps your existing network settings during the configuration upload.
- Page 36 For consistency, Seon recommends that the configuration upload file name should be kept to four characters maximum (****.seon) in the event that the file needs to be loaded to the DVR from the USB port. The DVR USB upload interface supports only four characters in the file name.
- Page 37 Explorer MX-HD Install and Setup Guide 16 In the Titles/Display menu, update the text in the Main_Title field. Figure 52 vMax Web Titles and Display Menu 17 Click Save to save the settings to the DVR. 18 Power down and restart the DVR.
-
Page 38: Updating The Firmware
The firmware version is displayed on the top right corner of every menu. The firmware update must be obtained from Seon Design. To install a firmware update, a USB memory device must be formatted by a Windows®-based computer using the FAT file format. Load the Program Update file onto the USB memory device. -
Page 39: Configuring Dvr Email Notifications
Explorer MX-HD Install and Setup Guide Configuring DVR Email Notifications If required by the customer, Seon DVRs can be configured to send emails when certain events are ® recorded. With the DVR configured to use Seon Design’s Smart-Reach wireless system, alarms and system events can trigger email notifications. - Page 40 Explorer MX-HD Install and Setup Guide 3 In the System menu, select E-mail from the Disk Full and HD Failure drop down menus. Figure 56 EX/TR series DVR Configure tab 4 Click Save. If the configured alarm or system events occur, the email will be sent when the DVR is within range of a Smart-Reach access point.
-
Page 41: Configuration Menu Descriptions
Explorer MX-HD Install and Setup Guide Configuration Menu Descriptions This section describes the functions and defaults of the fields and options on each configuration menu. DVR Configuration Menu Tree The MX-HD configuration menu tree shown in Figure 57 and Figure 58 applies to the on screen display configuration and to the vMax Web configuration. - Page 42 Explorer MX-HD Install and Setup Guide Record Network System Disk Full Repeat Record Setting Type HD Failure Record Delay-On Time IP Address Password Enable Record Delay-Off Time Subnet Mask Password Power Delay-Off Time Default Gateway Audio Output Channel Alarm Partition Size...
-
Page 43: Time And Date Menu
Explorer MX-HD Install and Setup Guide Time and Date Menu Use the Time and Date menu to set the time and date settings and Auto Daylight Savings settings. Figure 59 Time and Date Menu Table 3 Time and Date Configuration Items... - Page 44 Explorer MX-HD Install and Setup Guide DST (Daylight Savings Time) Settings Menu Configure the start date or end date settings for daylight savings. The DST Settings sub-menu is shown in Figure 60. Figure 60 DST Settings Menu Table 4 DST Settings Configuration Items...
-
Page 45: Titles And Display Menu
Explorer MX-HD Install and Setup Guide Titles and Display Menu Use the Titles and Display menu to set the main title, camera titles, and other camera view overlay options. Figure 61 Titles and Display Menu Table 5 Titles and Display Configuration Items... -
Page 46: Monitor Settings Menu
Explorer MX-HD Install and Setup Guide Monitor Settings Menu Use the Monitor Settings menu to set monitor default and alarm trigger views. Figure 62 Diagnostic Display Menu Table 6 Diagnostic Display Configuration Items Menu Item Description Value [Default] Front Default Setting... - Page 47 Explorer MX-HD Install and Setup Guide Diagnostic Display Menu Use the Diagnostic Display menu to set various diagnostic options to display on the camera view overlays. Figure 63 Diagnostic Display Menu Table 7 Diagnostic Display Configuration Items Menu Item Description...
-
Page 48: Alarms And Signals Menu
Explorer MX-HD Install and Setup Guide Alarms and Signals Menu Use the Alarms and Signals menu to set the options and actions that occur when an external alarm is received by the DVR. Usually, a driver-activated switch or other external device causes the alarm. - Page 49 Explorer MX-HD Install and Setup Guide Table 8 Alarm Settings Configuration Items Menu Item Description Value [Default] Speed Set the recording speed, in frames per second, to the desired setting. A Off, 1, 5, 7.5, 10, [15], 30 DVR usually records in a mode that conserves hard drive space, but increases video speed and quality for a short duration to record an alarm event.
- Page 50 Explorer MX-HD Install and Setup Guide Signals Menus Use the Signals menu to configure signals and the actions they generate. The MX-HD supports 10 independent signals. The first five are designated as follows: LT (left turn signal), STP (stop), BRK (brake), WRN (warning lights), and RT (right turn signal).
- Page 51 Explorer MX-HD Install and Setup Guide Speed Settings Menu Use the Speed Settings menu to set the options for recording speed data. Figure 67 Speed Settings Menu Figure 68 Table 10 Speed Settings Configuration Items Table 11 Menu Item Description...
-
Page 52: Gps Settings Menu
Explorer MX-HD Install and Setup Guide GPS Settings Menu Use the GPS Settings menu to configure how GPS data is displayed. Figure 69 GPS Settings Menu Table 12 GPS Settings Menu Items Menu Item Description Value [Default] GPS Display Show or hide the GPS display. With a GPS module connected... -
Page 53: Recording Settings Menu
Explorer MX-HD Install and Setup Guide Table 12 GPS Settings Menu Items Menu Item Description Value [Default] Bottom Right: LAT * Set the latitude to 0° 00.00.00’ through 90° 00.00.00’. [0 0.0 0 N] Bottom Right: LONG * Set the longitude to 0° 00.00.00’ through 180° 00.00.00’. -
Page 54: Camera Settings Menus
Set the picture quality option. The DVR uses H.264 video compression 1, 2, [3], 4 to extend the recording time on the hard drive. See Estimated Recording Time tables in the Explorer MX-HD DVR User Guide, 700-0160. Resolution Set the recording resolution in pixels. The higher the recording [720 ×... - Page 55 Set the picture quality option. The DVR uses H.264 video compression 1, 2, [3], 4 to extend the recording time on the hard drive. See Estimated Recording Time tables in the Explorer MX-HD DVR User Guide, 700-0160. Resolution Set the recording resolution in pixels. The higher the recording 720 ×...
- Page 56 Explorer MX-HD Install and Setup Guide Timer Settings Menus Use the Timer Settings menu to change the timer schedules to turn the DVR on and off independently of the vehicle ignition. The DVR supports ten independent timers that can be used to control when and how the DVR records.
- Page 57 Explorer MX-HD Install and Setup Guide HD Camera Settings Menu Use the HD Camera menu to change the CHW camera settings to meet different video recording requirements. Figure 74 HD Camera Settings Menu Table 17 HD Camera Settings Menu Item...
- Page 58 Advanced Settings Menu CAUTION: HD Camera Network Contact Seon Support if you wish to edit settings on this menu. Improper editing may cause network communication problems. The Advanced Settings menu is used to change the IP subnet address that the DVR monitors to receive HD camera data.
-
Page 59: Network Settings Menu
Explorer MX-HD Install and Setup Guide Network Settings Menu The Explorer MX-HD DVR has a built-in Ethernet interface for connecting to any of the following: • HD camera for high definition recording • PC computer with IE 8 for vMax Web DVR access ®... -
Page 60: User Levels Menu
CAUTION: DVR Password Security The default password is 11111111. For security purposes, Seon recommends that the user default login and system settings passwords should be changed. Seon is not responsible if the password is lost or forgotten. Set up to enable multiple users to access the DVR with vMax Web View with various permission levels. - Page 61 Explorer MX-HD Install and Setup Guide DDNS (Dynamic Domain Name Server) Settings Figure 78 DDNS Settings Menu Table 21 DDNS Settings Configuration Items Menu Item Description Value [Default] DDNS (Dynamic DynDNS currently supported. Maximum 64 characters Domain Name Server) User Name Set the user name.
-
Page 62: System Settings Menu
CAUTION: DVR Password Security The default password is 11111111. For security purposes, Seon recommends that the user default login and system settings passwords should be changed. Seon is not responsible if the password is lost or forgotten. Figure 79 System Settings Menu... -
Page 63: Program Update Menu
Explorer MX-HD Install and Setup Guide Program Update Menu Figure 80 Program Update Menu The Program Update menu enables users to update the internal firmware and to store and load the DVR configuration. Table 23 Program Update Configuration Items Menu Item... - Page 64 Explorer MX-HD Install and Setup Guide Figure 81 Load Configuration: Warning Message Figure 82 Store DVR Configuration to USB Device Message Figure 83 Update DVR Firmware Message 700-0159 R003...
- Page 65 Explorer MX-HD Install and Setup Guide Figure 84 Formatting the Hard Drive Message E-mail Settings Menu The E-mail Settings feature requires network connectivity. See Network Settings Menu, on page 59. Figure 85 Email Settings Table 24 Email Settings Configuration Items...
- Page 66 Explorer MX-HD Install and Setup Guide One-Touch Settings Menu Use the ONE TOUCH button when a video monitor is unavailable. Use One-Touch download for downloading specific alarm or event information to a USB memory device via the USB port. One-Touch download is available when the DVR is in live, playback, or record mode.
-
Page 67: Dimensions
Explorer MX-HD Install and Setup Guide Dimensions Important: Specifications are subject to change without notice. Table 26 Physical Specifications Smart-Link MX-HD Weight and Material 9 oz (255 g), steel, powder coated black 5.3 lb (2.4 kg) including lockbox, steel, powder... -
Page 68: Related Documents
Figure 88 Smart-Link Module Related Documents For more information, see the following user guides: • Explorer MX-HD Basic and Plus Mobile DVR User Guide, document number 700-0160 • CHW Series Camera Installation Guide, document number 700-0149 • POE Switch Installation Guide, document number 700-0193 •...
Need help?
Do you have a question about the Explorer and is the answer not in the manual?
Questions and answers