Table of Contents
Advertisement
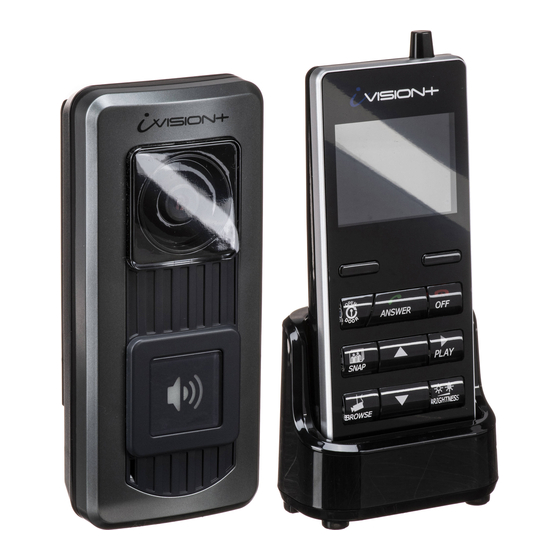
Wireless Video Intercom
For a setup of each device, please refer to individual "Installation Instructions"
Thank you for purchasing the iVISION+ wireless video intercom.
Due to the nature of radio frequency transmission technology, the transmission range,
stability of images, video and sound of the iVISION+ can not be guaranteed at all times.
Performance of this product depends on the environment where the product is being used.
Please carefully read all included documents and test for feasibility before applying
any damages to the installation environment. Keep documents safe for future reference.
Advertisement
Table of Contents
Troubleshooting

Related Manuals for Optex iVision+


Summary of Contents for Optex iVision+
- Page 1 Wireless Video Intercom For a setup of each device, please refer to individual “Installation Instructions” Thank you for purchasing the iVISION+ wireless video intercom. Due to the nature of radio frequency transmission technology, the transmission range, stability of images, video and sound of the iVISION+ can not be guaranteed at all times. Performance of this product depends on the environment where the product is being used.
-
Page 2: Other Settings
iVISION+ User Manual INDEX 1. What you can do with iVISION+ 1-1. Basic features of iVISION+ 1-2. Expanding iVISION+ with additional units 2. Overview of iVISION+ devices 2-1. Handheld Monitor Unit (IVP-HU) 2-2. Door Camera Unit (IVP-DU) 2-3. Gateway Chime Unit (IVP-GU) 3. - Page 3 IVP-GU can be hosted in a iVISION+ system. * One IVP-GU can only be associated with one of two Door Camera Unit at all times. Capture images triggered by motion detectors: OPTEX TD-20U Addition of OPTEX Wireless2000 TD-20U enables a sensor triggered call from a Door Camera Unit with image capturing function.
- Page 4 SENSOR ALERT disabling/enabling menu. OPEN DOOR Enabled only when a third party electronic door lock is connected to iVISION+ system via OPTEX IVP-GU unit. Select DOOR1 or DOOR 2 to activate output relay on designated IVP-GU unit. ANSWER Press to answer a call from Door Camera Unit...
- Page 5 IVP-GU is required when expanding the iVISION+ system with another third party equipment such as a door lock and a garage door activator. IVP-GU also receives a signal from OPTEX Wireless2000 TD-20U and bridges the signal to iVISION+ system. Status Indicator LED...
- Page 6 3. Before Using iVISION+ 3-1. Getting ready with iVISION+ system CHECK 1: Handheld Monitor Unit needs to be charged before usage Before using iVISION+ system, the system must be installed accordingly to individual Installation Instruction. Once the installation is done, please make sure that each Handheld Monitor Unit is fully charged on a cradle.
- Page 7 3-3. Date and Time Setting Please enter SYSTEM SETUP menu by pressing down on LEFT function key for more than 3 seconds. (Changes in SETUP can only be made on HU1) Select “1 DATE & TIME” by using UP and DOWN keys SYSTEM SETUP and press LEFT function key to confirm “OK”...
- Page 8 4. How to Use Basic Features 4-1. Answering to a Door Camera Unit When a visitor presses the PUSH button on a Door Camera Unit, all other iVISION+ devices in the system make a chime sound. The Handheld Monitor Units will automatically display a video image from the Door Camera Unit.
- Page 9 4-2. Using SNAP function to capture an image the Handheld Monitor Unit can capture an image from a Door Camera Unit and stores up to 500 images in an internal memory. During ANSWER or BROWSING MODE, press SNAP to record a still image from the Door Camera Unit.
- Page 10 5. Auto Recording Images 5-1. How “Auto Recording” works Every time Door Camera Unit makes a call, untill ANSWER button is pressed, the main Handheld Unit capture images from the screen and stores into its internal memory. When the Handheld Monitor Unit has newly captured images from Auto Recording, PLAY button blinks when you exit STANDBY MODE.
- Page 11 6. Handling Stored Images 6-1. Viewing Images (1) While in IDLE MODE, press PLAY to enter IMAGE VIEWING MODE (2) Use UP and DOWN keys to browse through stored images. (3) End IMAGE VIEWING MODE by pressing OFF button. 6-2. Deleting Stored Images CAUTION Please note that once images are deleted, they can not be restored.
- Page 12 (Effective in all settings) 7-2. Sensor Alert Enabling/Disabling Setting While Door Camera Unit(IVP-DU) is powered by an external power source and OPTEX Wireless2000 TD-20U is connected to iVISION+ system through Gateway Chime Unit, calls can be triggered by motion detectors, capturing images from the IVP-DU.
- Page 13 7-3. Door Open Duration Setting* * This setting is only active while iVISION+ system is properly connected to a third party doorlock or a garage door activator through a Gateway Chime Unit (IVP-GU). SYSTEM SETUP NOTE 1 DATE & TIME By default, DOOR OPEN DURATION Setting is 1 second 2 SYSTEM CONFIGURATION 3 DEVICES IN NETWORK...
-
Page 14: Technical Assistance
9. Trouble Shooting Symptoms Probable causes & solutions Is a microwave oven or a wireless LAN device in operation The video image is distorted. near the Handheld Monitor Unit? The voice is cut off while • Re-locate the Handheld Monitor Unit away from answering/browsing a Door such equipment. - Page 15 FCC WARNING About the radio frequency transmitter • This unit transmits a wireless signal in the frequency range 2.4 -2.4835GHz. This unit shares a frequency band with a wide range of equipment: i.e. industrial, scienti c and medical equipment, licensed and unlicensed low-power radio transmitters such as those used for RFID applications in factories/warehouses and amateur radio stations.
- Page 16 OPTEX DO BRASIL LTDA. (Brazil) OPTEX KOREA CO.,LTD. (Korea) OPTEX SECURITY SAS (France) URL: http://www.optex.net/br/es/sec/ URL: http://www.optexkorea.com/ URL: http://www.optex-security.com/ OPTEX (EUROPE) LTD. / EMEA HQ (U.K.) OPTEX (DONGGUAN) CO.,LTD. OPTEX SECURITY Sp.z o.o. (Poland) SHANGHAI OFFICE (China) URL: http://www.optexeurope.com/ URL: http://www.optex.com.pl/...
Need help?
Do you have a question about the iVision+ and is the answer not in the manual?
Questions and answers