
Related Manuals for Ortech TR-100


Summary of Contents for Ortech TR-100
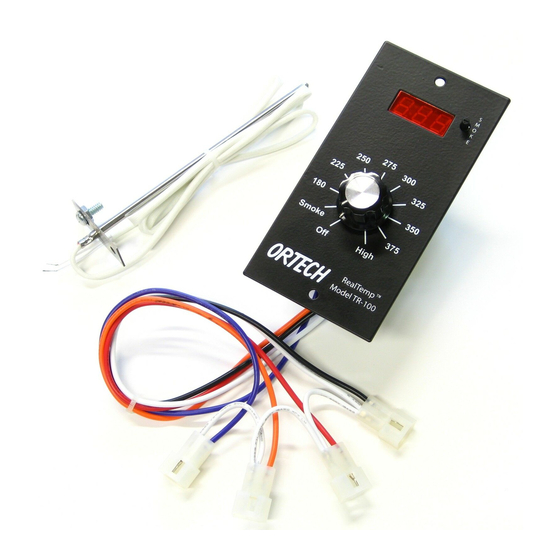
- Page 1 User’s Guide Model TR-100 Digital Grill Control Copyright © Ortech Controls, All Rights Reserved...
-
Page 2: Table Of Contents
Applications ................1 How It Works ................2 Compatible Grills..............2 Installation .................. 3 Removing the Old Control............3 Installing the RealTemp TR-100 Digital Control......5 Testing the Grill ............... 9 Operation .................. 10 Overview................10 Understanding the Display ............11 Connecting the Grill to AC Power.......... - Page 3 Foreword Preface Ortech Controls is a leading supplier of electronic controls for wood pellet stoves, furnaces, and grills. Founded in 1983 and located in Washington, Ortech has designed and manufactured controls for American Energy Systems, Lennox Hearth Products, and Traeger Grills, among others. Working...
-
Page 4: Introduction
Inadvertent Start Protection Overtemperature Protection Cool Down Feature Applications The RealTemp TR-100 is a plug-compatible replacement part for the Traeger Standard 3-Speed Control and the Traeger Digital Control and is compatible with the entire line of Traeger wood fired pellet grills. -
Page 5: How It Works
How It Works Cook Mode In Cook Mode, the temperature of the grill is continually monitored and a microprocessor operates the draft fan and fuel feed auger to maintain a constant grill temperature. Smoke Mode In Smoke Mode, the fuel feed rate is set manually by the operator. -
Page 6: Installation
Installation Removing the Old Control Required Tools Medium Phillips screwdriver Small slotted screwdriver Unplug the Grill Unplug the grill from AC power. WARNING: AC power is present on the control at all times and is a shock hazard unless the grill is disconnected from the wall socket or AC line. - Page 7 Temperature temperature detector is compatible with the RealTemp Detector TR-100. Replacing it is optional. For best results, we do recommend replacing the temperature detector, especially when installing the TR-100 as a service replacement. Open the cook lid and remove the internal grill and drip pan.
-
Page 8: Installing The Realtemp Tr-100 Digital Control
Installing the RealTemp TR-100 Digital Control Position the Open the cook lid and remove the internal grill and drip pan. Temperature Detector Locate the temperature detector’s mounting holes on the horizontal rail inside the grill. Remove the screw and nut from the base of the new detector. - Page 9 Attach the Detector Install the detector into the shaft hole with the slot to the Rail positioned over the screw hole. Install the screw from above, down through the slot and through the screw hole. Install the nut from below and tighten. Connect the WARNING: Disconnect the grill from AC power.
- Page 10 Connect the Control Connect the fuel feed auger, draft fan, igniter, and AC to Grill Components power to the TR-100. Working under the hopper, connect the control wiring harness to the grill components as follows: Control Wiring Harness Grill Component...
- Page 11 Connect Control’s Red Wire to Auger Auger Plug Connect Control’s Orange Wire to Draft Fan Draft Fan Plug Connect Control’s Purple Wire to Igniter Igniter Plug...
-
Page 12: Testing The Grill
Connect Control’s Black Wire to AC Power AC Power Plug Organize Wire Lead If necessary, use the tie wrap to tie back the temperature detector wire lead and the control’s wiring harness to ensure they do not interfere with the draft fan and other grill components. -
Page 13: Operation
Operation Overview LED Readout Displays grill temperature, smoke settings, idle fuel feed settings, igniter status, cool down timer, low temperature status, and error messages. Cook Control Switch Selects Off, Smoke Mode, or one of nine Cook Mode grill temperatures. Smoke Control Switch Selects one of sixteen smoke/Idle Fuel Feed Rates. Cook Mode Maintains the selected cook temperature automatically. -
Page 14: Understanding The Display
Understanding the Display Numbers When the grill is connected to AC power, the model number and software version of the control are displayed momentarily. Temperature In Cook Mode and Smoke Mode, the grill temperature is displayed in 5 degree (Fahrenheit) increments. Flashing In Cook Mode, the displayed temperature flashes if the grill Temperature... -
Page 15: Connecting The Grill To Ac Power
Connecting the Grill to AC Power Turn the Grill Off Set the Cook Control switch to the Off position. Plug the Grill In Connect the grill to AC power. The control displays its model number and software version. If you see “ErP” If the Cook Control switch is in the Smoke position or any temperature setting when the grill is plugged in, the control will display “ErP”, indicating an inadvertent start error. -
Page 16: Cooking
Cooking Cook Control Set the Cook Control switch to the desired temperature. The control displays the grill’s current temperature. Cook Sequence Once the ignition sequence is complete and the igniter turns off, the auger feeds fuel into the fire pot to maintain the set temperature. - Page 17 Idle Fuel Feed Rate The Idle Fuel Feed Rate is the rate the auger delivers fuel while the grill is idling at or above the set temperature. In Cook Mode, you can manually adjust the Idle Fuel Feed Rate using the Smoke Control switch. See “Understanding Idle Fuel Feed Rate and Smoke Settings”...
-
Page 18: Smoking
Smoking Smoke Control Set the Cook Control switch to Smoke. Use the Smoke Control switch to manually select the auger fuel feed rate. The control displays the grill’s current temperature. Smoke Sequence Once the ignition sequence is complete and the igniter turns off, the auger delivers fuel at a constant rate determined by the smoke setting (P0 - P15). -
Page 19: Cooling Down The Grill
Cooling Down the Grill Cook Control To cool down the grill, change the Cook Control switch from Smoke or any of the temperature settings to the Off position. Cool Down Sequence The igniter turns off. The fuel feed auger turns off. The draft fan turns on. -
Page 20: Understanding Idle Fuel Feed Rate And Smoke Settings
Understanding Idle Fuel Feed Rate and Smoke Settings Smoke Control The Smoke Control switch sets the fuel feed rate (the Switch amount of fuel delivered in a given period of time) when the grill is operating in Smoke Mode and when the grill is idling in Cook Mode. - Page 21 Cook Mode The Idle Fuel Feed Rate is the rate of fuel delivery that Idle Fuel Feed Rate maintains the fire in the fire pot without raising the grill’s temperature. In Cook Mode, whenever the grill temperature is at or above the set temperature, the auger runs at the Idle Fuel Feed Rate.
-
Page 22: Error Modes And Messages
Error Modes and Messages Inadvertent Start If the Cook Control switch is set to Smoke or to a Error (ErP) temperature setting at the time the grill is plugged in, the control will display “ErP” indicating an Inadvertent Start Error. The standard ignition sequence is halted. This feature prevents an inadvertent start. -
Page 23: Product Service And Support
Product Service and Support Wiring Diagram Digital Control Purple Black White Orange White White White Power Cord Igniter Auger Draft Fan... -
Page 24: Ac Auger Theory Of Operation
Auger On Auger Off 25 percent duty cycle Idle and Smoke When the TR-100 is in Smoke Mode or idling in Cook Mode, Fuel Feed Rates the AC auger is turned on and delivers fuel continuously for and “P” Settings 15 seconds and is then turned off. -
Page 25: Troubleshooting
Troubleshooting WARNING! Always disconnect the grill from AC power before accessing the control for service or working under the grill. Removing the control from the grill, installing the control into the grill, or working under the grill while the grill is connected to AC power could result in shock or damage the control. - Page 26 Example: The following grills contain dual draft fans, igniters, and augers and use a 5A 250V fast blow 5x20mm fuse. Traeger XL BBQ150 Double Commercial Trailer COM190 Large Commercial Trailer COM200 Fuse Control is defective. Contact Ortech Controls customer service.
- Page 27 Verify igniter is properly connected to control and operating normally. Replace igniter if defective. Control is defective. Contact Ortech Controls customer service. Fire Goes Out Set Cook Control switch to the Off position and allow grill to cool. No fuel in hopper.
- Page 28 Idle Fuel Feed Rate. High Temperature detector is defective. Replace temperature detector. Control is defective. Contact Ortech Controls customer service. Grill Temperature At the High temperature setting, the auger runs continually at the High Cook until the grill temperature reaches 450 degrees.
- Page 29 Close grill lid. Grill is designed to operate with grill lid closed. Temperature detector is defective. Replace temperature detector. Control is defective. Contact Ortech Controls customer service. This is normal. Grill Temperature Displayed is Different The displayed temperature is the precise temperature at Than Dome the temperature detector.
- Page 30 Reinsert wires and tighten contacts by turning set screw clockwise. Check for breaks in the wire throughout the wire run from detector to control terminal J1. Temperature detector is defective. Replace temperature detector. Control is defective. Contact Ortech Controls customer service.
-
Page 31: Replacement Parts List
3 Amp Fuse Kit, five 3A fuses 39-100-3A 5 Amp Fuse Kit, five 5A fuses 39-100-5A Contacting Ortech Controls Customer Service For product support and service, contact Ortech Controls: Ortech Controls, Inc. 14739 Aurora Ave N, #120 Shoreline, WA 98133 Email: cs@ortechcontrols.com Telephone: 206.633.7914...
Need help?
Do you have a question about the TR-100 and is the answer not in the manual?
Questions and answers