Table of Contents
Advertisement
Advertisement
Table of Contents

Related Manuals for JVC KW-XC838


Summary of Contents for JVC KW-XC838
- Page 1 SOUND SOURCE For installation and connections, refer to the separate manual. °√ÿ ≥ “¥Ÿ § Ÿ à ¡ ◊ Õ ∑’ Ë · ¬°µà “ ßÀ“° „π°“√µ‘ ¥ µ— È ß ·≈–°“√‡™◊ Ë Õ ¡µà Õ INSTRUCTIONS §”·π–π” KW-XC838 LVT0995-001A...
-
Page 2: Important For Laser Products
IMPORTANT FOR LASER PRODUCTS Precautions: 1.CLASS 1 LASER PRODUCT 2.CAUTION: Invisible laser radiation when open and interlock failed or defeated. Avoid direct exposure to beam. 3.CAUTION: Do not open the top cover. There are no user-serviceable parts inside. Leave all servicing to qualified service personnel. -
Page 3: Table Of Contents
Thank you for purchasing a JVC product. Please read all instructions carefully before operation, to ensure your complete understanding and to obtain the best possible performance from the unit. CONTENTS How to reset your unit ... LOCATION OF THE BUTTONS ... -
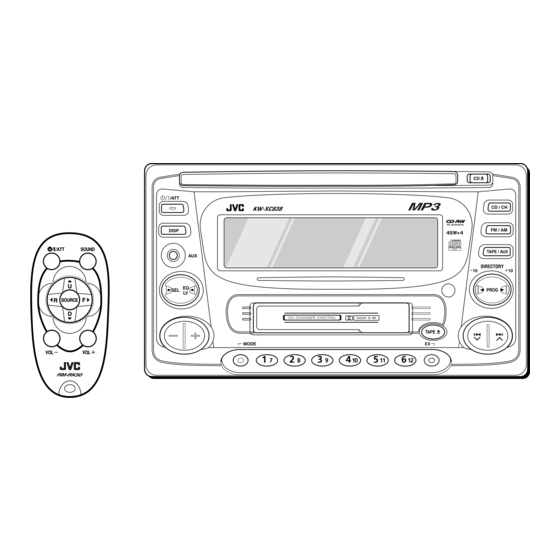
Page 4: Location Of The Buttons
LOCATION OF THE BUTTONS Control panel Display window Control panel 1 Display window 2 CD loading slot (standby/on / attenuator) button 4 DISP (display) button 5 Auxiliary input jack 6 SEL (select) button 7 EQ LV (Equalizer/Level) button 8 + / – buttons 9 Reset button p MODE button q Cassette compartment... -
Page 5: Remote Controller
Remote controller SOUND SOURCE 1 Functions the same as the on the main unit. 2 • Changes the band while listening to the radio. • Skips to the first file of the next directory if pressed while listening to an MP3 disc. •... -
Page 6: Preparing The Remote Controller
Preparing the remote controller Before using the remote controller: • Aim the remote controller directly at the remote sensor on the main unit. Make sure there is no obstacle in between. • Do not expose the remote sensor to strong light (direct sunlight or artificial lighting). -
Page 7: Select The Source
Turn on the power. “HELLO!” appears on the display. Note on One-Touch Operation: When you select a source in step 2 below, the power automatically comes on. You do not have to press this button to turn on the power. Select the source. -
Page 8: Radio Operations
RADIO OPERATIONS Listening to the radio You can use either automatic searching or manual searching to tune in to a particular station. Searching for a station automatically: Auto search Select the band (FM1, FM2, FM3 or AM). Note: This receiver has three FM bands (FM1, FM2, and FM3). -
Page 9: Storing Stations In Memory
Storing stations in memory You can use one of the following methods to store broadcasting stations in memory. • Automatic preset: SSM (Strong-station Sequential Memory) • Manual preset • Storing your favorite station into the EX button Automatic preset: SSM You can preset up to 6 local stations in each FM band (FM1, FM2, and FM3). -
Page 10: Storing Your Favorite Station Into The Ex (Extra) Button
Storing your favorite station into the EX (extra) button You can preset an FM or AM station (such as your favorite station or traffic announcement station); and recall it by one touch operation even if the unit is turned off. EXAMPLE: Storing an FM station of 88.3 MHz into the EX button Select the FM1 band. -
Page 11: Other Convenient Tuner Functions
Other convenient tuner functions Scanning broadcast stations Select “SCAN.” *SSM Canceled (frequency indication) * When receiving an FM stereo broadcast. Start scanning. Each time a broadcast is tuned in, scanning stops for about 5 seconds (tuned frequency number flashes on the display), and you can check what program is now being broadcasted. -
Page 12: Cd Operations
CD OPERATIONS Playing a CD Insert a disc into the loading slot. CD indicator lights up. Total track number of the inserted disc Current track Elapsed playing time Note on One-Touch Operation: When a CD is already in the loading slot, pressing CD/CH turns on the unit and starts playback automatically. -
Page 13: Locating A Track Or A Particular Portion On A Cd
Locating a track or a particular portion on a CD To fast-forward or reverse the track Press and hold ¢ playing a CD, to fast-forward the track. Press and hold 4 playing a CD, to reverse the track. To go to the next tracks or the previous tracks Press ¢... -
Page 14: Selecting Cd Playback Modes
Selecting CD playback modes To play back tracks repeatedly (Repeat Play) You can play back the current track repeatedly. 1 Press MODE repeatedly until “REPEAT” appears. 2 –10 +10 3 Canceled 2 Press SEL. Each time you press the button, CD repeat play mode turns on (“REPEAT ON”) and off (“REPEAT OFF”) alternately. -
Page 15: Playing A Cd Text
Playing a CD Text In a CD Text, some information about the disc (its disc title, performer and track title) is recorded. You can show these disc information on the display. Select text display mode while playing a CD Text. Each time you press the button, the display changes as follows:... -
Page 16: Mp3 Introduction
MP3 INTRODUCTION What is MP3? MP3 is an abbreviation of Motion Picture Experts Group (or MPEG) Audio Layer 3*. MP3 is simply a file format with a data compression ratio of 1:10 (128 Kbps**). That means, by using MP3 format, one CD-R or CD-RW can contain 10 times as much data volume as a regular CD can. -
Page 17: Mp3 Directory/File Configuration
MP3 directory/file configuration : Root ROOT : Directories : MP3 files MP3 playback/search order • The numbers in circles below the MP3 files ( the MP3 files. Normally this unit plays back MP3 files in the recorded order. • The numbers inside the directories indicate the playback order and search order of the directories on an MP3 disc. -
Page 18: Mp3 Operations
MP3 OPERATIONS Refer also to “CD OPERATIONS” on pages 12 to Playing an MP3 disc Insert an MP3 disc into the loading slot. The unit turns on, draws in an MP3 disc and starts playback automatically. Ex.: When the disc contains 13 directories and 125 MP3 files. -
Page 19: Locating A File Or Particular Portion On An Mp3 Disc
To change the display information While playing back an MP3 file, you can change the file information shown on the display. Each time you press DISP (display), the display changes to show the following: • When “TAG ON” is selected (initial setting: see page 32) Album name/ Performer name... - Page 20 To skip 10 files 1 Press MODE repeatedly until “2–10 +103” appears. 2 –10 +10 3 Canceled 2 Press +10 or –10 button. To skip 10 files* fowards to the last file. To skip 10 files* backwards to the first file. * The fist time you press +10 or –10 button, the file skips to the nearest higher or lower file with a file number of multiple ten (ex.
-
Page 21: Selecting Mp3 Playback Modes
Selecting MP3 playback modes To play back tracks repeatedly (Repeat Play) 1 Press MODE repeatedly until “REPEAT” appears. 2 –10 +10 3 Canceled 2 Press SEL. Each time you press the button, repeat play mode changes as follows: REPEAT1 ON REPEAT2 ON REPEAT OFF Mode... -
Page 22: Tape Operations
TAPE OPERATIONS Listening to a tape You can play back type 1 (normal) tapes. Insert a cassette into the cassette compartment. The unit turns on and tape play starts automatically. When one side of the tape reaches its end during play, the other side of the tape automatically starts playing. -
Page 23: Finding The Beginning Of A Tune
To stop play and eject the cassette Press TAPE 0. Tape play stops and the cassette automatically ejects from the cassette compartment. If you change the source, the tape play also stops (without ejecting the cassette this time). • You can also eject the cassette by pressing TAPE 0 with the unit turned off. -
Page 24: Other Convenient Tape Functions
Other convenient tape functions Skipping blank portions on the tape You can skip blank portions between the tunes (Blank Skip). 1 Press MODE repeatedly until “B.SKIP” appears. DOLBY B Canceled 2 Press SEL. Each time you press the button, skip function mode turns on (“B.SKIP ON”) and off (“B.SKIP OFF”) alternately. -
Page 25: Sound Adjustments
Adjusting the sound You can adjust the sound characteristics to your preference. Select the item you want to adjust. Each time you press the button, the adjustable items change as follows: FADER Indication To do: FADER* Adjust the front and rear speaker Adjust the left (Balance) -
Page 26: Selecting Preset Sound Modes
Selecting preset sound modes You can select a preset sound adjustment suitable to the music genre. Select “EQ.” Canceled Select the sound mode. The sound mode changes as follows: FLAT Hard Rock JAZZ DanceMusic Country Raggae USER** (back to the beginning) * Rhythm and Blues ** If you want to adjust and store your original sound mode (USER), see “Storing your own... -
Page 27: Storing Your Own Sound Adjustments
Storing your own sound adjustments You can adjust the sound modes to your preference and store your own adjustments in memory (USER sound mode). • There is a time limit in doing the following procedure. If the setting is cancelled before you finish, start from step 1 again. -
Page 28: Level Meter Setting
LEVEL METER SETTING Selecting level meter patterns You can select one from 7 different level meter patterns or a demonstration of all the patterns. Select “L.V. METER.” Canceled Press +/– to select the level meter pattern. Each time you press the button, the level meter changes as follows:... -
Page 29: Other Main Functions
About the demonstration mode (DEMO MODE) When shipped from the factory, “DEMO” is set to “DEMO ON” in this unit. The demonstration will start automatically if no sound comes in for 3 minutes. (See page 31.) To deactivate the demonstration mode Press and hold SEL (select) for more than 2 seconds so that one of the PSM items appears on the display. -
Page 30: Changing General Settings (Psm)
Adjust the minute. Finish the setting. To check the current clock time while the unit is turned off, press DISP (display). The power turns on, the clock time is shown for 5 seconds, then the power turns off. Changing general settings (PSM) You can change the settings for this unit by using the PSM (Preferred Setting Mode) control. -
Page 31: Preferred Setting Mode Items
Preferred Setting Mode (PSM) items Hold. Select. DEMO Demonstration mode CLOCK HOUR Hour adjustment CLOCK MIN Minute adjustment CLOCK DISP Clock display EQ LINK Sound control memory linkage DIMMER Dimmer mode CONTRAST Display contrast SCROLL Scroll mode EXT INPUT External input selection AUX ADJ Auxiliary input level... -
Page 32: Ext Input
Selecting the dimmer mode – DIMMER When you turn on the car headlights, the display automatically dims (Auto Dimmer). When shipped from the factory, Auto Dimmer mode is activated. • DIM OFF: Cancels Auto Dimmer. • DIM ON: Always dims the display. •... -
Page 33: Assigning Names To The Sources
Assigning names to the sources You can assign names to station frequencies, CDs, and the external component connected to the auxiliary (AUX) input jack. After assigning a name, it will appear on the display when you select the source. Sources Maximum number of the characters Station frequencies*... -
Page 34: External Component Operations
EXTERNAL COMPONENT OPERATIONS MD player, etc. You can connect two external components to this unit. Connect one to the auxiliary (AUX) input jack on the control panel, and the other to the CD changer jack on the rear. Preparations: • For connecting the Line Input Adapter KS-U57 and the external component, refer to the Installation/ Connection Manual (separate volume). -
Page 35: Cd Changer Operations
We recommended that you use one of the CH-X series with your unit (except for JVC MP3 compatible CD changer.) If you have another CD automatic changer, consult your JVC car audio dealer for connections. • For Example, if your CD automatic changer is one of the KD-MK series, you need a cord (KS-U15K) for connecting it to this unit. - Page 36 To fast-forward or reverse the track Press and hold ¢ while playing a CD, to fast-forward the track. Press and hold 4 while playing a CD, to reverse the track. To go to the next tracks or the previous tracks Press ¢...
-
Page 37: Selecting Cd Playback Modes
Selecting CD playback modes To play back tracks repeatedly (Repeat Play) 1 Press MODE repeatedly until “REPEAT” appears. REPEAT Canceled (Continuous play) 2 Press SEL. Each time you press the button, CD repeat play mode changes as follows: REPEAT1 ON REPEAT2 ON REPEAT OFF Mode... -
Page 38: Additional Information
ADDITIONAL INFORMATION Available characters • You can the following characters to assign names to station frequencies, CDs, and external component. (See page 33.) • You can display the information (album title, performer name, song title, etc.) as ID3v1 tags when you playback an MP3 file with this unit. -
Page 39: Handling Discs
Handling discs This unit has been designed to reproduce CDs, CD-Rs (Recordable), CD-RWs (Rewritable), and CD Texts. • This unit is also compatible with MP3 discs. How to handle discs When removing a disc from its case, press down the center holder of the case and lift the disc out, holding it by the edges. -
Page 40: Troubleshooting
TROUBLESHOOTING What appears to be trouble is not always serious. Check the following points before calling a service center. Symptoms • Sound is sometimes interrupted. • Sound cannot be heard from the speakers. • This unit does not work at all. - Page 41 Symptoms • Disc cannot be played back. • Files skip, or 00’00” appears and playback stops. • Noise is generated. • A longer readout time is required (“FILE CHECK” keeps flashing on the display). • Files cannot be played back as you have intended them to play.
- Page 42 Symptoms • A cassette tape cannot be inserted. • Cassette tapes become hot. • Tape sound is at very low level and sound quality is degraded. • “NO MAGAZINE” appears on the display. • “RESET 8” appears on the display. •...
-
Page 43: Audio Amplifier Section
AUDIO AMPLIFIER SECTION Maximum Power Output: Front: 45 W per channel Rear: 45 W per channel Continuous Power Output (RMS): Front: 17 W per channel into 4 Ω, 40 Hz to 20 000 Hz at no more than 0.8% total harmonic distortion. - Page 44 在安裝本機之後 • If you are not sure how to install this unit 檢查所有剎車燈、車燈、信號燈、刮水器等的操作是否正常。 correctly, consult a JVC car audio dealer or have it installed by a qualified technician. • When tightening screws or bolts be careful not to pinch any connection cord.
-
Page 45: Electrical Connections
Fix this unit to the car using the screws 下面以丰田牌(Toyota)汽車為例對安裝進行說明。 removed in step 1. 欲瞭解更多資料,請向 JVC 汽車音響分銷商詢問。 The following example shown is for installation in a Toyota. For more details, consult your JVC car audio dealer. Ý « Ð u d ½... - Page 46 中文 ENGLISH Typical Connections/ 典型的接線方法/ Before connecting: Check the wiring in the 接線前:仔細檢查汽車內的線路。不正確的接線會導 vehicle carefully. Incorrect connection may cause 致本機嚴重損壞。 serious damage to this unit. 按下述順序將配線束各個不同色標的導線接頭分別 Connect the colored leads of the power cord 接至電池,揚聲器和自動昇降天線(如有裝設): to the car battery, speakers and automatic 1 黑色:接地...
- Page 47 « ô d  « Ð Connections Adding Other Equipment/ 連接附加的其他音響設備/ You can connect an amplifier and other 你可以接上放大器和其它設備,以提升你的汽車立體 equipment to upgrade your car stereo system. 音響系統。 • For connections, refer also to the instructions • 連接時,請參閱其它裝置所提供的指南說明。 supplied for other components.
Need help?
Do you have a question about the KW-XC838 and is the answer not in the manual?
Questions and answers