Table of Contents
Advertisement
Quick Links
Advertisement
Table of Contents

Related Manuals for JVC KW-XC888


Summary of Contents for JVC KW-XC888
- Page 1 KW-XC888 CD/CASSETTE RECEIVER INSTRUCTIONS INSTRUKSI LVT1139 - 002A (UN)
-
Page 2: Important For Laser Products
IMPORTANT FOR LASER PRODUCTS 1. CLASS 1 LASER PRODUCT 2. CAUTION: Do not open the top cover. There are no user serviceable parts inside unit; leave all servicing to qualified service personnel. 3. CAUTION: Visible and invisible laser radiation when open and interlock failed or defeated. Avoid direct exposure to beam. -
Page 3: Table Of Contents
CONTENTS How to reset your unit ... LOCATION OF THE BUTTONS ... 4 BASIC OPERATIONS ... 5 RADIO OPERATIONS ... 6 Listening to the radio ... Storing stations in memory ... Tuning in to a preset station ... Selecting FM reception mode ... CD OPERATIONS ... -
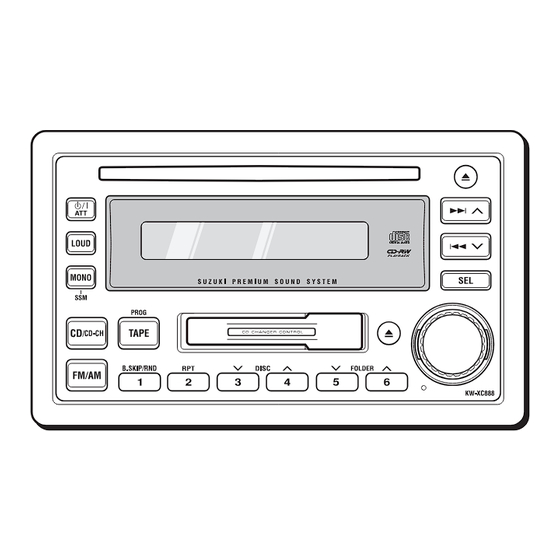
Page 4: Location Of The Buttons
LOCATION OF THE BUTTONS Control Panel 1 Display window 2 CD loading slot (standby/on/attenuator) button 4 LOUD (loudness) button 5 MONO (monaural) /SSM button 6 Source buttons • CD/CD-CH button • FM/AM button • TAPE (PROG) button 7 Number buttons •... -
Page 5: Select The Source
Turn on the power. Note on One-Touch Operation: When you select a source in step 2 below, the power automatically comes on. You do not have to press this button to turn on the power. Select the source. • Each time you press CD/ CD-CH, the source alternates between CD* and CD- changer**. -
Page 6: Radio Operations
RADIO OPERATIONS Listening to the radio You can use either automatic searching or manual searching to tune in to a particular station. Searching for a station automatically: Auto search Select the band (FM1, FM2, FM3 or AM). Note: This receiver has three FM bands (FM1, FM2, and FM3). -
Page 7: Storing Stations In Memory
Notes: • If you release your finger from the button, the manual search will automatically turn off after 5 seconds. • If you hold down the button, the frequency keeps changing (in 50 kHz intervals for FM and 9 kHz for AM) until you release the button. -
Page 8: Tuning In To A Preset Station
Repeat the above procedure to store other stations into other preset numbers. Notes: • A previously preset station is erased when a new station is stored in the same preset number. • Preset stations are erased when power supply to the memory circuit is interrupted ( for example, during battery replacement). -
Page 9: Cd Operations
Playing a CD Insert a CD into the loading slot. The unit turns on, draws in the CD and starts playback automatically (the CD-in indicator and “LOADING” flash on the display). CD-in indicator Total playing time of the inserted disc Elapsed playing time CD OPERATIONS... -
Page 10: Locating A Track Or A Particular Portion On A Cd
Locating a track or a particular portion on a CD To fast-forward or reverse the track Press and hold ¢ playing a CD, to fast-forward the track. Press and hold 4 playing a CD, to reverse the track. To go to the next tracks or the previous track Press ¢... -
Page 11: Tape Operations
Listening to a tape You can play back type I (normal) tapes. Insert a cassette into the cassette compartment. The unit turns on and tape play starts automatically (“LOADING” flashes on the display). When one side of the tape reaches its end during play, the other side of the tape automatically starts playing. -
Page 12: Finding The Beginning Of A Tune
To fast-forward and rewind a tape Press ¢ second to fast-forward the tape. When the tape reaches its end, the tape is reversed and playback starts from the beginning of the other side. Corrent tape direction Press 4 second to rewind the tape. When the tape reaches its end, playback of the same side starts. -
Page 13: Other Convenient Tape Functions
Other convenient tape functions Skipping blank portions on the tape You can skip blank portions between the tunes (Blank Skip). Press B.SKIP/RND so that “B.SKIP” appears on the display. Each time you press the button, skip function mode turns on and off alternately. -
Page 14: Sound Adjustments
SOUND ADJUSTMENTS You can adjust the sound characteristics to your preference. Select the item you want to adjust. Each time you press the button, the adjustable items change as follows: Indication To do: Adjust the bass. Adjust the treble. FAD* Adjust the front and rear speaker balance. -
Page 15: Cd Changer Operations
We recommend that you use the JVC MP3- compatible CD changer with this unit. This unit cannot read MP3 “tracks” (word “file” is not used to indicate MP3 files, “track” is used in this manual) recorded on CD-Rs, CD-RWs or CD-ROMs. -
Page 16: Connecting The Cd Changer
• If you are not sure how to connect the CD changer correctly, consult your car dealer or JVC car audio dealer, or have it installed by a qualified technician. Refer also to the instructions supplied for the CD changer. -
Page 17: Locating A Track Or A Particular Portion On A Disc
When the current disc is an MP3 disc: Playback starts from the first folder of the current disc once track check is completed. The display changes to show the following: Current disc number MP3 indicator Locating a track or a particular portion on a disc To fast-forward or reverse the track Press and hold ¢... -
Page 18: Locating A Folder On A Disc
Locating a folder on a disc To skip to the next or previous folders (only for MP3 discs) Press FOLDER an MP3 disc, to go to the next folder. Each time you press the button consecutively, the next folder is located and the first track in the folder starts playback. -
Page 19: Additional Information
Handling cassettes The cassette deck built in this unit requires very little attention, but you will be able to extend the life of the cassette deck if you follow the instructions below. To clean the heads • Clean the heads after every 10 hours of use using a wet-type head cleaning tape (available at an audio store). -
Page 20: Handling Discs
Handling discs This unit has been designed to reproduce CDs, CD-Rs (Recordable), and CD-RWs (Rewritable). • This unit is not compatible with MP3 discs, but can operate a JVC MP3-compatible CD changer. How to handle discs When removing a disc... -
Page 21: Troubleshooting
What appears to be trouble is not always serious. Check the following points before calling a service center. Symptoms • Sound cannot be heard from the speakers. • This unit does not work at all. • SSM (Strong-station Sequential Memory) automatic preset does not work. - Page 22 Symptoms • “NO CD” appears on the display. • “NO MAG” appears on the display. • “RESET 8” flashes on the display. • “RESET 1” – “RESET 7” flashes on the display. • The CD changer does not work at all. •...
-
Page 23: Specifications
AUDIO AMPLIFIER SECTION Maximum Power Output (DC 16V): Front: 50 W per channel Rear: 50 W per channel Continuous Power Output (10% THD): 25 W per channel into 4 Ω. Front: 25 W per channel into 4 Ω. Rear: Load Impedance: 4 Ω (4 to 8 Ω allowance) TUNER SECTION Frequency Range: 87.5 MHz to 108.0 MHz... - Page 24 Having TROUBLE with operation? Please reset your unit Refer to page of How to reset your unit Punya MASALAH pengoperasian ? Tolong reset unit anda Lihat pada halaman tentang mereset unit © 2004 VICTOR COMPANY OF JAPAN, LIMITED 0504MNMMDWJEIN...
Need help?
Do you have a question about the KW-XC888 and is the answer not in the manual?
Questions and answers