Table of Contents
Advertisement
Quick Links
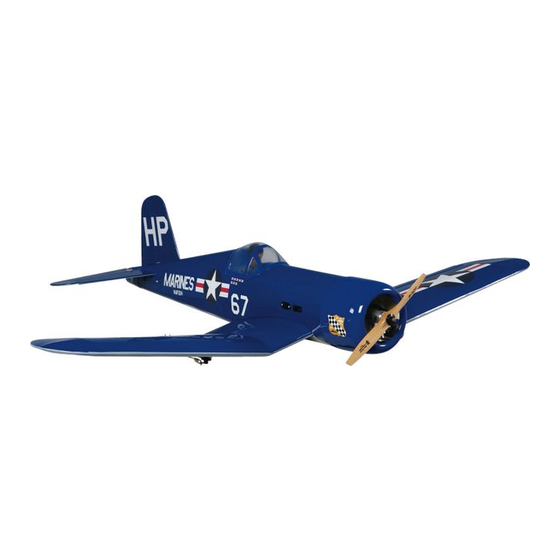
Wingspan: 43.25 in [1110mm]
Wing Area: 340 sq in [21.9 dm
Weight: 2.5-3 lb [1130-1360 g]
Wing Loading: 17-20 oz/sq ft [52-61 g/dm
Length: 34 in [865mm]
Radio: 3-channel
Engine: .15-.25 cu in [2.5-4cc] two-stroke,
.30 cu in [5cc] four-stroke
Great Planes
®
Model Manufacturing Co. guarantees this kit to be free from defects in both material and workmanship at the date of
purchase. This warranty does not cover any component parts damaged by use or modification. In no case shall Great Planes' liability
exceed the original cost of the purchased kit. Further, Great Planes reserves the right to change or modify this warranty without notice.
In that Great Planes has no control over the final assembly or material used for final assembly, no liability shall be assumed nor
accepted for any damage resulting from the use by the user of the final user-assembled product. By the act of using the user-assembled
product, the user accepts all resulting liability.
If the buyer is not prepared to accept the liability associated with the use of this product, the buyer is advised to return this
kit immediately in new and unused condition to the place of purchase.
To make a warranty claim send the defective part or item to Hobby Services at the address below:
Include a letter stating your name, return shipping address, as much contact information as possible (daytime telephone number, fax
number, e-mail address), a detailed description of the problem and a photocopy of the purchase receipt. Upon receipt of the package
the problem will be evaluated as quickly as possible.
READ THROUGH THIS MANUAL BEFORE STARTING
CONSTRUCTION. IT CONTAINS IMPORTANT WARNINGS
AND INSTRUCTIONS CONCERNING THE ASSEMBLY
AND USE OF THIS MODEL.
© Copyright 2005
INSTRUCTION MANUAL
2
]
2
]
3002 N. Apollo Dr. Suite 1
Champaign IL 61822 USA
WARRANTY
Hobby Services
Champaign, Illinois
(217) 398-8970, Ext 5
airsupport@greatplanes.com
GPMZ0286 for GPMA1470 V1.0
Advertisement
Table of Contents

Related Manuals for GREAT PLANES Combat Corsair


Summary of Contents for GREAT PLANES Combat Corsair
-
Page 1: Instruction Manual
Further, Great Planes reserves the right to change or modify this warranty without notice. In that Great Planes has no control over the final assembly or material used for final assembly, no liability shall be assumed nor accepted for any damage resulting from the use by the user of the final user-assembled product. -
Page 2: Table Of Contents
Combat Corsair visit the Great Planes web site at Optional Supplies and Tools ........3 www.greatplanes.com. Open the “Airplanes” link, then select the 1/12 scale Combat Corsair ARF. If there is new IMPORTANT BUILDING NOTES........4 technical information or changes to this model a “tech COMMON ABBREVIATIONS ..........4... -
Page 3: Additional Items Required
3. You must take time to build straight, true and strong. This is the list of hardware and accessories required to finish the Combat Corsair. Order numbers are provided in parentheses. 4. You must use an R/C radio system that is in first-class... -
Page 4: Important Building Notes
Mail parts orders and payments by personal check to: mail-order company. Hobby Services To locate a hobby dealer, visit the Great Planes web site at 3002 N Apollo Drive, Suite 1 www.greatplanes.com . Choose “Where to Buy” at the Champaign IL 61822 bottom of the menu on the left side of the page. -
Page 5: Kit Contents
If any parts are missing or are not of acceptable quality, or if you need assistance with assembly, contact Product Support. When reporting defective or missing parts, use the part names exactly as they are written in the Kit Contents list. Great Planes Product Support: 3002 N Apollo Drive, Suite 1 Champaign, IL 61822 Telephone: (217) 398-8970, ext. -
Page 6: Preparations
the LE of the aileron and the wing. The gap should be small, PREPARATIONS just enough to see light through or to slip a piece of paper through. Apply six drops of thin CA to the top and bottom of 1. -
Page 7: Join The Wing
2. Attach the servo extensions to the aileron servos. Secure the connectors together using a large piece of heat shrink tubing, tape or other method for securing the connectors. 6. Make the aileron pushrod and connect the aileron to the servo arm using the hardware shown in the photo. If necessary, enlarge the hole in the servo arm with a 5/64"... -
Page 8: Mount The Wing To The Fuselage
2. Test fit the plywood wing joiner into the joiner pocket in 2. Center the hardwood wing bolt plates over the wing bolt each wing half. Be careful to make sure that you insert the holes. Use a fine-point felt-tip pen to trace the wing bolt plate joiner positioned as shown. -
Page 9: Assemble The Fuselage
BUILD THE FUSELAGE Install the Stab and Fin 1. Cut the covering from the slots for the stab and fin and the pushrod and antenna exits. 3. Glue the plates to the wing. Allow the glue to harden. 4. From the top of the wing, drill a 1/4" [6mm] hole through the wing bolt hole and through the wing bolt plates. - Page 10 5. Install the elevator joiner wire into the stab slot. Re-install 9. Tape one of the elevators in place on the stab. the stab into the fuselage. Double-check the stab placement Center the elevator joiner wire, then mark where the joiner and alignment to the fuselage.
-
Page 11: Install The Elevator Servo And Pushrod
Install the Fuel Tank, Engine, Install the Elevator Servo and Pushrod Throttle Servo and Pushrod FUEL TANK PRESSURE TAP TO MUFFLER SILICONE FUEL FUEL LINE PIPE TO NEEDLE FUEL CLUNK VALVE 1. Place the servo into the servo tray, positioning it on the right side of the fuselage. - Page 12 6. Install a 3mm blind nut on the back side of the firewall in each of the four holes. 7. Mount the engine mount to the firewall with four 3 x 19mm screws, 3mm lock washers and 3mm flat washers. 8.
-
Page 13: Mount The Cowl
3. Cut the cowl ring at the muffler cut out. 13. Install the fuel tank into the fuselage with the neck of the tank through the firewall. Hold the tank in place with a 4. Place the cowl onto the cowl ring. Position the cowl so rubber band. -
Page 14: Install The Canopy And Tail Cone
Install the Canopy and Tail Cone Install the Radio Refer to this photograph for the following five steps. 1. If you will be installing a pilot, do this before installing the canopy. Glue the canopy to the fuselage with Z-56 1. -
Page 15: Get The Model Ready To Fly
Use a Great Planes AccuThrow (or a ruler) to accurately measure and set the control throw of each control surface as indicated in the chart that follows. If your radio does not have 2. -
Page 16: Balance The Model Laterally
GPMQ4646 for the 2 oz. [57g] weight). If spinner weight is not CAUTION: Unless the instructions that came with your practical or is not enough, use Great Planes (GPMQ4485) radio system state differently, the initial charge on new “stick-on” lead. A good place to add stick-on nose weight is to transmitter and receiver batteries should be done for 15 the firewall (don’t attach weight to the cowl—it is not intended... -
Page 17: Range Check
recommendations. Do not use hands, fingers or any other Range Check body part to try to stop the engine. To stop a gasoline powered engine an on/off switch should be connected to the engine coil. Ground check the operational range of your radio before the first Do not throw anything into the propeller of a running engine. -
Page 18: Check List
If no damage is found, add more rubber bands. 5. Balance your model laterally as explained in the instructions. The Combat Corsair is a great-flying model that flies smoothly 6. Use threadlocking compound to secure critical and predictably. The Combat Corsair does not, however,... -
Page 19: Hand Launching
Take it easy with the Combat Corsair for the first few flights, gradually getting acquainted with it as you gain confidence. Adjust the trims to maintain straight and level flight. After... - Page 20 Radio Required: 3-channel with 3 micro servos A competitor's streamer enters your sights. Use your Great Planes Combat Mustang's speed and agility to take a deep bite! You can be ready to fly in just 7-10 hours. Easy to assemble and afford, the 1/12 scale Mustang features prebuilt balsa/ply structures that are factory-covered with high-quality, iron-on film.