Table of Contents
Advertisement
INSTRUCTION
MANUAL
SPECIFICATIONS
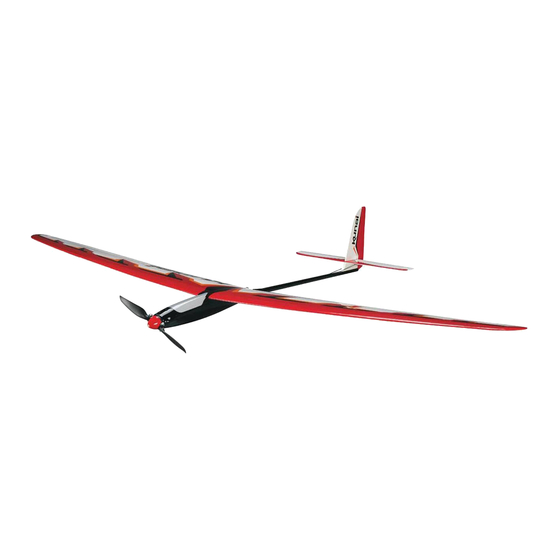
Wingspan: 55 in [1395 mm]
Length: 36 in [915 mm]
Weight: 20.0 – 21.5 oz [565 – 610 g]
WARRANTY
Great Planes
®
Model Manufacturing Co. guarantees this kit to
be free from defects in both material and workmanship at the
date of purchase. This warranty does not cover any component
parts damaged by use or modification. In no case shall Great
Planes' liability exceed the original cost of the purchased kit.
Further, Great Planes reserves the right to change or modify this
warranty without notice.
In that Great Planes has no control over the final assembly or
material used for final assembly, no liability shall be assumed nor
accepted for any damage resulting from the use by the user of
the final user-assembled product. By the act of using the
user-assembled product, the user accepts all resulting liability.
If the buyer is not prepared to accept the liability associated
with the use of this product, the buyer is advised to return
READ THROUGH THIS MANUAL BEFORE STARTING CONSTRUCTION. IT CONTAINS IMPORTANT
INSTRUCTIONS AND WARNINGS CONCERNING THE ASSEMBLY AND USE OF THIS MODEL.
®
Entire Contents © 2014 Hobbico,
Inc. All rights reserved.
2
Wing Area: 308 in
[19.9 dm
Wing Loading: 9.4 – 10.1 oz/ft
[29 – 31 g/dm
this kit immediately in new and unused condition to the
place of purchase.
To make a warranty claim send the defective part or item to
Hobby Services at the address below:
Include a letter stating your name, return shipping address, as
much contact information as possible (daytime telephone
number, fax number, e-mail address), a detailed description of
the problem and a photocopy of the purchase receipt. Upon
receipt of the package the problem will be evaluated as quickly
as possible.
Radio: 4+ channel, 4 servos
2
]
Motor,
A2212-10 1400 kV outrunner,
2
ESC:
20A ESC, 8 x 6 folding propeller
2
]
Hobby Services
3002 N. Apollo Dr. Suite 1
Champaign IL 61822 USA
Champaign, Illinois
(217) 398-8970, Ext 5
airsupport@greatplanes.com
GPMA1815 ARF GPMA1816 Rx-R
Advertisement
Table of Contents

Subscribe to Our Youtube Channel
Related Manuals for GREAT PLANES Kunai


Summary of Contents for GREAT PLANES Kunai
-
Page 1: Instruction Manual
3002 N. Apollo Dr. Suite 1 Champaign IL 61822 USA In that Great Planes has no control over the final assembly or material used for final assembly, no liability shall be assumed nor Include a letter stating your name, return shipping address, as... -
Page 2: Academy Of Model Aeronautics
Kunai silently speeds by. kit are made of fi berglass or carbon fi ber, the fi bers of which And if you dump the spoilerons the Kunai slows to a crawl for may cause eye, skin and respiratory tract irritation. Never thermal seeking and easy, feather-light landings. -
Page 3: Tools And Building Supplies
❍ Optional: Du-Bro 1/8" [3mm] double-sided foam mounting tape (DUBQ3551 for attaching ESC) Fuselage space in the Kunai is limited, yet there are still several battery options from 850mAh up to 1300mAh. Each has obvious tradeoffs of weight and fl ying time. The thinner profi... -
Page 4: Ordering Replacement Parts
The fastest, most economical service can be provided by your hobby dealer or mail-order company. To locate a hobby dealer, visit the Great Planes web site at www.greatplanes.com. Select “Where to Buy” in the menu across the top of the page and follow the instructions provided to locate a U.S., Canadian or International dealer. -
Page 5: Kit Contents
Input Spoileron Input Between the time the Kunai was produced and the time you opened the box, the covering may have relaxed, causing areas of loose covering or wrinkles. The absolute best way to tighten the covering is with a covering iron and a protective, ❏... -
Page 6: Install The Aileron Servos
Install the Aileron Servos Start with the right wing so yours looks like the photos. Note: If you do not have a radio capable of mixing the aileron servos electronically, a Y-harness will have to be used to connect both servos into a single channel in the receiver. Then, spoilerons will not be an option. - Page 7 ❏ 5. Mount a screw-lock connector in the side of the aileron horn that faces outward (toward the wing tip)—be certain the plastic retainer snaps on tightly. If not, use another (a couple of spare servo retainers are included). Test-fi t, then securely glue the horn into the slot in the aileron.
-
Page 8: Join The Wing Halves
The following step should be performed with the radio on so the servo arm remains centered. ❏ 8. Once you’ve confi rmed that everything operates correctly, ❏ tape the aileron centered to the wing, then glue the servo into 2. Scuff the joiner rod and one of the two carbon pegs position—it’s not necessary to “glop”... -
Page 9: Assemble The Fuselage
ASSEMBLE THE FUSELAGE Glue on the Tail Surfaces Fit the Wing to the Fuselage ❏ 1. Bolt the wing to the fuselage with the plastic wing bolt ❏ plate. Use a fi ne-point felt-tip pen to mark the outline of the 1. - Page 10 ❏ 3. Glue the stab to the fi n, making sure the two are perpendicular to each other. ❏ 6. Mount the wing to the fuselage and test-fi t the stab/ fi n assembly into the slot in the back of the fuselage boom. View the model from behind, checking to see if the stab is parallel with the wing (the kit box top or bottom serves as a handy stand).
-
Page 11: Install The Motor And Esc
Install the Motor and ESC Do not mount the propeller until instructed to do so. ❏ 4. Insulate the bullet connectors with 3/16" [5mm] shrink tubing, then connect the ESC to the motor so the motor will turn the correct direction (this will require temporary connection of the receiver and a battery). -
Page 12: Final Assembly
❏ 6. Turn on the transmitter and connect a battery to the ESC so you can operate the servos with your radio. Position the servos laterally on the servo tray so the pushrods move smoothly and do not interfere with the receiver or anything else. -
Page 13: Decal Application
+/- 1/2" [ 13 mm] Balanced anywhere within the recommended C.G. range the Kunai fl ies well. Balanced toward the aft end of the C.G. range the Kunai will respond faster and glide slower for maximizing lift in rising air as well as reduced ground speed for feather-like landings, but will also require more pilot input in windier conditions. -
Page 14: Final Preparations
Add weight to the bottom of the wing (or inside the wing tip) of the light side until the Kunai balances laterally. FINAL PREPARATIONS Additionally, use a LiPo cell checker to check individual cell voltage after each fl... - Page 15 There’s nothing extraordinary that you need to be made aware a high altitude. of before fl ying the Kunai – it has no unusual characteristics and simply does what you tell it. Before fl ying, always Also at high altitude, extend the spoilerons to see how it reacts.
- Page 16 ® Entire Contents © 2014 Hobbico, Inc. All rights reserved. GPMA1815...
Need help?
Do you have a question about the Kunai and is the answer not in the manual?
Questions and answers