
Subscribe to Our Youtube Channel
Related Manuals for Steel City 50000


Summary of Contents for Steel City 50000
-
Page 1: Model Number
METAL BAND SAW Model Number 50000 STEEL CITY TOOL WORKS VER. 12.10 Manual Part No. SC76056... -
Page 3: Table Of Contents
The drawings, illustrations, photographs, and specifications in this user manual represent your machine at time of print. However, changes may be made to your machine or this manual at any time with no obligation to Steel City Tool Works... -
Page 4: Warranty
STEEL CITY TOOL WORKS 5 YEAR LIMITED WARRANTY Steel City Tool Works, LLC (“SCTW”) warrants all “STEEL CITY TOOL WORKS” machinery to be free of defects in workmanship and materials for a period of 5 years from the date of the original retail purchase by the original owner. -
Page 5: Warranty Card
City:______________________________________________ ___ Vacuum Veneer Press ___ Wide Belt Sander Other____________________________________________ How did you first learn of Steel City Tool Works? ___ Advertisement ___ Mail Order Catalog 11. Which benchtop tools do you own? Check all that apply. ___ Web Site... - Page 6 FOLD ON DOTTED LINE PLACE STAMP HERE Steel City Tool Works 3656 Enterprise Avenue Hayward, CA 94545 FOLD ON DOTTED LINE...
-
Page 7: General Safety
General Safety Symbols used in this manual For your safety Danger! Danger! Before using the metal band saw, please read and follow: Denotes impending danger. Non-observance - there operating instructions, of this warning may result in death or - the currently valid site rules and the extremely severe injuries. -
Page 8: Safety Instructions
Safety instructions Damage to property! Danger! - The mains voltage and the voltage - Keep children away from the power tool. specifications on the rating plate (5) must - If the power cord is damaged while the correspond. power tool is being used, do not touch the - Do not lubricants or coolants. -
Page 9: Product Specifications
Product Specifications Noise and Vibration Identify additional safety measures to protect the operator from the effects of vibration such - The noise and vibration values have been as: maintain the tool and the accessories, determined in accordance with EN 60745. keep the hands warm, organisation of work The A evaluated noise level of the power tol patterns. -
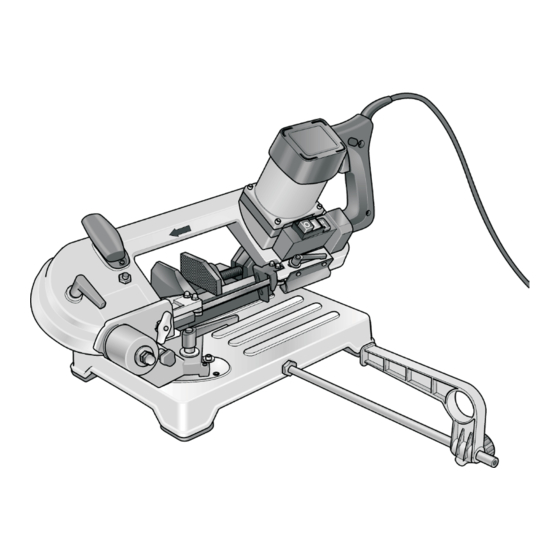
Page 10: Feature Identification
Feature Identification 1. Handle 14. Clamping lever (swivel support) 2. Locking button 15. End stops for swivel support 3. Switch 16. Parallel stop 4. Motor 17. Machine table 5. Rating plate 18. Machine vice 6. Saw frame 19. Saw band 7. -
Page 11: Operating Instructions
OPERATING INSTRUCTIONS Danger! Transport and installation Before adjusting the power tool, always press 1. Lift the machine onto the machine table the main switch Off/O. (C). SEE FIG.2 Fig.2 Before switching on the power tool Unpack the metal band saw and check that no parts are missing or damaged. - Page 12 Tensioning the saw band Switch on and off Fig.4 1. Press main switch On/I Fig.3 Swivel tension lever (A): - Anti-clockwise: Tension saw band; - Clockwise: Release saw band tension; Brief operation without engaged switch rocker: Caution 2. Press and hold down the switch(3) If the tension is too high, the saw band has a 3.
- Page 13 Fig.5 Changing the saw band Danger! Before adjusting the power tool, always press the main switch Off/0 and pull out the mains plug. Caution! Risk of injury! Wear protective gloves! 1. Press the main switch Off/0 and pull out the mains plug. 1.
- Page 14 8. Insert the new saw band into the guides, Running in the saw band then onto the guide rollers. SEE FIG.8 Note: To ensure an optimum cutting result, Fig.8 each new saw band must be run in. ¢ 1. Clamp a 1.5”-2.0”...
- Page 15 4. Take hold of the handle with you right Fig.11 hand and press the switch. Slowly feed the saw frame along the material. 5. After making the first cut, increase the pressure. Apply uniform feed through the Material. 6. After cutting the material, release the switch and move the handle to its original Position.
-
Page 16: Maintenance And Care
Cutting area Maintenance and care Danger! (Inch) Before performing any work on the power 3.34” tool, pull out the mains plug. 3.34” Cleaning 3.34”x4” Risk of injury 2.75” Never use compressed air to below swarf away. 2.75” 1. Regularly clean the power tool 2. -
Page 17: Parts List
PARTS LIST... - Page 19 PART PART DESCRIPTION DESCRIPTION SC80710 SC10579 ST4.2X18 PAN HD SELF SCR ADJUSTABLE HANDLE SC80711 SC82122 M4X30 PAN HD SCREW Φ6 FLAT WAHER (18X6.5X1.8) SC10569 SC10587 LEFT HANDLE LOWER SLIDE GUIDE SC76057 OR90145 CUTTING SPEC. LABEL M5 LOCK WASHER SC80712 SC80716 ST4.2X12 PAN HD SELF SCR M5X12HEX SOC PAN HD SCR 2 SC80712...
- Page 20 PART PART DESCRIPTION DESCRIPTION SC10609 DRIVEN WHEEL ASSY OR90311 M8 FLAT WASHER SC83012 NEEDLE BEARING SC81118 M8 LOCK NUT SC10610 DRIVEN SHAFT SC10629 BASE FOOT SC10611 NYLON WAHER OR90248 M8 LOCK WASHER SC10612 BUSH SC80331 M8x20 HEX SOC HD SCR SC80720 M8X12 PAN HD SCR OR91758...
- Page 21 NOTES...
- Page 22 STEEL CITY TOOL WORKS 1-877-SC4-TOOL (1-877-724-8665) 5 Year Warranty...
Need help?
Do you have a question about the 50000 and is the answer not in the manual?
Questions and answers