Table of Contents
Advertisement
Quick Links
Advertisement
Table of Contents

Related Manuals for Interlogix TruVision TVC-7120-1-N


Summary of Contents for Interlogix TruVision TVC-7120-1-N
- Page 1 TruVision TVC-7120-1 Camera User Manual P/N 1072793A • REV 1.0 • ISS 12MAY14...
- Page 2 Copyright © 2014 United Technologies Corporation. Interlogix is part of UTC Building & Industrial Systems, a unit of United Technologies Corporation. All rights reserved. Trademarks and Trade names used in this document may be trademarks or patents registered trademarks of the manufacturers or vendors of the respective products.
-
Page 3: Table Of Contents
Content Product overview 2 Package contents 2 Features 2 User guidelines 2 Product description 3 Installation 4 Attach the lens 4 Connect the cables 4 Programming 6 OSD control button 6 ... -
Page 4: Product Overview
Product overview The TVC-7110-1-N(-P) / TVC-7120-1-N(-P) camera uses a digital signal processor (DSP) to process video signals. The camera includes a microcontroller to provide high-quality images with high-color reproduction and sharp pictures. Package contents The package contains the following: • Box camera •... -
Page 5: Product Description
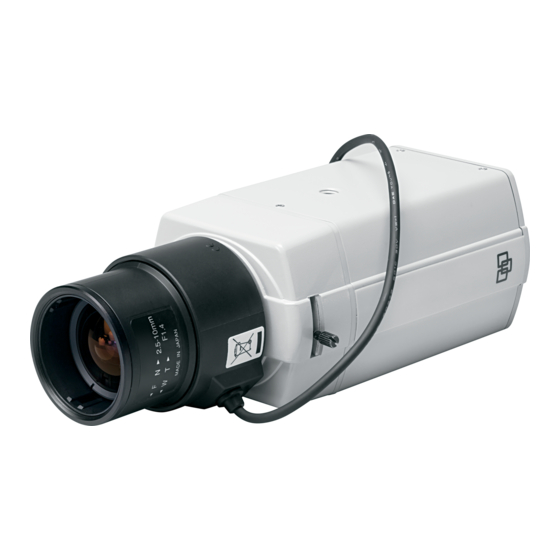
WARNING: To reduce the risk of fire or electronic shock, do not expose the camera to rain or moisture and do not remove the cover or back. Product description Figure 1: Product description - TVC-7120-1-N(-P) 1. OSD control button 5. Power LED 2. -
Page 6: Installation
Installation Please check the package contents and make sure that the device in the package is in good condition and all the assembly parts are included. To install the camera you will need to prepare the mounting surface, mount the camera, attach the lens, and make cable connections. - Page 7 Power supply Monitor TruVision TVC-7120-1 Camera User Manual...
-
Page 8: Programming
Programming Once the camera hardware has been installed, the camera can then be configured. Program the camera by attaching a standard video monitor to the system. To connect the monitor: 1. Plug the monitor output cable to the video monitor output connector. 2. -
Page 9: Save Changes
Table 2: Setup Menu description Menu item Description Lens Defines autoiris or manual iris. Shutter/AGC Define the method of light control. White Bal Defines the white balance (WB) set up. Backlight Defines the highlight compensation (HLC) and backlight compensation (BLC) set up. Pict Adjust Defines the image quality functions. -
Page 10: Set The Shutter/Agc
Manual menu: Select a higher shutter speed value to see movement and a lower value to see clearer images. The shutter speed available are 1/50, 1/120, 1/250, 1/500, 1/1000, 1/2000, 1/4000 and 1/10000. The AGC value can be set between 6 and 44.8. -
Page 11: Set White Balance
Brightness: Select the brightness level to which the iris and shutter speed will adjust automatically. The value ranges from 0 to 255. Low Luminance: Sets the lux level for low light conditions. Mode: Only AGC is available. Brightness: Adjust the brightness to X0.25, X0.50, X0.75 or X1. Manual shutter menu: Mode: Only Shut/AGC available. -
Page 12: Set Backlight Compensation (Blc)
Menu Item Description compensated for high color temperature such as from daylight). Default is Indoor. Push Like ATW, the Push function continually monitors/analyzes the color temperature of the incoming light and corrects the WB. However, Push has no limits between 1,800 to 10,500˚K so it may over-compensate the WB for a large single-color object. -
Page 13: Adjust The Picture Characteristics
Adjust the picture characteristics In the Setup Menu, go to Pict Adjust and select the options to be modified. Set the camera image characteristics such as brightness, contrast, sharpness, hue, and saturation (called “Gain” here) of the picture. The parameters of each can be set between 0 and 255. -
Page 14: Set The Privacy Mask Area
In the Setup Menu, go to Motion Det and select the desired parameters. Default setting is Off. Detect Sense: Set the sensitivity level for motion detection. A higher value is more sensitive. Block Disp: When enabled, any movement detected will be tracked on- screen. -
Page 15: Set The Day/Night Mode
Set the Day/Night mode In the Setup Menu, go to Day/Night and select the desired mode. The Day/Night mode has four options: Auto, Color, B/W, and EXT1/EXT2. Select Color to manually set the camera to color (day) mode. Select Auto so that the camera can automatically switch between day (color) and night (black and white) mode. -
Page 16: Set Image Noise Reduction
On the B/W submenu, you can switch it to ON or OFF to enable or disable BURST. EXT1/EXT2 mode: EXIT1/EXT2 mode enables synchronization of day/night and IR light. Note: EXIT1/EXT2 mode is only available for TVC-7120-1. Set image noise reduction In the Setup Menu, go to and select the desired mode. -
Page 17: Set The Sync Mode
To delete a character in the input line, select the character so that it blinks. Then move the cursor to CLR on the command line and press Enter. To position the camera ID on-screen, move the cursor to POS and press Enter. The menu will then disappear on-screen and the camera ID will be displayed on the monitor. -
Page 18: Specifications
Specifications Model TVC-7120-1-N(P) Pickup device 1/3" Super HAD CCD II NTSC: 1028 × 508 / PAL: 1028 × 596 Total pixels (H NTSC: 976 × 494 / PAL: 976 × 582 Effective pixels Resolution 700 TVL Synchronization system Internal / Line lock Scanning system 2:1interlace DWDR... -
Page 19: Menu Tree
Menu Tree TruVision TVC-7120-1 Camera User Manual...
Need help?
Do you have a question about the TruVision TVC-7120-1-N and is the answer not in the manual?
Questions and answers