Table of Contents
Advertisement
Advertisement
Table of Contents

Related Manuals for Horizon Fitness Treadmill


Summary of Contents for Horizon Fitness Treadmill
-
Page 2: Table Of Contents
T A B L E C O N T E N T S SAFETY INSTRUCTIONS FOLDING & MOVING LEVELING, POWER & EMERGENCY STOP KNOW YOUR TERADMILL ID100 GETTING STARTED PROGRAMMING/DISPLAY PROGRAM PROFILES USING YOUR BODY FAT TEST @ @ @ @ @ @ @ @ @ @ g ? HOW TO ADJUST THE MANUAL INCLINE TROUBLESHOOTING COMMON QUESTIONS... -
Page 3: Safety Instructions
I N S T R U C T I O N S SAVE THESE INSTRUCTIONS Read all instructions before using this Treadmill. When using an electrical product, basic precautions should always be followed, including the following: Read all instructions before using this Horizon Fitness Treadmill WARNING ! Connect this exercise product to a properly grounded outlet only. - Page 4 • Do not remove the treadmill motor covers or roller covers. Service should be performed only by an authorized Horizon Fitness service provider. 20amp circuit. • Treadmill should be plugged into a dedicated • At no time should more than one person be on treadmill while in operation.
- Page 5 CHILDREN • Keep children off your Treadmill at all times. • When the Treadmill is in use, young children and pets should be kept at least 10 feet away. CLEANING • Clean with soap and slightly damp cloth only; never use solvents.
- Page 6 Fitness Treadmill will help you eliminate the obstacles that prevent you from getting in your exercise time. Inclement weather and darkness won't interfere with your workout when you use your Horizon Fitness Treadmill in the comfort of your home. This manual provides you with basic information for using and enjoying your new machine.
- Page 7 If there is any play in these areas, the treadmill has not been properly assembled. To prevent damage to the treadmill, the assembly...
-
Page 8: Folding & Moving
FOLDING Firmly grasp the back end of the treadmill. Carefully lift the end of the treadmill deck to the upright position until the hand lock latch engages and securely locks the deck into position. Make sure the deck is securely latched before letting go. To unfold, firmly grasp the back end of the treadmill. -
Page 9: Leveling, Power & Emergency Stop
@ @ @ @ @ @ @ @ @ @ @ @ @ @ @ @ @ @ @ @ @ @ @ @ @ @ 0 Y e SAFETY KEY Your treadmill will not start unless the safety key is placed on the safety key holder. Attach the clip end securely to your clothing. This safety key is designed to cut the NEVER USE THE TREADMILL WITHOUT power to the treadmill if you should fall. -
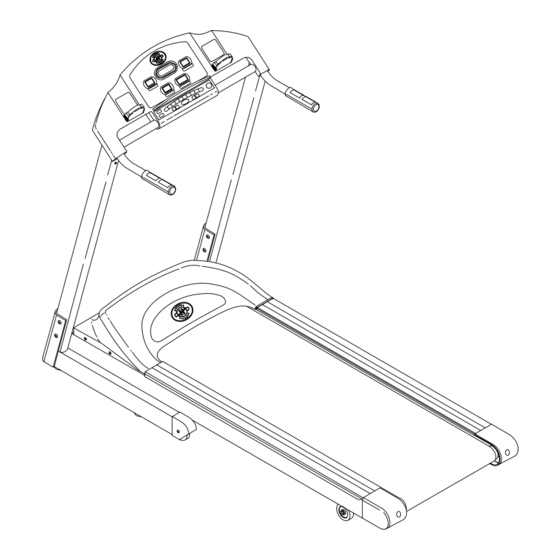
Page 10: Know Your Teradmill Id100
K N O W Y O U R T R E A D M I L L CONSOLE W ATER BOTTLE HOLDER HAND GRIP HANDLE BARS UPRIGHT SUPPORT MOTOR COVER SIDE RAIL END CAP TRANSPORT WHEEL RUNNING BELT... -
Page 11: Getting Started
BOD Y FAT STOP SELECT STAR T HOL D TO RESET PAUSE Press the Stop button to pause your workout. RESET Press and hold the Stop button to reset the treadmill. LO W NORMAL HIGH VERY HIGH BOD Y FAT STOP SELECT... - Page 12 STAR T HOL D TO RESET FINISHING A WORKOUT When your workout is finished, the treadmill console will beep twice and 'P1' will be displayed in the Time window. your workout information will stay displayed on the con-sole for 20 seconds before it will reset.
-
Page 13: Programming/Display
D I S P L A Y TIME Shown as Minutes: Serconds. View the time remaining or the time elapsed in your workout. DISTANCE Shown as Miles. View the accumulated distance during your workout. CALORIES Shown as total accumulated calories burned during your workout. -
Page 14: Program Profiles
P R O G R A M P R O F I L E S MANUAL Customized workout, with no default time INTERVALS Speed changes; time defaults to 24 minutes ROLLING Speed changes; time defaults to 48 minutes WEIGHT LOSS Elevation changes;... - Page 15 P R O G R A M P R O F I L E S...
-
Page 16: Using Your Body Fat Test
U S I N G Y O U R B O D Y - F A T T E S T Your Body-Fat test is designed for you to test your body fat condition. After the test is completed, it will show your BMI (Body Mass Index) & Body-Fat percentage. This can help by letting you know your current health conditions and giving you motivation to exercise daily. -
Page 17: How To Adjust The Manual Incline
Hold the back end of treadmill frame with both hands. When the back end of the treadmill is in the lowest position, the in cline is about 3. Raise the back end until incline leg click into the second position, the position will be about 1.5 . - Page 18 TARGET ZONE Your Target Zone is a percentage of your maximum heart rate. Target Zone will vary for each individual, depending on age, current level of conditioning, and personal fitness goals. The American Heart Association recommends working-out at a Target Heart Rate Zone of between 60% and 75% of your maximum heart rate.
-
Page 19: Troubleshooting
PROBLEM: The running belt does not stay centered during a workout. SOLUTION: Verify that the treadmill is on a level surface. Ve r i f y t h a t t h e b e l t i s properly tightened (refer to Centering The Belt.) PROBLEM: The treadmill makes a clicking noise towards the front of the machine while walking or running on it. - Page 20 36 inches. SOLUTION: The battery in the chest strap may be dead. Take the chest strap to a jewelry store or return to Horizon Fitness for a battery replacement. PROBLEM: Erratic or inconsistent readout. SOLUTION: This is often caused by dry electrodes or a loose chest strap.
-
Page 21: Common Questions
WHEN SHOULD I BE WORRIED ABOUT A NOISE? As long as the sounds your treadmill makes are no louder that a normal conversational tone of voice, it is considered normal noise. If your treadmill is louder than this, Please contact your local dealer for further assistance. - Page 22 TENSIONING THE BELT If you can feel a slipping sensation when running on the treadmill, the running belt must be tightened. In most cases, the belt has stretched from use, causing the belt to slip. This is a normal and common adjustment. To eliminate this slipping, tension...
-
Page 23: Maintenance Procedures
Never use solvents, as they can cause damage to the treadmill. • Inspect the power cord. If the power cord is damaged, contact Horizon Fitness. • Make sure the power cord is not underneath the treadmill or in any other area where it can become pinched or cut. -
Page 24: Exercise Guidelines
How hard you workout is also determined by your goals. If you use your Horizon Fitness Treadmill to prepare for a 5K run, you will probably work out at a higher intensity than if your goal is general fitness. Regardless of your long term goals, always begin an exercise program at low intensity. - Page 25 P R O G R A M STRETCH FIRST Before using your Horizon Fitness product, it is best to take a few minutes doing a few gentle stretching exercises. Stretching prior to exercise will improve flexibility and reduce chances of exercise related injury. Ease into each of these stretches with a slow gentle motion.
- Page 26 G O A L S An important step in developing a long term fitness program is to determine your goals. Is your primary goal for exercising on your Horizon Fitness Treadmill to lose weight? Improve muscle? Burn Stress? Prepare for the spring racing schedule? Knowing what your goals are will help you develop a more successful exercise program.
-
Page 27: Weekly Log Sheets
W E E K L Y L O G S H E E T WEEKLY GOAL: WEEK# D ATE DISTANCE CALORIES TIME COMMENTS D AY M O N TUES W E D THUR F R I WEEK TOTALS WEEKLY GOAL: WEEK# D ATE DISTANCE... -
Page 28: Monthly Log Sheets
M O N T H L Y L O G S H E E T MONTHLY GOAL: M O N T H WEEK# CALORIES TIME DISTANCE MONTHLY TOTALS MONTHLY GOAL: M O N T H WEEK# TIME DISTANCE CALORIES MONTHLY TOTALS... -
Page 29: Limited Home Use Warranty
LABOR Horizon Fitness shall cover the labor cost for the repair of the device for a period from the date of the original purchase, so long as the device remains in the possession of the original owner.
Need help?
Do you have a question about the Treadmill and is the answer not in the manual?
Questions and answers