Table of Contents
Advertisement
Advertisement
Table of Contents

Related Manuals for Horizon Fitness TR5.0


Summary of Contents for Horizon Fitness TR5.0
- Page 1 TR5.0 TREADMILL OWNER’S MANUAL...
-
Page 3: Important Precautions
IMPORTANT PRECAUTIONS SAVE THESE INSTRUCTIONS When using an electrical product, basic precautions should always be followed, including the following: Read all instructions before using this treadmill. It is the responsibility of the owner to ensure that all users of this treadmill are adequately informed of all warnings and precautions. - Page 4 DANGER TO REDUCE THE RISK OF ELECTRICAL SHOCK: Always unplug the treadmill from the electrical outlet immediately after using, before cleaning, performing maintenance and putting on or taking off parts. WARNING TO REDUCE THE RISK OF BURNS, FIRE, ELECTRICAL SHOCK OR INJURY TO PERSONS: •...
- Page 5 WARNING TO REDUCE THE RISK OF BURNS, FIRE, ELECTRICAL SHOCK OR INJURY TO PERSONS: • At NO time should pets or children under the age of 13 be closer to the treadmill than 10 feet. • At NO time should children under the age of 13 use the treadmill. •...
-
Page 6: Grounding Instructions
GROUNDING INSTRUCTIONS This product must be grounded. If a treadmill should malfunction or breakdown, grounding provides a path of least resistance for electrical current to reduce the risk of electrical shock. This product is equipped with a cord having an equipment- grounding conductor and a grounding plug. - Page 7 Place the treadmill on a level and stable surface. There should be one foot of clearance in front of the treadmill for the power cord. Please leave a clear zone behind the treadmill that is at least the width of the treadmill and at least 79” (2 meters) long. This zone must be clear of any obstruction and provide the user a clear exit path from the machine.
- Page 9 ASSEMBLY WARNING There are several areas during the assembly process that special attention must be paid. It is very important to follow the assembly instructions correctly and to make sure all parts are firmly tightened. If the assembly instructions are not followed correctly, the treadmill could have parts that are not tightened and will seem loose and may cause irritating noises.
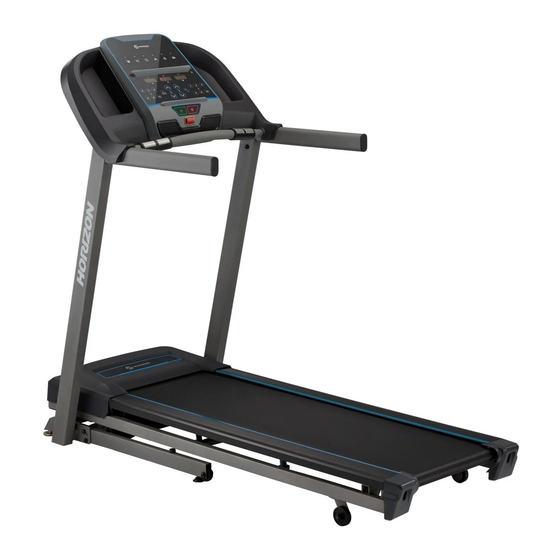
- Page 10 CONSOLE WATER BOTTLE HOLDER TABLET/READING RACK CONTROL PANEL & DISPLAY WINDOWS TABLET/READING RACK WATER BOTTLE HOLDER HANDLEBAR SAFETY KEY PULSE GRIP HANDLEBARS CONSOLE MAST ON/OFF SWITCH POWER CORD SIDE RAIL MOTOR COVER RUNNING DECK / RUNNING BELT ROLLER END CAP CAUTION WARNUNG KEEP HANDS AND FEET AWAY...
-
Page 11: Pre-Assembly
PRE ASSEMBLY TOOLS INCLUDED: 5 mm L-Wrench 6 mm T-Wrench WARNING PARTS INCLUDED: DO NOT ATTEMPT TO LIFT THE TREADMILL! Do not move or lift 1 Console Assembly treadmill from packaging until specified to do so in the assembly 2 Console Masts instructions. -
Page 12: Assembly Step
ASSEMBLY STEP 1 Open HARDWARE FOR STEP 1. HARDWARE FOR STEP 1 PART TYPE DESCRIPTION Attach the LEFT CONSOLE MAST (1) to the BOLT M8X1.25PX20L BASE FRAME (3) using 4 BOLTS (A), 4 SPRING WASHERS (B) and 4 FLAT WASHERS (C). SPRING WASHER 8.2X15.4X2T FLAT WASHER... - Page 13 ASSEMBLY STEP 2 Open HARDWARE FOR STEP 2. HARDWARE FOR STEP 2 PART TYPE DESCRIPTION Attach LEAD WIRE to bottom end of CONSOLE BOLT M8X1.25PX20L CABLE (4). Pull LEAD WIRE through RIGHT CONSOLE MAST (2). After pulling the lead wire SPRING WASHER 8.2X15.4X2T through the mast, the top of the CONSOLE...
- Page 14 ASSEMBLY STEP 3 NOTE: Be careful not to pinch any wires HARDWARE FOR STEP 3 while assembling the console. PART TYPE DESCRIPTION BOLT M8X1.25PX20L Pull the LEAD WIRE through the bottom end of SPRING WASHER 8.2X15.4X2T the HANDLEBAR. FLAT WASHER 8.4X15.5X1.6T Open HARDWARE FOR STEP 3.
- Page 15 ASSEMBLY STEP 4 Open HARDWARE FOR STEP 4. HARDWARE FOR STEP 4 PART TYPE DESCRIPTION Gently place the CONSOLE (5) on top of the CONSOLE MASTS (1&2). Attach the LEFT SIDE BOLT M8X1.25PX20L first using 3 BOLTS (A), 3 SPRING WASHERS (B) SPRING WASHER 8.2X15.4X2T and 3 FLAT WASHERS (C).
- Page 16 ASSEMBLY STEP 5 ASSEMBLY COMPLETE!
-
Page 17: Treadmill Operation
TREADMILL OPERATION This section explains how to use your treadmill’s console and programming. The BASIC OPERATION section in the TREADMILL GUIDE has instructions for the following: • LOCATION OF THE TREADMILL • USING THE SAFETY KEY • FOLDING THE TREADMILL •... - Page 18 C Q D...
-
Page 19: Console Operation
CONSOLE OPERATION Note: There is a thin protective sheet of clear plastic on the overlay of the console that should be removed before use. A) LED DISPLAY: Incline, Calories, Time, Distance, Speed, Heart Rate. B) WORKOUT PROGRAMS: used to reference program code shown on LED display. C) START: press to begin exercising, start your workout, or resume exercising after pause. -
Page 20: Display Windows
DISPLAY WINDOWS INCLINE: Shown as percent. Indicates the incline of your walking or running surface. CALORIES: Total calories burned or calories remaining left to burn during your workout. TIME: Set up your workout time and speed. Then start your work out. DISTANCE: Shown as kilometer. -
Page 21: Getting Started
GETTING STARTED 1) Check to make sure no objects are placed on the belt that will hinder the movement of the treadmill. 2) Plug in the power cord and turn the treadmill ON. (The ON/OFF switch is next to the power cord.) 3) Stand on the side rails of the treadmill. - Page 22 WORKOUT PROFILES P1) MANUAL: Adjust your speed manually during your workout. P2) DISTANCE: Push yourself and go further during your workout with 13 distance workouts. Choose from L1: 1.6 km, L2: 3.2 km, L3: 5km, L4: 8 km, L5: 10km, L6: 12.8 km, L7: 15km, L8: 16 km, L9: 20km, L10: half marathon, L11: 24 km, L12: 32 km and L13: marathon goals.
- Page 23 P5) FAT BURN: A workout designed specifically to target fat. Promotes weight loss by increasing and decreasing the speed, while keeping you in your fat burning zone. Includes 10 levels. Segment Warm Up Time 4:00 Mins 30 Sec 30 Sec 30 Sec 30 Sec 30 Sec...
- Page 24 P6) HILL CLIMB: Simulates a hill ascent and descent. This program helps tone muscle and improve cardiovascular ability. Speed and Incline changes, segments repeat every 30 seconds. Segment Warm Up Time 4:00 Mins 30 Sec 30 Sec 30 Sec 30 Sec 30 Sec 30 Sec 30 Sec...
-
Page 25: Finishing Your Workout
2) Use your CD / MP3 player buttons to adjust song settings. 3) Remove the AUDIO ADAPTOR CABLE when not in use. 4) To connect to the Bluetooth speakers open your Bluetooth settings, turn on Bluetooth, scan for new devices, look for “HZ TR5.0 SPEAKERS” and select connect. - Page 26 Führen Sie das Gerät am Ende der Nutzungsdauer einer sachgerechten Entsorgung zu (örtliche Sammelstelle). Dut: Verwijderingsaanwijzing VISION Fitness / HORIZON Fitness / TEMPO Fitness / TREO Fitness producten zijn recyclebaar. Breng het apparaat aan het einde van de gebruiksduur naar een in recycling gespecialiseerd bedrijf (plaatselijk verzamelpunt).
- Page 28 Horizon TR5.0 | Rev. 1.0 D ©2020 Johnson Health Tech...
Need help?
Do you have a question about the TR5.0 and is the answer not in the manual?
Questions and answers