Advertisement
Quick Links
Advertisement

Related Manuals for Horizon Fitness T-R01


Summary of Contents for Horizon Fitness T-R01
- Page 1 T-R01 OWNER’S MANUAL...
-
Page 3: Important Precautions
IMPORTANT PRECAUTIONS SAVE THESE INSTRUCTIONS When using an electrical product, basic precautions should always be followed, including the following: Read all instructions before using this treadmill. It is the responsibility of the owner to ensure that all users of this treadmill are adequately informed of all warnings and precautions. - Page 4 DANGER TO REDUCE THE RISK OF ELECTRICAL SHOCK: Always unplug the treadmill from the electrical outlet immediately after using, before cleaning, performing maintenance and putting on or taking off parts. WARNING TO REDUCE THE RISK OF BURNS, FIRE, ELECTRICAL SHOCK OR INJURY TO PERSONS: •...
- Page 5 • Do not operate under blanket or pillow. Excessive heating can occur and cause fire, electric shock, or injury to persons. • Connect this exercise product to a properly grounded outlet only. • If you experience any kind of pain, including but not limited to chest pains, nausea, dizziness, or shortness of breath, stop exercising immediately and consult your physician before continuing.
- Page 6 WARNING TO REDUCE THE RISK OF BURNS, FIRE, ELECTRICAL SHOCK OR INJURY TO PERSONS: • At NO time should pets or children under the age of 13 be closer to the treadmill than 10 feet. • At NO time should children under the age of 13 use the treadmill. •...
- Page 7 • Place the treadmill on a level and stable surface. There should be one foot of clearance in front of the treadmill for the power cord. Please leave a clear zone behind the treadmill that is at least the width of the treadmill and at least 79” (2 meters) long. This zone must be clear of any obstruction and provide the user a clear exit path from the machine.
- Page 8 GROUNDING INSTRUCTIONS This product must be grounded. If a treadmill should malfunction or breakdown, grounding provides a path of least resistance for electrical current to reduce the risk of electrical shock. This product is equipped with a cord having an equipment-grounding conductor and a grounding plug.
- Page 9 WARNING TO REDUCE THE RISK OF BURNS, FIRE, ELECTRICAL SHOCK OR INJURY TO PERSONS: • Never use the treadmill before securing the safety tether clip to your clothing. • If you experience any kind of pain, including but not limited to chest pains, nausea, dizziness, or shortness of breath, stop exercising immediately and consult your physician before continuing.
- Page 10 At NO time should children under the age of 13 or pets be within 3 m (10 feet) of the treadmill. At NO time should children under the age of 13 use the treadmill. Children over the age of 13 or disabled persons should not use the treadmill without adult supervision. It is essential that your treadmill is EN CLASS HB certified and use only indoors, in a climate controlled room.
-
Page 11: Basic Operation
BASIC OPERATION CONGRATULATIONS ON CHOOSING YOUR TREADMILL! You’ve taken an important step in developing and sustaining an exercise program! Your treadmill is a tremendously effective tool for achieving your personal fitness goals. Regular use of your treadmill can improve the quality of your life in so many ways. Here are just a few of the health benefits of exercise: •... - Page 12 EMERGENCY DISMOUNT In case of an emergency, place both hands on the side arm rests to hold yourself up and place your feet onto the side rails. FOLDING THE TREADMILL Firmly grasp the back end of the treadmill. Carefully lift the end of the treadmill deck into the upright position until the foot lock latch or deck lock pin engages and securely locks the deck into position.
- Page 13 TENSIONING THE RUNNING BELT The running belt has been properly adjusted at the factory before it was shipped. At times the belt can move off-center during shipment. CAUTION Running belt should NOT be moving during tensioning. Over-tightening the running belt can cause excessive wear on the treadmill as well as its components.
- Page 14 CENTERING THE RUNNING BELT The running belt has been properly adjusted at the factory before it was shipped. At times the belt can move off-center during shipment. Before operating the treadmill, make sure the belt is centered and remains centered to maintain smooth operation. CAUTION Do not run belt faster than 1 mph or 1.6 kmh while centering.
- Page 15 USING THE HEART RATE FUNCTION Your treadmill could be equipped with either heart rate pulse grips or a thumb pulse sensor. To find out what your model has, refer to the beginning of the ASSEMBLY section of your OWNER’S MANUAL. The heart rate function on this product is not a medical device.
- Page 17 ASSEMBLY WARNING There are several areas during the assembly process that special attention must be paid. It is very important to follow the assembly instructions correctly and to make sure all parts are firmly tightened. If the assembly instructions are not followed correctly, the treadmill could have frame parts that are not tightened and will seem loose and may cause irritating noises.
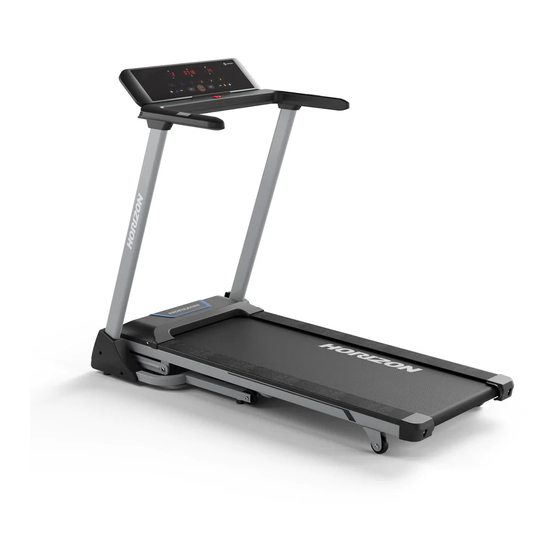
- Page 18 READING RACK CONSOLE HANDLEBARS SAFETY KEY PLACEMENT CONSOLE MAST MOTOR COVER ON/OFF SWITCH POWER CORD SIDE RAIL RUNNING BELT/DECK TRANSPORT WHEEL CAUTION ACHTUNG KEEP HANDS AND FEET AWAY HALTEN SIE HÄNDE UND FÜSSE FROM THE MOVING PARTS. VON BEWEGLICHEN TEILEN FERN. REAR ROLLER TENSION/ADJUSTMENT BOLTS FOOT LOCK LATCH (UNDERNEATH DECK)
-
Page 19: Pre-Assembly
TOOLS INCLUDED: PRE ASSEMBLY F 5 mm L-Wrench /screwdriver F 6 mm L-Wrench UNPACKING Place the treadmill carton on a level flat surface. It is recommended that you place PARTS INCLUDED: a protective covering on your floor. Take CAUTION when handling and transporting F 1 Main System this unit. - Page 20 ASSEMBLY STEP 1 Open all the package and check all the parts. Follow the picture to pull up the CONSOLE MAST. NOTE: Please do not damage or fold any wire during assembly.
- Page 21 ASSEMBLY STEP 2 HARDWARE PARTS: BOLT (A) BOLT (B) M8 X 45 M8 X 16 QTY: 2 QTY: 2 WASHER (C) WASHER (D) Φ8 Φ8 QTY: 2 QTY: 2 Open the component bags. Follow the picture to stabilize LEFT CONSOLE MAST by using (A)+(C) and (B)+(D).
- Page 22 ASSEMBLY STEP 3 HARDWARE PARTS: BOLT (B) WASHER (D) M8 X 16 Φ8 QTY: 2 QTY: 2 Attach the RIGHT HANDLE BAR with RIGHT CONSOLE MAST by (B)+(D). Follow the same step to set up the LEFT HANDLE BAR. Follow the arrow direction in the picture to set the CONSOLE BASE COVER till the CONSOLE BASE.
- Page 23 ASSEMBLY STEP 4 HARDWARE PARTS: BOLT (F) BOLT (E) M4 X 10 ST4.0 X 12 QTY: 4 QTY: 2 Attach the RIGHT and LEFT CONSOLE MAST COVER with CONSOLE MAST by (F). Attach the RIGHT and LEFT CONSOLE BASE COVER with CONSOLE BASE by (E).
- Page 24 Plug in the POWER CORD and bend up the CONSOLE than you are all set. ASSEMBLY COMPLETE! T-R01 Product Weight: 43 kg / 95 lbs. User Weight Capacity: 100 kg / 220 lbs. Dimensions (L×W×H) : 147 x 74 x 114.5 cm / 57.8”...
-
Page 25: Treadmill Operation
TREADMILL OPERATION This section explains how to use your treadmill’s console and programming. - Page 26 stop...
- Page 27 T-R01 CONSOLE OPERATION Note: There is a thin protective sheet of clear plastic on the overlay of the console that should be removed before use. MODE: Choose from P1 to P25 while the system is stop. Press “Clear/Set” bottom to exit.
- Page 28 DISPLAYS WINDOW TIME: Shown as minutes : seconds. View the time remaining or the time elapsed in your workout. SPEED: Adjust speed during workout. Shown as KM/H. stop CALORIES: Total calories burned or remaining for your workout. DISTANCE: Shown as KM. Indicates distance traveled or distance remaining during your workout. INCLINE: Adjust incline during workout.
- Page 29 PROGRAM INFORMATION 1.WALKING AND JOGGING 1 MIN 2-5MIN 6-25 MIN 26-28MIN 29-30MIN 30MINS STOP 1 MIN 2-5MIN 6-25 MIN 26-28MIN 29-30MIN 30MINS STOP 1 MIN 2-5MIN 6-20 MIN 21-25MIN 26-30MIN 30MINS STOP 1 MIN 2-5MIN 6-25 MIN 26-28MIN 29-30MIN 30MIN STOP 1 MIN 2-5MIN...
- Page 30 PROGRAM INFORMATION 2. JOGGING AND RUNNING 1 MIN 2-8MIN 9-15MIN 16-22MIN 23-29MIN 30MIN 30MINS STOP 1 MIN 2-8MIN 9-15MIN 16-22MIN 23-29MIN 30MIN 30MINS STOP 3. INCLINE TRAINING 1 MIN 2-8 MIN 9-15MIN 16-22MIN 23-29MIN 30MIN 30MINS 6KM/LV5 4KM/LV5 5KM/LV5 3KM/LV5 STOP 1 MIN 2-8MIN...
- Page 31 4. SPEED TRAINING 1 MIN 2-8MIN 9-15MIN 16-22MIN 23-28MIN 29-30MIN 30MINS 12KM STOP 1 MIN 2-8MIN 9-15MIN 16-22MIN 23-28MIN 29-30MIN 30MINS 10KM 13KM STOP 1 MIN 2-8MIN 9-15MIN 16-22MIN 23-28MIN 29-30MIN 30MINS 10KM 14KM STOP 1 MIN 2-8MIN 9-15MIN 16-22MIN 23-28MIN 29-30MIN 30MINS...
- Page 32 PROGRAM INFORMATION 5. JOGGING AND HIKING 1 MIN 2-8MIN 9-15MIN 16-22MIN 23-28MIN 29-30MIN 30MINS STOP 1 MIN 2-8MIN 9-15MIN 16-22MIN 23-28MIN 29-30MIN 30MINS 2KM/LV9 4KM/LV9 6KM/LV9 8KM/LV9 5KM/LV9 3KM/LV9 STOP 1 MIN 2-8MIN 9-15MIN 16-22MIN 23-28MIN 29-30MIN 30MINS 2KM/LV10 4KM/LV10 6KM/LV10 8KM/LV10 6KM/LV10...
- Page 33 GETTING STARTED 1) Check to make sure no objects are placed on the belt that will hinder the movement of the treadmill. 2) Plug in the power cord and turn the treadmill ON. 3) Stand on the side rails of the treadmill. 4) Attach the safety key clip to part of your clothing making sure that it is secure and will not become detached during operation.
- Page 34 HEART RATE ZONE INCLUDES TARGET HR, % TARGET HR: A workout designed to keep you in your specified heart rate zone. TARGET HEART RATE: The first step is knowing the right intensity for your training is to find out your maximum heart rate (max HR=220-age). The age-based method provides an average statistical prediction of your max.
- Page 35 WARNING Heart rate monitoring systems may be inaccurate. Over exercising may result in serious injury or death. If you feel faint stop exercising immediately. TARGET HEART RATE ZONE CHART WHAT IS TARGET HEART RATE ZONE? Target Heart Rate Zone tells you the number of times per minute your heart needs to beat to achieve a desired workout effect.
- Page 36 MAINTENANCE • Fold the treadmill into the upright position, making sure that the Preventative maintenance is the key to smooth operating lock latch is secure. equipment, as well as keeping the users liability to a minimum. • Move the treadmill to a remote location. Equipment needs to be inspected at regular intervals.
- Page 37 Führen Sie das Gerät am Ende der Nutzungsdauer einer sachgerechten Entsorgung zu (örtliche Sammelstelle). Dut: Verwijderingsaanwijzing VISION Fitness / HORIZON Fitness / TEMPO Fitness / TREO Fitness producten zijn recyclebaar. Breng het apparaat aan het einde van de gebruiksduur naar een in recycling gespecialiseerd bedrijf (plaatselijk verzamelpunt).
- Page 40 Horizon T-R01 | Rev. 1.0 ©2020 Johnson Health Tech...
Need help?
Do you have a question about the T-R01 and is the answer not in the manual?
Questions and answers