
Related Manuals for Asko CW4611


Summary of Contents for Asko CW4611
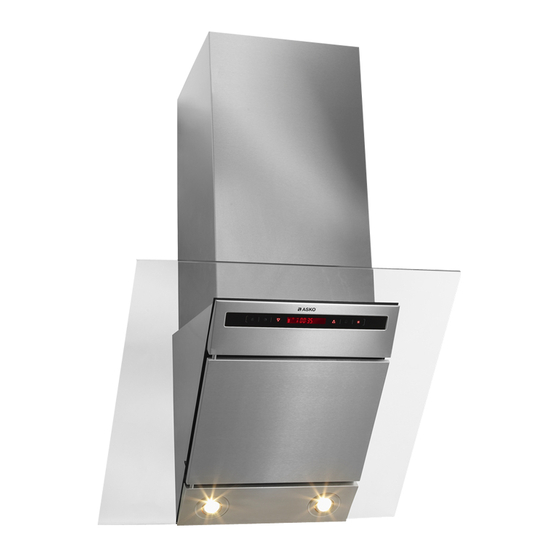
- Page 1 Operation instructions Wall-mounted Cooker Hood Gebruiksaanwijzing Wandgemonteerde afzuigkap Инструкция по эксплуатации Настенная вытяжка...
-
Page 2: Operating Instructions
Operating Instructions Wall-mounted Cooker Hood Dear Customer, Thank you for choosing this quality product from ASKO. We hope it will meet your expectations and fulfil your needs for many years to come. Scandinavian design combines clean lines, everyday functionality and high quality. These are key characteristics of all our products and the reason they are greatly appreciated throughout the world. -
Page 3: Table Of Contents
CONTENTS SAFETY INFORMATION General Recycling Electrical safety DESCRIPTION OF THE CONTROLS DESCRIPTION OF THE DISPLAY USING THE EXTRACTOR FAN Starting and stopping the fan Activating Turbo mode Setting the clock Auto off Activating the egg timer Light Energy saving mode for the display CARE AND CLEANING General Cleaning the grease filter... -
Page 4: Safety Information
SAFETY INFORMATION General Recycling These operating instructions contain important This appliance complies with European Commu- information on installation and maintenance that nity directive 2002/96/EC, Waste Electrical and ought to be read very carefully. Keep these oper- Electronic Equipment (WEEE). By ensuring that ating instructions for future reference. -
Page 5: Description Of The Controls
DESCRIPTION OF THE CONTROLS 1 Filter cleaning indicator/clock activation button 2 Timer activation button 3 Reduce speed/hour setting button 4 Display 5 Increase speed/minute setting button 6 Egg timer setting button 7 Light button DESCRIPTION OF THE DISPLAY 1 Light indicator 2 Auto off indicator 3 Auto off time display 4 Alarm time display... -
Page 6: Using The Extractor Fan
USING THE EXTRACTOR FAN Starting and stopping the fan Activating the egg timer Use the alarm for cooking reminders. Set the Press to start the fan. Use the same but- alarm time as follows: tons to stop the fan. Press . -
Page 7: Care And Cleaning
CARE AND CLEANING General Replacing the charcoal filter (standard Regular maintenance is required to ensure that hood) the cooker hood functions properly. This is espe- Replace the charcoal filter (standard hood) as cially true of the grease and charcoal filters. follows: Remove the grease filter. -
Page 8: Emptying And Cleaning The Fat Collector
CARE AND CLEANING Emptying and cleaning the fat collector The fan is fitted with a fat collector that collects fat from the fan blades and fan housing. Remove the grease filter and the charcoal filter (if fitted). Remove the fat collector and clean it in warm water with washing up liquid. -
Page 9: Troubleshooting
TROUBLESHOOTING Problem Possible cause Solution Cooker hood does not work No power supply Check that the plug is connected Poor air flow Aluminium grease filter blocked Clean grease filter and replace once dry Charcoal filter blocked Replace charcoal filter Motor running, but no air flow Butterfly valve jamming Call the service divi- sion... -
Page 10: Electrical Connection
ELECTRICAL CONNECTION Installation and electrical connections must be performed by qualified professionals. The cooker hood is manufactured in compliance with Class I and as such must be earthed. Connect the cooker hood to the electrical supply as instructed below. IEC227 North America L=phase Brown... -
Page 11: Installation
INSTALLATION REMEMBER! Unpacking • The distance between the top of the hob and Remove the packaging with the product in the lowest part of the cooker hood must be place. Cut off the packing ribbons and carefully at least 65 cm. cut open the packaging (do not cut too deeply), •... -
Page 12: Mounting The Extensible Cover Plate
INSTALLATION Mounting the extensible cover plate Run the power supply so that it fits inside the cover plate. Adjust the mounting plate by pulling it apart or pushing it together so that it fits the cover plate. Then screw the mounting plate to the wall (A). Screw the cover plate to the mounting plate (B). - Page 13 Gebruiksaanwijzing Wand afzuigkap Geachte klant, Bedankt dat u voor dit kwaliteitsproduct van ASKO hebt gekozen. Wij hopen dat het product jarenlang aan uw wen- sen en verwachtingen zal voldoen. Scandinavisch design is een combinatie van heldere lijnen, alledaagse functionaliteit en hoogstaande kwaliteit. Dit zijn de hoofdkenmerken van al onze producten en de reden dat onze producten wereld- wijd zo geliefd zijn.
- Page 14 INHOUD VEILIGHEIDSINFORMATIE Algemeen Recycling Elektrische veiligheid BESCHRIJVING VAN HET BEDIENINGSPANEEL BESCHRIJVING VAN HET DISPLAY DE AFZUIGKAP GEBRUIKEN De motor starten en stoppen Turbo-modus activeren De klok instellen Automatische uitschakeling De timer activeren Verlichting Energiebesparende modus voor de display ONDERHOUD EN REINIGING Algemeen Het vetfilter reinigen Het koolfilter vervangen (standaardkap)
-
Page 15: Veiligheidsinformatie
VEILIGHEIDSINFORMATIE Algemeen Recycling Deze gebruiksaanwijzing bevat belangrijke infor- Dit apparaat voldoet aan richtlijn 2002/96/EG matie over de installatie en het onderhoud die van het Europese parlement, Afgedankte Ele- zorgvuldig doorgelezen moet worden. Bewaar ktrische en Elektronische apparatuur (AEEA). deze gebruiksaanwijzing voor toekomstig ge- Door dit product op de juiste manier te recyclen, bruik. -
Page 16: Beschrijving Van Het Bedieningspaneel
BESCHRIJVING VAN HET BEDIENINGSPANEEL 1 Activeerknop indicator filterreiniging/klok 2 Activeerknop timer 3 Instelknop snelheid/uur 4 Display 5 Instelknop snelheid/minuut verhogen 6 Instelknop timer 7 Knop verlichting BESCHRIJVING VAN HET DISPLAY 1 Indicator lamp 2 Indicator automatische uitschakeling 3 Tijddisplay automatische uitschakeling 4 Tijddisplay alarm 5 Indicator alarm... -
Page 17: De Afzuigkap Gebruiken
DE AFZUIGKAP GEBRUIKEN De motor starten en stoppen De timer activeren U kunt het alarm gebruiken als geheugensteun Druk op om de motor te starten. Ge- tijdens het koken. Stel de alarmtijd als volgt in: bruik dezelfde knoppen om de motor te stoppen. Druk op . -
Page 18: Onderhoud En Reiniging
ONDERHOUD EN REINIGING Algemeen Regelmatig onderhoud is vereist om ervoor te zorgen dat de afzuigkap goed blijft functioneren. Dit is voornamelijk van belang voor de vet- en koolfilters. Reinig de motor en andere oppervlakken van de afzuigkap regelmatig met een doek die onderge- Als u het vetfilter in de vaatwasser schoonmaakt: dompeld is in gedenatureerde alcohol of een niet- doe er alleen het vetfilter in en geen andere voor-... -
Page 19: De Vetopvangbak Legen En Reinigen
ONDERHOUD EN REINIGING Knijp in de klemmen van het koolfilter en trek het koolfilter naar achteren om deze te Plaats de nieuwe halogeenlamp. verwijderen. Als u de halogeenlamp aanraakt met uw blote handen, kan dat de levensduur van de lamp ver- minderen. -
Page 20: Problemen Verhelpen
PROBLEMEN VERHELPEN Probleem Mogelijke oorzaak Oplossing Afzuigkap functioneert niet Geen stroomtoevoer Controleer of de stekker in het stopcontact zit Slechte luchtstroom Aluminium vetfilter geblokkeerd Reinig het vetfilter en plaats het filter terug na het drogen Koolfilter geblokkeerd Vervang het koolfilter Motor draait, maar er is geen Terugslagklep verstopt Neem contact op met... -
Page 21: Elektrische Aansluiting
ELEKTRISCHE AANSLUITING De installatie en elektrische aansluitingen moet door erkende vakmensen worden uit- gevoerd. De afzuigkap wordt gefabriceerd conform Klasse I en moet als zodanig worden geaard. Sluit de afzuigkap aan op de elektrische toevoer (zie instructies hieronder). IEC227 Noord-Amerika L=fase Bruin Zwart... -
Page 22: Installatie
INSTALLATIE LET OP! Uitpakken • De afstand tussen de bovenkant van het Verwijder de verpakking van het product. Snijd de kooktoestel en de onderkant van de afzuig- banden van de verpakking los en snijd de ver- kap moet ten minste 65 cm bedragen. pakking voorzichtig open (niet te diep snijden). -
Page 23: De Verlengbare Afdekplaat Monteren
INSTALLATIE De verlengbare schacht monteren Plaats de stroomtoevoer dusdanig dat deze in de schacht past. Stel de montageplaat af door deze uiteen te trekken of samen te duwen, zodat deze op de schacht past. Monteer vervolgens de montageplaat aan de muur (A). - Page 24 Настенная вытяжка Уважаемый покупатель! Благодарим вас за приобретение этого качественного изделия производства компании ASKO. Надеемся, что наше изделие будет соответствовать всем вашим ожиданиями и удовлетворит ваши потребности на много лет вперед. Скандинавский дизайн сочетает в себе строгие линии, повседневную функциональность...
- Page 25 СОДЕРЖАНИЕ ИНФОРМАЦИЯ ПО БЕЗОПАСНОСТИ Общие положения Утилизация Электрическая безопасность ОПИСАНИЕ СРЕДСТВ УПРАВЛЕНИЯ ОПИСАНИЕ ДИСПЛЕЯ ИСПОЛЬЗОВАНИЕ ВЫТЯЖНОГО ВЕНТИЛЯТОРА Запуск и останов вентилятора Активация режима “Турбо” Настройка часов Автоматическое отключение Активация таймера для варки яиц Освещение Энергосберегающий режим дисплея УХОД И ОЧИСТКА Общие...
-
Page 26: Информация По Безопасности
ИНФОРМАЦИЯ ПО БЕЗОПАСНОСТИ Общие положения Безответственная утилизация может нанести ущерб окружающей среде или привести к Внимательно ознакомьтесь с важной травмам. информацией по установке и обслуживанию, Ни при каких обстоятельствах недопустима которая содержится в данной инструкции по утилизация данного вытяжного вентилятора эксплуатации. -
Page 27: Описание Средств Управления
ОПИСАНИЕ СРЕДСТВ УПРАВЛЕНИЯ Индикатор очистки фильтра/кнопка активации часов Кнопка активации таймера Кнопка уменьшения скорости/настройки часов Дисплей Кнопка увеличения скорости/настройки минут Кнопка настроек таймера для варки яиц Кнопка освещения. ОПИСАНИЕ ДИСПЛЕЯ 1. Световой индикатор 2. Индикатор автоматического отключения 3. Дисплей времени автоматического отключения... -
Page 28: Использование Вытяжного Вентилятора
ИСПОЛЬЗОВАНИЕ ВЫТЯЖНОГО ВЕНТИЛЯТОРА Запуск и останов вентилятора Активация таймера для варки яиц Используйте оповещение для напоминаний, Нажмите или для запуска вентилятора. связанных с приготовлением пищи. Настройте Используйте те же кнопки для останова таймер следующим образом: вентилятора. Нажмите . Загорается лампа, и мигает Например: При... -
Page 29: Уход И Очистка
УХОД И ОЧИСТКА Общие положения Для обеспечения правильного функционирования вытяжки требуется регулярный уход. Это особенно касается масляного и угольного фильтров. Производите регулярную очистку вентилятора и других поверхностей вытяжки с помощью Внимание! ткани, смоченной в денатурате или очищающей Для очистки масляного фильтра в неабразивной... -
Page 30: Разгрузка И Очистка Жироуловителя
УХОД И ОЧИСТКА Удалите перегоревшую галогенную лампу Нажмите защелки угольного фильтра и (если вытяжка включает 4 лампы = 10 Вт, 2 потяните его, чтобы снять. лампы = 20 Вт). Помните, что лампа может быть горячей! Вставьте новую галогенную лампу. Прикосновение к галогенной лампе голыми руками... -
Page 31: Поиск И Устранение Неисправностей
ПОИСК И УСТРАНЕНИЕ НЕИСПРАВНОСТЕЙ Проблема Возможная причина Решение Вытяжка не работает Нет электричества Проверьте, что вилка вставлена в розетку Недостаточное течение воздуха Заблокирован алюминиевый Очистите масляной масляной фильтр фильтр, дождитесь, когда он высохнет, и установите на место. Заблокирован угольный фильтр Замените... -
Page 32: Подсоединение К Электрической Сети
ПОДСОЕДИНЕНИЕ К ЭЛЕКТРИЧЕСКОЙ СЕТИ Работы по установке и подключению к электросети должны выполняться квалифицированными специалистами. Вытяжка изготовлена в соответствии с требованиями для Класса I и поэтому должна быть заземлена. Подсоедините вытяжку к электросети в соответствии с нижеприведенной инструкцией. IEC227 Северная Америка L = фаза... -
Page 33: Установка
УСТАНОВКА ПОМНИТЕ! Распаковка • Расстояние между верхом горелки и самой Удалите упаковку, содержащую изделие. нижней частью вытяжки должно быть не Разрежьте упаковочные ленты и осторожно менее 65 см. разрежьте упаковку (глубина разреза не • При использовании соединительной должна быть слишком большой), удалите трубы... -
Page 34: Установка Расширяемой Крышки
УСТАНОВКА Установка расширяемой крышки Проведите шнур электропитания так, чтобы он располагался внутри крышки. Настройте монтажную плиту, растягивая или сжимая ее, пока она не подойдет к крышке. Затем прикрепите монтажную плиту шурупами к стене (А). Привинтите крышку к монтажной плите (В). При... - Page 36 Australian & European Booklet ASKO Cooker Hood X2 Wall mounted Ver05...
Need help?
Do you have a question about the CW4611 and is the answer not in the manual?
Questions and answers