Table of Contents
Advertisement
Quick Links
REMOTE CONTROL CLASS A
PREAMPLIFIER
INSTRUCTIONS FOR USE
Thank you for purchasing the Musical Fidelity
X-P100 Remote Control Class A Pre-Amplifier.
Used properly and carefully, it should give you many
years of outstanding musical reproduction.
This X-P100 is closely based on our highly
regarded (and now unavailable) Nu-Vista model but
uses a specially selected J-FET in place of the
Nuvistor triode.
The X-P100 has been designed to offer almost
indistiguishable sonic charateristics to the Nu-Vista.
Aesthetically and electronically the X-P100 matches
perfectly with the X-AS100 power amplifier, X-RAY 24 bit
CD player and X-PLORA tuner. Together, they form one
of the finest hi-fi systems available.
Dust regularly with a soft duster or soft brush but be
careful when using cleaning or polishing agents - they may
harm the surface finish.
If you have any questions about anything in your
audio system, please consult your dealer who is there
to help and advise you.
X-P100
Instructions For Use. Page 1
Advertisement
Table of Contents

Related Manuals for Musical Fidelity X-P100


Summary of Contents for Musical Fidelity X-P100
- Page 1 X-P100 Remote Control Class A Pre-Amplifier. Used properly and carefully, it should give you many years of outstanding musical reproduction. This X-P100 is closely based on our highly regarded (and now unavailable) Nu-Vista model but uses a specially selected J-FET in place of the Nuvistor triode.
-
Page 2: Please Read
RFI. It is possible that if this product is subjected to abnormally high levels of RFI the unit may be susceptible and not perform as expected. In the unlikely event of this happening on a regular basis, please contact Musical Fidelity's service department. -
Page 3: Front View
Tape record output Infra Red remote receiver lens Tape input Tape monitor button Aux 2 input Source selector switch Aux 1 input Tuner input CD input Preamp Output Phono (MM) input Phono chassis earth X-P100 Instructions For Use. Page 3... -
Page 4: Installation Precautions
INSTALLATION INSTALLATION PRECAUTIONS Your new X-P100 is designed and built to provide trouble-free performance but as with all electronic devices it is necessary to observe a few precautions. Please ensure that you have complied with them before you connect any AC power to your amplifier. Retain this guide for future reference. -
Page 5: Tape Recording
X-P100 offers a very similar level of sonic fidelity to the Nu-Vista but at the The X-P100 has 5 line level inputs - CD, reduced cost afforded by the choice of FET Tuner, Aux1, Aux2 and Tape, plus an MM devices. -
Page 6: Remote Control
The Infra Red receiver is the small red lens marked I.R. situated on the front panel, it is a good idea to place your X-P100 such that there is an unobstructed line-of-sight to this lens from around your listening room. -
Page 7: Troubleshooting
If none of these actions effect a cure, please contact your dealer, or an authorised Musical Fidelity service agent. Remember, never open the case of the X-P100 yourself, as this will invalidate the guarantee. X-P100 Instructions For Use. Page 7... -
Page 8: Specifications
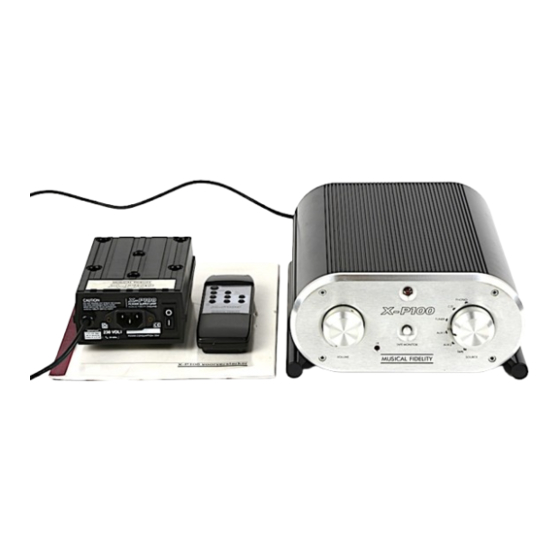
Remote control handset X-P100 power supply unit IEC type mains lead 2 x batteries (AA, SUM-3, CR6) Musical Fidelity reserves the right to make improvements which may result in specification or feature changes without notice. X-P100 Instructions For Use. Page 8...
Need help?
Do you have a question about the X-P100 and is the answer not in the manual?
Questions and answers