Table of Contents
Advertisement
Quick Links
Advertisement
Table of Contents

Related Manuals for moon Evolution Series 740P


Summary of Contents for moon Evolution Series 740P
- Page 1 Owner’s Manual MOON Evolution Series 740P Dual-Mono Preamplifier...
-
Page 2: Important Safety Instructions
MOON 740P Dual-Mono Preamplifier Important Safety Instructions Read these instructions. Keep these instructions. Heed all warnings. Follow all instructions. Do not use this apparatus near water. Clean only with a dry cloth. Do not block ventilation openings. Install in accordance with the manufacturer’s instructions. - Page 3 To prevent shock hazard, all three connections must ALWAYS be used. Connect the MOON 740P only to an AC source of the proper voltage; Both the shipping box and rear panel serial number label will indicate the correct voltage. Use of any other voltage will likely damage the unit and void the warranty AC extension cords are NOT recommended for use with this product.
-
Page 4: Table Of Contents
MOON 740P Dual-Mono Preamplifier Table of Contents Congratulations ..........5 Unpacking............5 Introduction ............. 6 Installation & Placement ........6 Front Panel Controls ........7 Software Setup ..........9 Rear Panel Connections ........12 SimLink™ ............13 Operating the 740P ........13 Remote Control Operation .......14... -
Page 5: Congratulations
Before setting up your new MOON 740P, we encourage you to please read this manual thoroughly to properly acquaint yourself with its features. We hope you enjoy listening to the MOON 740P dual-mono preamplifier as much as the pride we have taken in creating this fine audio product. -
Page 6: Introduction
Installation & Placement The MOON 740P dual-mono preamplifier should be placed on a solid, level surface. You should avoid placing it near a heat source or inside a closed cabinet that is not well ventilated as this could compromise the preamplifier’s performance and reliability. -
Page 7: Front Panel Controls
MOON 740P Dual-Mono Preamplifier Front Panel Controls Figure 1: Front panel of MOON 740P dual-mono Preamplifier The front panel will look similar to Figure 1 (above). The large display window normally indicates the current volume level and, whenever you change the input, it will briefly show the selected input label. Located to the left side of the display are seven (7) buttons;... - Page 8 The MOON 740P Preamplifier provides a range of five-hundred and thirty (530) unique volume settings. This is achieved as follows: Within the 0.0dB to 30.0dB range, you can increase and decrease the volume in 1.0dB steps. From the 30.0dB to 80.0dB range, you can increase and decrease the volume by either 0.1dB or 1.0dB steps;...
-
Page 9: Software Setup
MOON 740P Dual-Mono Preamplifier Software Setup The MOON 740P preamplifier includes powerful software that allows you to configure it to meet your specific needs. For label maximum each of the five (5) inputs, you can assign a to replace the factory assigned name (i.e. B1, S1, etc.), assign a... - Page 10 (see the following examples). The MOON 740P is equipped with software that allows the MiND app to control various features of this preamplifier. With the MiND app you will be able to adjust the volume level, mute the output, place the preamplifier into ‘Standby’ mode and then place it back into operational mode.
- Page 11 (continued) The MOON 740P is equipped with a 12 Volt trigger output. When an input is assigned to the 12 Volt trigger, the device connected to the trigger will automatically start-up whenever you switch to that input. The default setting for all five inputs is on.
-
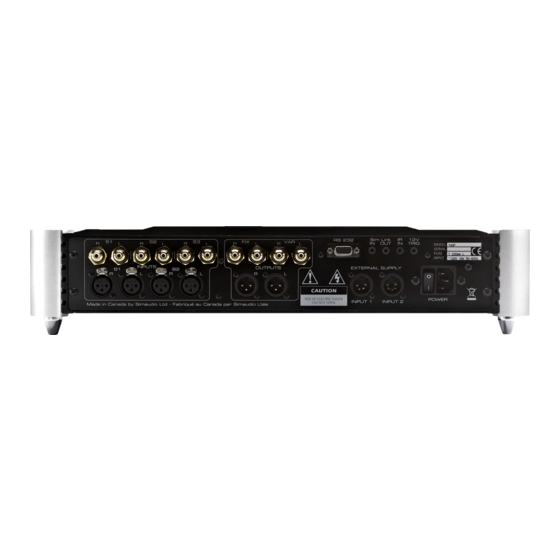
Page 12: Rear Panel Connections
SUPPLY” “INPUT 1” and “INPUT 2” which are reserved for future use when an external power supply will be made available for the MOON 740P. Finally, to the far right is the “AC Power” section with the main power switch (“0”=off, “1”=on) and the IEC receptacle for the included AC power cord. -
Page 13: Simlink
A third feature of SimLink™ involves the “Standby” function. By pressing down and holding the “Standby” button for 2 seconds on the 740P, all other MOON components connected via the SimLink will go into “Standby” mode along with the 740P. The same logic applies when switching from “Standby” to active mode. -
Page 14: Remote Control Operation
The MOON 740P Dual-Mono Preamplifier uses the ‘FRM-3’ full function, all aluminum backlit remote control (figure 3). It operates on the Philips RC-5 communication protocol and is can be used with other MOON components such as CD Players, DAC’s, Integrated Amplifiers, as well as other Preamplifiers. -
Page 15: Balanced Operation
For example, when one conductor is carrying a signal of +10 Volts, the other will be carrying a signal of –10 Volts. When these two inverted signals on a balanced line are output from the MOON 740P, any noise picked up by the interconnect will be eliminated since a differential circuit amplifies only the difference between these two signals: Noise on a balanced interconnect will be equal on both conductors and therefore not be processed. -
Page 16: Specifications
Pin 1........ Ground Pin 2........ Positive Pin 3 ......Negative NOTE: In the event that you require the RS-232 codes for your MOON 740P, please contact Simaudio Ltd. directly by either email (service@simaudio.com) or by toll-free telephone (877-980-2400). Fuse Replacement: For the 120V version use a 0.2A slow blow (5 x 20mm size).
Need help?
Do you have a question about the Evolution Series 740P and is the answer not in the manual?
Questions and answers