Table of Contents
Advertisement
Quick Links
Advertisement
Table of Contents

Related Manuals for moon 600i Evolution Series


Summary of Contents for moon 600i Evolution Series
- Page 1 Owner’s Manual Evolution Series 600i Dual-Mono Integrated Amplifier...
-
Page 3: Important Safety Instructions
600i Dual-Mono Integrated Amplifier Important Safety Instructions Read these instructions. Keep these instructions. Heed all warnings. Follow all instructions. Do not use this apparatus near water. Clean only with a dry cloth. Do not block ventilation openings. Install in accordance with the manufacturer’s instructions. Do not install near any heat sources such as radiators, heat registers, stoves or another apparatus that produces heat. - Page 4 To prevent shock hazard, all three connections must ALWAYS be used. Connect the MOON 600i only to an AC source of the proper voltage; Both the shipping box and rear panel serial number label will indicate the correct voltage. Use of any other voltage will likely damage the unit and void the warranty AC extension cords are NOT recommended for use with this product.
-
Page 5: Table Of Contents
600i Dual-Mono Integrated Amplifier Table of Contents Introduction ............. 6 Unpacking............7 Installation & Placement ........7 Front Panel Controls ........8 Software Setup ..........9 Rear Panel Connections ........15 SimLink™ ............16 Operating the 600i .........16 Remote Control Operation .......17 Troubleshooting .......... -
Page 6: Introduction
The performance of your Your MOON 600i dual-mono integrated amplifier incorporates many significant design features to achieve its “world-class” level of performance. This is an abbreviated list of the more important features: Our “no overall feedback” amplifier circuit design. The M-eVOL2 volume control circuit using MDAC’s (operating... -
Page 7: Unpacking
600i from any potential damage during packaging, storing it in a safe, dry place in case transit. Please write the serial number of your new MOON 600i in the space provided below for future reference. Serial No.: ________________ Installation & Placement... -
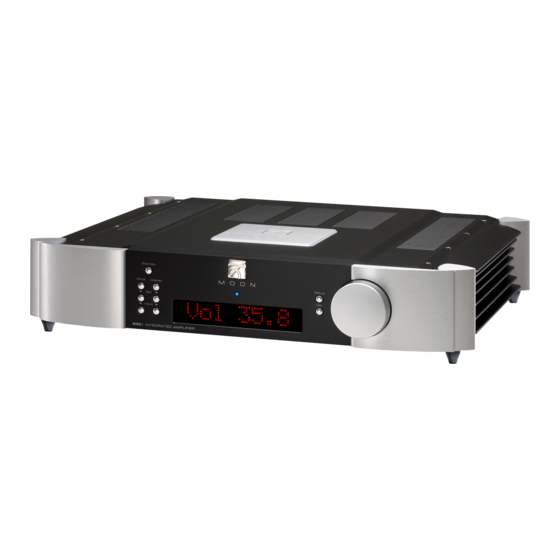
Page 8: Front Panel Controls
600i Dual-Mono Integrated Amplifier Front Panel Controls Figure 1: Front panel of MOON 600i dual-mono Integrated Amplifier The front panel will look similar to Figure 1 (above). “Display” button once will increase the level to the The large display window normally indicates the highest setting. -
Page 9: Software Setup
Input ” buttons allow you to choose which the audio signal regardless of the setting, unlike all input source you wish to listen to. The MOON 600i potentiometer based circuits. Since this circuitry dual-mono integrated amplifier has a total of five (5) operates in a fully balanced differential mode, no inputs;... - Page 10 “OK” and in alphabetical order (AUX … CD … TUNER, “SAVED” will briefly appear in the display etc.), various MOON source model names (i.e. followed by “MAX VOL”. The lowest possible ANDROMEDA … 750D, etc) and finally a choice setting is 40.0dB.
- Page 11 , which then outputs its to adjust the volume level, mute the output, place analog signal to the MOON 600i. Only one of the the preamplifier into ‘Standby’ mode and then place five inputs may be configured for the MiND. “B1” is it back into operational mode.
- Page 12 (for use with a sub-woofer or when OUT” can be found on the MOON 600i’s rear using the MOON 600i only as a preamplifier). This is panel. The output level can be configured as either done as follows: fixed level (for use with a recording device) or 2.
- Page 13 (example on previous page). 6. Repeat steps 3 and 4. If you want to control the MOON 600i using a with a universal remote control, you can disable the wired aftermarket infrared remote control receiver IR sensor located on the front panel as follows: 1.
- Page 14 “IR CODE”. inputs (examples on previous pages). Reset the MOON 600i software settings back to their factory defaults: 1. You may either continue were we left off in the 4. Press “OK” and “SURE ? N” will appear in the previous example by turning the volume control display.
-
Page 15: Rear Panel Connections
Figure 2: Rear panel of MOON 600i Integrated Amplifier The rear panel of the MOON 600i dual-mono The MOON 600i is equipped with a “Line Out”, that integrated amplifier will look similar to Figure 2 can be configured as either a fixed or variable (above). -
Page 16: Simlink
750D’s brightness level will automatically adjust the If you are using your MOON 700i with an older brightness level of the 600i. MOON product such as a SuperNova, you will need to update the software of the older product to allow A third feature of SimLink™... -
Page 17: Remote Control Operation
The MOON 600i Dual-Mono Integrated Amplifier uses the ‘FRM-3’ full function, all aluminum backlit remote control (figure 3). It operates on the Philips RC-5 communication protocol and is can be used with other MOON components such as CD Players, DAC’s, Integrated Amplifiers, as well as other Preamplifiers. - Page 18 (3) seconds. The backlight will illuminate once, very briefly for confirmation. Remote operation with multiple MOON components Figure 4: Remote Operation with SimLink™ this system’s ZONE, the 180 MiND will turn on, as In figure 4 we have a 180 MiND Music Streamer will the 650D and 600i;...
-
Page 19: Troubleshooting
Amplifier via their respective 12V triggers (using a 1/8” mini-jack cable). When you turn on the 600i Troubleshooting Your MOON 600i is a “smart” integrated amplifier more) of your source components. You must equipped with a self-diagnostic system that will determine if there is any DC present. -
Page 20: Specifications
Pin 1 ......Ground Pin 2 ......Positive Pin 3 ......Negative NOTE: If you require the RS-232 codes for your MOON 600i, please contact Simaudio directly by email (service@simaudio.com) or toll-free telephone (877-980-2400). Fuse Replacement: For the 120V version use a 6A fast blow (3AG size).
Need help?
Do you have a question about the 600i Evolution Series and is the answer not in the manual?
Questions and answers