Table of Contents
Advertisement
Quick Links
Advertisement
Table of Contents

Related Manuals for Integra DTR-7.4


Summary of Contents for Integra DTR-7.4
- Page 1 AV Receiver DTR-7.4 Instruction Manual...
-
Page 2: Important Safety Instructions
WARNING: TO REDUCE THE RISK OF FIRE OR ELECTRIC SHOCK, DO NOT EXPOSE THIS APPARATUS TO RAIN OR MOISTURE. CAUTION: TO REDUCE THE RISK OF ELECTRIC SHOCK, DO NOT REMOVE COVER (OR BACK). NO USER-SERVICEABLE PARTS INSIDE. REFER SERVICING QUALIFIED PERSONNEL. -
Page 3: Precautions
AC outlet voltages vary from country to country. Make sure that the voltage in your area meets the voltage requirements printed on the DTR-7.4’s rear panel (e.g., AC 230 V, 50 Hz or AC 120 V, 60 Hz). Setting the [Standby/On] switch to Standby does not fully shutdown the DTR-7.4. -
Page 4: Table Of Contents
Important Safety Instructions ...2 Precautions ...3 Table of Contents ...4 Features ...6 Supplied Accessories ...6 Before Using the DTR-7.4 ...7 Installing the Batteries ...7 Using the Remote Controller ...7 Facilities and Connections Index Parts and Facilities ...8 Front Panels ...8 Front Panel Display ...10... - Page 5 Table of Contents —Continued Enjoying Music and Movies Enjoying Music or Videos with the DTR-7.4 ... 40 Basic Operation... 40 Temporarily turning off the sound ... 40 Listening with headphones ... 40 Temporarily Changing the Speaker Output Levels ... 41 Using the Sleep Timer (remote controller only) ...
-
Page 6: Features
AM loop antenna Remote controller & three batteries (AA/R6) *In catalogs and on packaging, the letter added to the end of the product name indicates the color of the DTR-7.4. Specifications and operation are the same regardless of color. Other Performance Features... -
Page 7: Before Using The Dtr-7.4
• You can set the transmission signal format to infrared (IR), or radio frequency (RF) for use with the optional RF Receiver. This is useful when, for exam- ple, the DTR-7.4 is installed in a rack or is not in line of sight of the remote controller. -
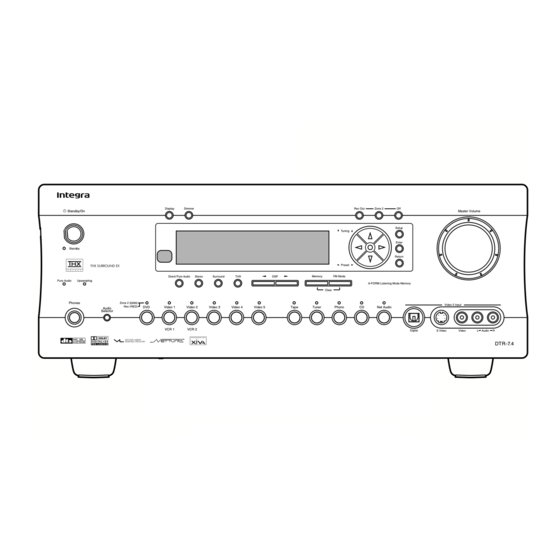
Page 8: Index Parts And Facilities
Index Parts and Facilities Here is an explanation of the controls and displays on the front panel of the DTR-7.4. The specifications for your model may differ due to regional requirements. Front Panels Standby/On Standby Pure Audio Upsampling Phones Zone 2 (... - Page 9 For further operational instructions, see the pages indi- cated in brackets [ ]. Standby/On button [27] This button is used to set the DTR-7.4 to On or Standby. In the standby state, the display is turned off and the DTR-7.4 cannot be operated.
-
Page 10: Front Panel Display
MODEL NO. RATING: AC 120 V AC OUTLETS SURR CENTER BACK/ SPEAKER ZONE 2 AC 120 V SPEAKERS SWITCHED TOTAL 120W 1A MAX. AC INLET ZONE 2 12 V TRIGGER OUT RS232 REMOTE CONTROL DTR-7.4 60 Hz 8.1 A 60 Hz... - Page 11 DVD recorder, see page 22; and to con- nect a digital satellite tuner, see page 22. PRE OUT [18, 25, 66] To use the DTR-7.4 as a preamplifier, connect a power amplifier to this jack. ANTENNA [14] These jacks are for connecting the FM indoor antenna and the AM loop antenna that are supplied with the DTR-7.4.
-
Page 12: Remote Controller
Remote Controller The DTR-7.4’s remote controller is a multipurpose device that can be used to control not just the DTR-7.4 but your other AV components as well. This section explains how its various operating modes can be used to control the DTR-7.4. When you use the Net-Tune mode, see page 74 for details. - Page 13 This button is used to access the onscreen setup menus (OSD) that appear on the TV. Muting button [40] This button is used to mute the DTR-7.4. This func- tion can be set only with the remote controller. All CH ST button [47] This button is used to select the All Ch Stereo listen- ing mode.
-
Page 14: Connecting Antenna
I Australian Models Insert the plug fully into the socket Once your DTR-7.4 is ready for use, you’ll need to tune into an FM radio station and adjust the position of the FM antenna to achieve the best possible reception. -
Page 15: Connecting An Outdoor Fm Antenna
Connecting Antenna—Continued Connecting an Outdoor FM Antenna If you cannot achieve good reception with the supplied indoor FM antenna, try using a commercially available outdoor FM antenna instead. Notes: • Outdoor FM antennas work best outside, but usable results can sometimes be obtained when installed in an attic or loft. •... -
Page 16: About Home Theater
This enables you to easily enjoy rich sound effects just like you were in a theater or concert hall at home. For the DTR-7.4, We recommend you to use the THX-certified THX speaker system for THX Surround EX playback. When playing a DVD, you can enjoy sound effects provided by DTS, Dolby Digital or THX, depending on recording formats. -
Page 17: Speaker Placement
Speaker Placement Before connecting the speakers, it is very important to place them properly to create the optimum sound space for your listening pleasure. During placement and connection, be sure to refer to the manuals and instructions that came with the speakers. Furthermore, be aware that for surround playback, the configuration and placement of your speakers are both very important. -
Page 18: Connecting Speakers
Caution: Connect only speakers with an impedance between 4 and 16 Ω to the DTR-7.4. If the impedance of even one speaker is between 4 and 6 Ω, be sure to set the speaker impedance setting accordingly (See page 30). -
Page 19: Av Cables And Connectors
AV Cables and Connectors • Always refer to the instructions that came with the component that you are connecting. • Do not plug in the power cord until all connections have been properly made. • For input jacks, red connectors (marked R) are used for the right channel, white connectors (marked L) are used for the left channel, and yellow connectors (marked V) are used for video... -
Page 20: Connecting To Audio/Video Equipment
The audio inputs and outputs require RCA-type connectors. DIGITAL IN/OUT On the rear panel of the DTR-7.4, there are three coaxial digital inputs, three optical digital inputs, and two optical digital outputs. To the digital inputs, connect CD players, LD players, DVD players, or other digital source components. -
Page 21: Connecting A Dvd Player (Dvd)
Using an RCA video connection cable, connect the video output jack (composite) of the DVD or LD player to the DVD VIDEO IN jack of the DTR-7.4. Or if the DVD or LD player has an S video output jack, connect it to the DVD S VIDEO IN jack with an S video connection cable. -
Page 22: Connecting A Dvd Recorder Or Other Digital Video Recording Device (Video 2)
VIDEO IN jack of the DTR-7.4 and connect the video input jack of the device to the VIDEO 2 VIDEO OUT jack of the DTR-7.4. Or if the device has S video input and output jacks, connect them to the VIDEO 2 S VIDEO IN and OUT jacks of the DTR-7.4 using S video... -
Page 23: Connecting Video Camera, Etc
Using an RCA video connection cable, connect the video output jack (composite) of the device to the Video 5 Video jack of the DTR-7.4. Or if the device has an S video output jack, connect it to the Video 5 S Video jack of the DTR-7.4 using an S video connection cable. -
Page 24: Connecting A Cassette Tape Deck, Md Recorder, Dat Deck, Or Cd Recorder (Tape)
Using RCA audio connection cables, connect the output jacks (PLAY) of the device to the TAPE AUDIO IN jacks of the DTR-7.4 and connect the input jacks (REC) of the device to the TAPE AUDIO OUT jacks of the DTR-7.4. -
Page 25: Connecting Auxiliary Power Amplifier
These jacks are for connecting an auxiliary power amplifier. You can use an auxiliary power amplifier to listen at louder volumes than you can with the DTR-7.4 alone. When using a power amplifier, connect each speaker to the power amplifier. -
Page 26: Connecting
Be aware that this function will not work if the power cord for the -connected component is connected to the AC OUTLET on the DTR-7.4, or if the DTR-7.4 has already been turned on. Direct change function When the play button is pressed on an component, the input source selected at the DTR-7.4... -
Page 27: Connecting The Power
Language Loca t ion RC- 550 M • Before you plug in the DTR-7.4, confirm that all con- nections have been made properly. • Turning on the power may cause a momentary power surge, which might interfere with other electrical equipment on the same circuit, such as computers. -
Page 28: Setup Menu
When making the various settings required to configure your DTR-7.4 for optimum performance, you can either use the OSD Menu that appears on your television monitor or you can use the display on the front of the DTR-7.4. The OSD Menu is a settings menu that is displayed on your TV monitor. -
Page 29: Navigating Through The Setup Menu
Navigating Through the Setup Menu You can change settings in the Setup Menu using the buttons on the front panel and on the remote controller. The buttons on the remote controller correspond to those on the DTR-7.4 as shown below. Display Dimmer Rec Out... -
Page 30: Selecting The Appropriate Setting For Your Connections
Note: The settings within the Hardware Setup Menu will need to be made before you use your DTR-7.4 for the first time. Once you have selected one of the Hardware Setup menu items, the setting will not be displayed again when you enter the Basic Menu. -
Page 31: Surr Back/Zone 2 Sub-Menu
IR IN terminal. The setting in this sub-menu tells the DTR-7.4 whether the remote control sensor is being used for operation of the DTR-7.4 in the main zone or the remote zone (Zone 2). 0-3.Remote Setup a.Position :Main b.Remote ID... -
Page 32: Changing The Remote Controller's Control Id
Note: If you change the remote controller’s ID, be sure to select the same ID on the DTR-7.4. For details on setting up the DTR-7.4’s remote control ID, refer to the previous “Remote Setup Sub-menu” section. The default ID for... -
Page 33: Speaker Config Sub-Menu
Selecting the Appropriate Setting for Your Connections —Continued Speaker Config Sub-menu Use this sub-menu to enter which speakers are connected and the size of each speaker. For your reference to speaker size settings, if the diameter of your speaker unit is larger than 6-1/2” (16 cm), use the “Large”... -
Page 34: Level Calibration Sub-Menu
–12 and +12 decibels in 1 decibel increments. For subwoofer, values between –15 and +12 dB can be set.) The DTR-7.4 will now emit the pink noise from the center speaker. Using the cursor buttons,... -
Page 35: Configuring Input Settings Suitable For Your Connections
Selector To Change the Display of the Input Source from TAPE to MD If you connected an MD recorder to the TAPE jack on the DTR-7.4, you can have “MD” appear when the Tape source button is pressed. DTR-7.4 Tape... -
Page 36: Input Setup
→Advanced Menu [ENTER]Quit:[SETUP] The illustrations used here represent the remote controller. When you perform the procedures on the DTR-7.4, use the corresponding buttons on the front panel. Press the Input button, and then Input roll the scroll wheel to select the input source. - Page 37 This is not a malfunction. In such cases, try playing the source with the “DTS” selected. • The DTS indicator on the DTR-7.4 lights while a DTS source is played. When playback finishes and the DTS signal transmission stops, the DTR-7.4 remains in DTS mode and the DTS indicator remains lit.
-
Page 38: Multichannel Setup Sub-Menu
----: Set this option when you do not want any video inputs to be displayed. b. Component Video Use this setting if you connect monitors like TV to the COMPONENT VIDEO OUTPUT jacks on the DTR-7.4. 2-3.Video Setup Input:DVD a.Video :DVD b.Component Video... - Page 39 None: No video signals are assigned. When you select “None,” the OSD screen disappears. If you want to change this setting later on, use the front panel display on the DTR-7.4.
-
Page 40: Enjoying Music Or Videos With The Dtr-7.4
Enjoying Music or Videos with the DTR-7.4 Though the DTR-7.4 is often used to listen to the radio, it does not show you its true ability until it is used to play music or watch videos, DVDs, and the like. The DTR-7.4 has the latest state-of-the-art features to play... -
Page 41: Temporarily Changing The Speaker Output Levels
Tone button after you complete step 3 in the proce- dure above. Using the Sleep Timer (remote controller only) With the sleep timer you can set the DTR-7.4 so that it automatically turns off after a set period. Press the scroll wheel, and then... -
Page 42: Switching The Display
Enjoying Music or Videos with the DTR-7.4—Continued Display Display Dimmer Standby/On Standby Direct / Pure Audio Stereo Surround Pure Audio Upsampling Phones Zone 2 ( Rec ( Audio Video 1 Video 2 Video 3 Video 4 Video 5 Selector VCR 1... -
Page 43: Changing The Audio Mode
Enjoying Music or Videos with the DTR-7.4 —Continued Changing the audio mode The DTR-7.4 accepts analog, digital and multichannel signals for audio input. You can choose which kind of signal to be played for a specific device. Press the Input button, and then... -
Page 44: Using The Listening Modes
Using the Listening Modes The DTR-7.4’s surround sound enables you to enjoy movie theater or concert hall quality sound in your home. The configuration of the speakers is very important for the surround sound effect. Refer to “About Home Theater” on page 16. - Page 45 A list of movies created using this technology can be found on the Dolby web site at http://www.dolby.com. The DTR-7.4 can play the 5.1 channel sources in THX surround EX mode, even if the source is not encoded in Dolby Digital Surround EX format. In...
-
Page 46: Selecting The Listening Mode
Direct Display Muting listening mode or Pure Audio listening mode. When you Step / Slow Random use the buttons on the DTR-7.4 for this operation, with Audio Subtitle Angle Last Memory Surround... - Page 47 TV Logic ALL Ch Stereo *1 On the DTR-7.4, use the Direct/Pure Audio button for selecting these listening modes. *2 Available only when the surround back speakers are connected to the DTR-7.4. *3 Available only when the input source is encoded in the DTS 96/24 format.
-
Page 48: Listening To Radio Broadcasts
Listening to Radio Broadcasts One of the features of the DTR-7.4 that is most fre- quently used is its ability to play FM and AM broadcast radio stations. The DTR-7.4 provides a number of listen- ing modes perfect for listening to the radio and getting the most out of your audio system. -
Page 49: Presetting A Radio Station
Memory FM Mode Clear You can enter text names for any of the preset radio stations (See page 52). Selecting a preset radio station When using the DTR-7.4: Tuner Tuning Preset Flashes When using the remote controller: Input... -
Page 50: Recording A Source
S Video Video Audio record the music or video that is being played in the DTR-7.4 main zone. • If you select FM (or AM) with the Tuner input source button when the recording source is set to AM (or FM), the output for the recording source also changes to AM (or FM). -
Page 51: Recording The Video From One Source And The Audio From Another
Video 5 Input to video cas- sette tape in a video cassette recorder connected to the VIDEO 1 OUT jack. The illustrations used here represent the DTR-7.4. Press the CD input source button. Set “VIDEO 5” for the Video setting in the Video Setup sub-menu of the Setup menu: Input Setup →... -
Page 52: Input Setup (Basic)
The illustrations used here represent the remote control- ler. When you perform the procedures on the DTR-7.4, use the corresponding buttons on the front panel. Press the Input button, and then... -
Page 53: Adjusting The Volume Differences Between Components (Intellivolume)
When switching input sources, you may find that the output level for different components or input sources connected to the DTR-7.4 is different even though the main volume setting is the same. Under normal circum- stances, you would then have to change the volume set- ting each time you change the input source. -
Page 54: Audio Adjust (Basic)
Press the Setup button to exit. Adjusting the Bass and Treble Sound (Tone Control) Standby This sub-menu allows you to adjust the bass and treble Input sounds. @. - ' / TV CH DTR-7.4 PQRS WXYZ TV VOL Clear --/--- Direct Tuning Custom Macro... -
Page 55: Setting The Various Sound Effects (Sound Effect)
This can be set to either “Off” or “Low,” or “High.” On the remote controller, press the scroll wheel, and then press the L Night button repeatedly. However, when the DTR-7.4 enters the standby state, this setting returns to the default setting (“Off”). Notes: •... -
Page 56: Input Setup (Advanced)
5.Network Setup →Basic Menu [ENTER]Quit:[SETUP] With the DTR-7.4, you can set a different listening mode for each different signal type that comes from each input source. For example, if your DVD player also plays com- pact discs and the DVD video signal is Dolby Digital and the compact disc signal is PCM, then you can set a differ- ent listening mode for each. -
Page 57: Audio Adjust (Advanced)
Input Setup (Advanced)—Continued 2-6.ListeningMode Preset Input:DVD a.Analog/PCM :Last Valid b.PCM fs=96k :Last c.Dolby D :Last Valid d.DTS :Last Valid e.D.F.2ch :Last Valid f.D.F.Mono:Last Valid Quit:[SETUP] a. Analog/PCM Analog sources consist of LP records, FM and AM broadcasts, cassette tapes, and the like. PCM (Pulse Code Modulation) is one form of digital audio signal and is recorded directly onto compact discs and DVDs with- out compression. -
Page 58: Setting The Low Frequency Effect Levels (Lfe Level)
filters, loudspeaker response, and screen loss. Some films have been transferred to video without such a high- frequency rolloff, and thus sound overly bright and hissy. The DTR-7.4 includes this “Academy Filter,” which is based on contemporary playback practices for such films over wide-range systems. -
Page 59: Theater-Dimensional Sub-Menu
Audio Adjust (Advanced)—Continued Theater-Dimensional Sub-menu Select this to modify the Theater-Dimensional (T-D) lis- tening modes. 3-7.Theater-Dimensional a.Listening Angle b.Center :Off c.Front Expander:Off d.Virtual Surr Level : 0dB e.Dialog Enhance:Off Quit:[SETUP] a. Listening angle The listening angle is the angle subtended by the front left and right speakers as seen from the listener. - Page 60 Audio Adjust (Advanced)—Continued c. Dolby Digital EX (Dolby D) If you have surround back speakers connected, use this setting to select whether or not you will use Dolby EX playback. Auto: When the source has an EX flag (ID signal for Surround EX), the playback is automatically changed to Dolby Digital EX.
-
Page 61: Thx Sub-Menu
You can use the Re-EQ button on the remote controller for setting “On” or “Off.” This setting returns to the default setting (“On”) when the DTR-7.4 enters the standby state. b. Decoder (2ch) This setting allows you to select the decoding mode for THX processing. -
Page 62: Preference (Advanced)
To not set a maximum volume, select “Off.” d. Power On Volume This sets a designated volume to which the DTR-7.4 will be set every time that the power is turned on. This pre- vents the DTR-7.4 from suddenly outputting very loud sounds if it is turned on while it is set to an extremely high volume. -
Page 63: Adjusting The Headphone Volume Level (Headphones Level)
Preference (Advanced)—Continued Adjusting the Headphone Volume Level (Headphones Level) If you notice a large difference in the volume when listening with the headphones than when listening to the speakers, you can change the headphone volume level so that you do not have to make adjustments with the main volume dial each time you put on the headphones. -
Page 64: Enjoying Analog Multichannel Audio Playback
Connecting to Devices with Analog Multichannel Output Connect the MULTI CH INPUT jacks of the DTR-7.4 to the 5.1 channel output jacks of the device. Make sure that you properly connect the left channels to the L jacks and the right channels to the R jacks. -
Page 65: Playing Analog Multichannel Audio
The illustrations used here represent the remote control- ler. When you perform the procedures on the DTR-7.4, use the corresponding buttons on the front panel. Press the Input button, and then... -
Page 66: Enjoying Music In The Remote Zone
With this connection method you can use 5.1 surround sound in the main room and play a different source in Zone 2. Zone 2’s volume is adjusted on the DTR-7.4. • Set the Surr Back/Zone2 setting to Zone 2 (see page 67). -
Page 67: Performing The Settings For The Remote Zone (Zone 2)
Enter Return Video 5 Input Digital S Video Video Audio DTR-7.4 Enter Enter Enter Note: When the SURR BACK/ZONE 2 outputs (SPEAKERS and PRE OUT) are set to Zone 2, listening modes that need surround back speakers (i.e., Dolby Digital EX, DTS-ES, and THX Surround EX) are not available. -
Page 68: Enjoying Music In The Remote Zone
Notes: • If the Sleep function has been set, any Zone 2 compo- nent will turn off along with the DTR-7.4 when the specified sleep time expires. To use the Sleep function with Zone 2 only, set the Sleep function and then set the DTR-7.4 to Standby. -
Page 69: Operating Components Not Reached By The Remote Controller Signals (Ir In/Out)
If Remote Controller Signal Does not Reach the DTR-7.4 Remote Sensor If the DTR-7.4 is located inside a cabinet or other enclosure where the infrared rays from the remote controller cannot enter, then operation with the remote controller will not be possible. -
Page 70: Using The Remote Controller With Radio Frequency
RF receiver to pick up commands from the remote controller, which are then fed to the DTR-7.4 via its IR IN socket. For this to work, you must assign the same ID and channel to the remote controller and RF receiver. -
Page 71: Using An External Device With 12V Trigger Terminal
They output 12 volts (100 milliamperes max). The ZONE 2 TRIGGER OUT out- puts 12 volts while the DTR-7.4 is in Zone 2 mode. The A and B outputs can be assigned to input sources, in which case, the assigned trigger output outputs 12 volts while the input source is selected. -
Page 72: Enjoying Net Audio
Enjoying Net Audio Features The DTR-7.4 is a network audio client that is con- nected via a LAN to the Network Audio Server with Net-Tune System Protocol and allows you to enjoy music files saved on the server, as well as Internet radio, from anywhere in your home. -
Page 73: Connecting The Dtr-7.4 To Your Ethernet Network
Enjoying Net Audio —Continued Connecting the DTR-7.4 to Your Ethernet Network Plug one end of an Ethernet CAT-5 cable into the port on the backside of the DTR-7.4 and the other end into the gateway. DTR-7.4 DIGITAL PRE OUT AUDIO... -
Page 74: Using The Remote Controller
Enjoying Net Audio—Continued Using the Remote Controller To select Net-Tune mode, press the Mode button, and then roll the scroll wheel until “NET-T” appears on the display. Note: While neither the Input button nor Mode button is illu- minated, the scroll wheel changes the input source and remote controller mode simultaneously. - Page 75 Enjoying Net Audio —Continued Number/letter buttons [82] These buttons are used to enter numbers and letters when searching for music in your Network Audio Server. Mode button [80, 82] This button is used with the scroll wheel to select the remote controller modes. Press this button first, and then roll the scroll wheel until “NET-T”...
-
Page 76: Network Setup Menu
Display Muting Network Setup Menu Before you can use the DTR-7.4 to play music contained in the music library on the Network Audio Server and listen to Internet radio, you must correctly configure the DTR-7.4’s network settings so that it can connect to your LAN and the Internet. -
Page 77: Ip Address Sub-Menu
Referring to the documentation from your ISP, enter the IP address and subnet mask assigned to your DTR-7.4 as well as the IP addresses of the default gateway and DNS server. After the necessary settings are complete, press the Return button to go back to “5. -
Page 78: Mac Address Sub-Menu
Quit:[SETUP] a. Client Name Shows the name used on the Network Audio Server. The client name has already been set by the DTR-7.4. b. Wakeup on LAN (Network connection status) Sets whether to leave the network connection open or not while the DTR-7.4 is in the standby state. - Page 79 Enjoying Net Audio—Continued Use the cursor buttons to select the sub-menu that you want to enter and then press the Enter button. Use the cursor buttons to select an item and then use the cursor buttons to set the desired value. Press the Setup button to return to the main menu.
-
Page 80: Enjoying Internet Radio
Mode button is illuminated, rolling the scroll wheel to select IRD (Internet Radio). “NET-T” appears on the bottom line. On the DTR-7.4, press the Net Audio button. This button switches between two alternative settings: Server and Internet Radio. Press the Display button on the remote controller. - Page 81 Press the Enter button. Buffering starts with the following mes- sage displayed. Enter When the buffering is complete, the DTR-7.4 starts playback of the broad- cast. Note: If you’re using a narrowband Internet connection (e.g., 56K modem, ISDN), depending on the station, Internet radio may not work satisfactorily.
-
Page 82: Playing A Music File Saved On The Network Audio Server
Audio Server starts up. It may take a second. Turn on the DTR-7.4. When you connect the DTR-7.4 to the net- work the first time, it will be connected to the first server found. While either the Input button nor... - Page 83 All → Off. Repeat 1: Repeats the current track only. Repeat All: Repeats the tracks in the currently selected mode. Repeat Off: Repeat mode is disabled. You can operate the DTR-7.4 when playing and when stopped. button in step 1. button.
-
Page 84: Operating Onkyo Products Using The Remote Controller
Controller The RC-550M remote controller is a useful tool that can not only operate the DTR-7.4, but also all the other com- ponents of your home theater as well. To operate any component, first press the Mode button on the remote controller that corresponds to the component that you wish to control. - Page 85 Setup/Guide button This button is used to access the DVD player’s onscreen setup menus. Muting button This button is used to mute the DTR-7.4. This func- tion can be set only with the remote controller. Play button This button is used to start DVD playback.
-
Page 86: Cd Mode
This button is used to set the volume of the DTR-7.4. Muting button This button is used to mute the DTR-7.4. This func- tion can be set only with the remote controller. Play button This button is used to start CD playback. -
Page 87: Minidisc Mode
This button is used to set the volume of the DTR-7.4. Muting button . To select This button is used to mute the DTR-7.4. This func- tion can be set only with the remote controller. Play button This button is used to start MiniDisc playback. -
Page 88: Tape Mode
This button is used to set the volume of the DTR-7.4. Muting button This button is used to mute the DTR-7.4. This func- tion can be set only with the remote controller. Play button This button is used to start tape playback. -
Page 89: Using The Remote Controller With Other Components
DVD player. This is the default setting, so if you’re using , you don’t need to change it. Point the remote controller at the DTR-7.4 to operate the DVD player. 5002: Use this code if your DVD player doesn’t have socket, or you’re not using... -
Page 90: Remote Control Codes
DVD (DVD Player) Manufacturer Control code Aiwa 5010 Apex 5015, 5016 Denon 5017, 5020 5003 Hitachi 5009 Integra 5001, 5002 Integra Research 5001, 5002 5023 Kenwood 5017 Magnavox 5004 Marantz 5025, 5026 Mitsubishi 5005 Onkyo 5001, 5002 Panasonic 5011, 5017, 5020... - Page 91 Using the Remote Controller with Other Components—Continued Manufacturer Control code 2010, 2011, 2012, Sylvania 2014 Symphonic 2012 Tandy 2007 Teac 2012 Technics 2010 Teknika 2010, 2012 Toshiba 2013, 2015 Totevision 2008 Unitech 2008 Vector Research 2005, 2006 Video Concepts 2005, 2006 2008, 2010, 2012, Wards 2013, 2017...
-
Page 92: Controlling A Satellite Receiver
Standby CH/Disc +/– Select satellite channels Select menu items Enter Confirm selection Number buttons Enter numbers The following buttons control the DTR-7.4. Adjust the DTR-7.4 volume Muting Mute the DTR-7.4 Controlling a VCR Input TV CH TV VOL Scroll wheel... -
Page 93: Controlling A Cable Receiver
TV regardless of the currently selected remote control- ler mode. These buttons do not work with the additional TV modes. The following buttons control the DTR- 7.4. Adjust the DTR-7.4 volume Muting Mute the DTR-7.4 Controlling a Cable Receiver Standby TV CH +/–*... -
Page 94: Learning Commands From Another Remote Controller
LIGHT, Customs, Macro, Mode, Input, Zone 2, and the scroll wheel button. • The DTR-7.4’s remote controller can learn a total of 150 commands. However, the commands of some remote controllers may use a lot of memory, in which case, this total will be reduced. -
Page 95: Using Macros
DTR-7.4: 1. Press the scroll wheel, (to select AMP mode). 2. Press the On button (to turn on the DTR-7.4). 3. Roll the scroll wheel to select CD (to select the CD remote controller mode and the CD input source). -
Page 96: Editing Remote Controller Modes
Using the Remote Controller with Other Components—Continued Running Macros Programmed macros can be run as follows. Press the Macro button. Roll the scroll wheel to select the macro’s number, and then press the scroll wheel. The actions in the macro are per- formed in the order in which they were programmed. - Page 97 Using the Remote Controller with Other Components—Continued Roll the scroll wheel to select the type of mode you want to add, and then press the scroll wheel. You can add up to 8 additional modes: 4 DVD, 2 TV, 1 VCR, and 1 CBL. Reordering the Remote Controller Modes You can change the order in which the remote controller modes appear when you roll the scroll wheel.
-
Page 98: Resetting The Remote Controller
Using the Remote Controller with Other Components—Continued Roll the scroll wheel to select the mode you want to delete, and then press the scroll wheel. If the mode is deleted successfully, after “OK” has been displayed, the DEL dis- play (step 3) reappears. Assigning Remote Controller Modes With this function you can assign a remote controller mode to an input source. -
Page 99: Troubleshooting Guide
If a problem occurs while you are using the remote controller, first try to operate the controls on the front panel of the DTR-7.4 to make sure that it is not due to a malfunction (or dead batteries) in the remote controller. -
Page 100: Video And Audio
(See pages 76 to 79). Make sure that your system satisfies all the system requirements listed on page 72. When you play WAVE files on multiple DTR-7.4, the playback sound may discontinue because of net- work overload. In this case, deploying another inde-... -
Page 101: Remote Controller
Network Audio Server to create the list of audio files saved on the server. Turn off the power of the DTR-7.4 and turn it on again (When the DTR-7.4 is without a power switch, unplug the power cord and plug it in again). -
Page 102: If One Of The Messages Shown Below Appears
* To reset the surround mode and other settings to the factory default settings, hold down the Video 1 button with the DTR-7.4 turned on and then press the Standby/On button. “CLEAR” appears in the front display and the DTR-7.4 enters the standby state. -
Page 103: Specifications
Specifications AMPLIFIER SECTION Power output (USA model) (FTC): All channels: 100 W per channel min. RMS into 8 Ω, 2 channels driven from 20 Hz to 20 kHz with no more than 0.08% total harmonic dis- tortion. 130 W min. RMS into 6 Ω, 2 channels driven, 1 kHz with no more than 0.1% total harmonic distortion. - Page 104 Integra Division of ONKYO U.S.A. CORPORATION 18 Park Way, Upper Saddle River, N.J. 07458, U.S.A. Tel: 201-785-2600 Fax: 201-785-2650 http://www. integrahometheater.com Integra Division of ONKYO CORPORATION Sales & Product Planning Div. : 2-1, Nisshin-cho, Neyagawa-shi, OSAKA 572-8540, JAPAN Tel: 072-831-8023 Fax: 072-831-8124...
Need help?
Do you have a question about the DTR-7.4 and is the answer not in the manual?
Questions and answers