Table of Contents
Advertisement
Quick Links
Download this manual
See also:
Specification Manual
Advertisement
Table of Contents

Subscribe to Our Youtube Channel
Related Manuals for Opticon OPI 4002


Summary of Contents for Opticon OPI 4002
- Page 1 OPI 4002 Wireless 1D/2D Scanner Instruction Manual...
-
Page 2: Serial Number
Opticon assumes no liability for any direct, indirect, consequential or incidental damages arising out of use or inability to use both the hardware and software, even if Opticon has been informed about the possibility of such damages. -
Page 3: Table Of Contents
3.1.1. Handheld Scanner Hand Strap....................10 3.2. USB Dongle (OPA 1001) ....................11 3.2.1. USB Dongle LED Indicator .....................11 3.3. CHG 4001 (Charging Cradle for OPI 4002 Handheld Scanner)........12 3.3.1. Battery Charging Time......................12 4. Battery Pack...........................13 4.1. Using the Charging Cradle.....................13 4.2. Scanner LED Indicator State..................13 4.3. - Page 4 Figure 7: Replacing the scanner battery ..................14 Figure 8: Aiming guide for barcode scanning................17 Tables Table 1: OPI 4002 Handheld Scanner components ..............10 Table 2: OPA 1001 USB Dongle LED Indicator................11 Table 3: CHG 4001 charging cradle components ..............12 Table 4: Scanner status—LED indicator state................13 Table 5: Default settings: readable codes ..................19...
-
Page 5: Overview
This manual applies only to the wireless interface. Specifications and additional detailed settings are available in the OPI 4002 Master Specifications and the Universal Menu Book. 2. Safety, Regulations, and Handling This instruction manual includes the following symbols and markings to help you use this product properly and safely. -
Page 6: Medical Equipment
Opticon OPI 4002 Instruction Manual WARNING PRODUCT HANDLING Do not throw this device into a fire. Doing so may cause the battery case to burst, resulting in injury or possibly acting as an accelerant for the fire. Do not immerse this product. -
Page 7: Radio Equipment
Opticon OPI 4002 Instruction Manual 2.4. Radio Equipment This device complies with Part 15 of the FCC Rules, which states that this device may not cause harmful interference and this device must accept any interference received, including interference that may cause undesired operation. -
Page 8: Battery Handling
This makes it possible to collect and recycle used batteries and to save the environment. Note: The batteries used in Opticon products comply with California Perchlorate Best Management Practices Regulations and the Law for the Promotion of Utilization of... -
Page 9: Package Contents And Detailed View
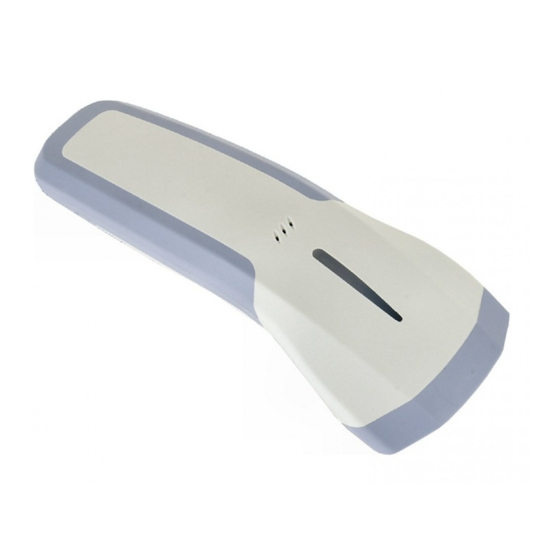
OPI 4002 (scanner) with battery* • Hand strap • OPA 1001 (USB dongle) • Dedicated AC adapter (6V/750mA) • Instruction manual (this document) 3.1. Scanner (OPI 4002) Figure 1 and Table 1 identify the scanner components. Figure 1: OPI 4002 handheld scanner... -
Page 10: Handheld Scanner Hand Strap
Negative contact point for the charging base. * When using the dedicated charger CHG 4001 (optional), the power will be supplied via the feeding terminals. Table 1: OPI 4002 Handheld Scanner components Handheld Scanner Hand Strap 3.1.1. Use the hand strap (Figure 2) to avoid dropping the handheld scanner while carrying it. -
Page 11: Usb Dongle (Opa 1001)
Opticon OPI 4002 Instruction Manual 3.2. USB Dongle (OPA 1001) A dongle is a mechanism for ensuring that only authorized users can copy or use specific software applications. Common mechanisms include a hardware key that plugs into a parallel, serial, or USB port on a computer and that the software application accesses for verification before continuing to run. -
Page 12: Chg 4001 (Charging Cradle For Opi 4002 Handheld Scanner)
Opticon OPI 4002 Instruction Manual 3.3. CHG 4001 (Charging Cradle for OPI 4002 Handheld Scanner) Figure 5 and Table 3 describe the handheld scanner charging cradle and its components. Figure 5: CHG 4001 charging cradle Name Functions Scanner identification serial number Identifies product and serial number. -
Page 13: Battery Pack
To fully charge the main battery, connect the dedicated AC adapter or plug the scanner into the charging cradle. 4.1. Using the Charging Cradle Figure 6 shows the procedure for inserting the OPI 4002 handheld scanner into the CHG 4001 charging cradle. Figure 6: Inserting the scanner into the charging cradle 4.2. -
Page 14: Replacing The Handheld Scanner Battery
The illustration on the right shows the process in reverse. 5. Wireless Connection The interface used by the OPI 4002 Handheld Scanner and the OPA 1001 USB Dongle complies with the wireless communication standard IEEE 802.15.4. The dongle is a receiver for the scanner. -
Page 15: Settings Via Menu Barcodes
Opticon OPI 4002 Instruction Manual 5.2. Settings via Menu Barcodes The wireless connection can be configured by reading the barcodes listed in this document, beginning on page 21. • Register the scanner with the host computer by scanning the IEEE address barcode label on the USB dongle (see 5.4.2 Connecting the Scanner on page... -
Page 16: Connecting The Scanner
Opticon OPI 4002 Instruction Manual Connecting the Scanner 5.4.2. 1. Connect the USB dongle to the host computer and make sure a green LED is blinking. 2. Press the trigger key to start the reading operation. 3. Scan the IEEE address barcode label “A4xxxxxxxx” on the USB dongle to register the scanner. -
Page 17: Aiming Guide
Opticon OPI 4002 Instruction Manual 6.1. Aiming Guide The following chart is an aiming guide that approximates the conditions for achieving a proper scan. Figure 8: Aiming guide for barcode scanning A recommended aiming point is where two LED light patterns (green square-shaped symbols on the chart) overlap or are positioned together. -
Page 18: Appendix A: Default Settings
Opticon OPI 4002 Instruction Manual 7. Appendix A: Default Settings 7.1. Default Settings 1: Readable Codes Refer to the Product Specification Manual and the Universal Menu Book for readable barcodes. Table 5 shows a list of default readable codes. Reading... -
Page 19: Table 5: Default Settings: Readable Codes
Opticon OPI 4002 Instruction Manual Reading Transmit Transmit Calculate Transmit Prefix Suffix Code type Code Other Settings Settings Length RSS Limited Standard Expanded Stacked EAN-13 Composite EAN-13 EAN-13 EAN-8 CCA EAN-8 CCB UPC-E CCA UPC-E CCB UPC-A CCA Composite UPC-A CCB... -
Page 20: Default Settings 2: Read Options, Trigger, Buzzer
Opticon OPI 4002 Instruction Manual Notes: 1) In the Reading column, “ ” means Enable Reading and “X” means Disable Reading. 2) In the Transmit Code Length column, “ ” means Transmit Code Length and “X” means “Do Not Transmit Code Length. -
Page 21: Appendix B: Menu Barcodes
Instruction Manual 8. Appendix B: Menu Barcodes This section contains the menu barcode labels for the OPI 4002 default settings. Other menu labels, such as Code Options, String Options, Read Options, and Indicator Options are listed in the Universal Menu Book. Refer to this guide when programming the scanner for optimal performance. -
Page 22: Changing The Wireless Communication Channel
Opticon OPI 4002 Instruction Manual 8.3. Changing the Wireless Communication Channel Use the following barcodes to change the wireless communication channel. Code39 labels QR code labels _ZZ_ _CH11_ CH11 _CH12_ CH12 _CH13_ CH13 _CH14_ CH14 Communication channels _CH15_ CH15 * Alternative... -
Page 23: Memorizing Options
Opticon OPI 4002 Instruction Manual Code39 labels QR code labels _CH22_ CH22 _CH23_ CH23 _CH24_ CH24 _CH25_ CH25 _CH26_ CH26 _ZZ_ Table 9: Wireless communication channel barcodes 8.4. Memorizing Options Code39 labels QR code labels _ZZ_ _DTME_ DTME Enabled Memorizing...
Need help?
Do you have a question about the OPI 4002 and is the answer not in the manual?
Questions and answers