Jøtul F 50 TL Installation And Operating Instructions Manual
Hide thumbs
Also See for F 50 TL:
- Installation and operating instructions manual (28 pages) ,
- Installation and operating instructions manual (28 pages)

Related Manuals for Jøtul F 50 TL


Summary of Contents for Jøtul F 50 TL
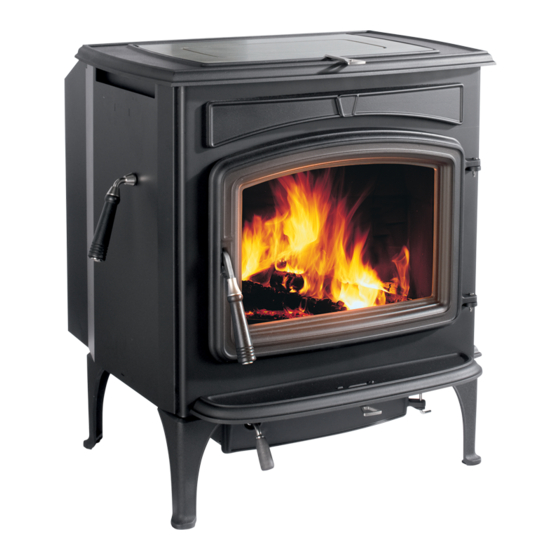
- Page 1 Jøtul F 50 TL Rangeley Installation and Operating Instructions for USA and Canada Keep these instructions for future reference.
-
Page 2: Table Of Contents
Spark Screen #157232 Use Solid Wood Fuel Only ............ 14 Enjoy the warmth of open door fire-viewing with use of How your Jøtul F 50 TL works ..........14 this custom fit spark screen. Controling the Fire ..............14 5.4 Air Control Settings ............... 15 Stove-Top Thermometer #5002 Top Loading Feature .............. - Page 3 Always consult your local building inspector or The Jøtul F 50 TL wood stove is only listed to burn solid authority having jurisdiction to determine what wood only. Do not burn any other fuels.
-
Page 4: Safety Notices
139262 Rev_H 9 / 11 / 2012 Safety Notices • We recommend that this stove be installed • Burn solid wood fuel only by a professional solid fuel technician or that you consult one if you do the work • Do not use chemicals or fluids to start the fire. yourself. Also, consult your insurance Do not burn garbage or flammable fluids. -
Page 5: Installation
139262 Rev_H 9 / 11 / 2012 1.0 Installation 27 1/4” (692 mm) If this solid fuel room heater is not properly installed, a house fire may result. For your safety, follow the installation directions. Contact the local building or fire officials about restrictions and installation inspection requirements in your area. -
Page 6: Flue Collar Installation
139262 Rev_H 9 / 11 / 2012 1.2 Flue Collar Orientation Figure 2. Flue Collar heat shield attachment. The Flue Collar is oriented in the Top Exit position. To change orientation to Rear Exit: 1. Twist and remove the perforated cut-out section from the top edge of the rear shroud. -
Page 7: Chimney Requirements
2.1 Masonry Chimneys struction is desired, the installation must conform with NFPA 211 or CAN/CSA-B365, and is also addressed in this Follow these guidelines when installing the Jøtul F 50 TL manual. into a masonry fireplace: • Do not connect this stove to a chimney flue serving •... -
Page 8: Prefabricated Chimneys
139262 Rev_H 9 / 11 / 2012 2.2 Prefabricated Chimneys Figure 7. 2’ A prefabricated metal chimney must be tested and Chimney Height 61 cm 3’ listed for use with solid fuel burning appliances. High Requirement. 10’ 91.5 cm Temperature (HT) Chimney Standard UL 103 for the U.S. and 305 cm High Temperature Standard ULC S-629 for Canada. -
Page 9: Connecting To The Chimney
Use extreme care when The Jøtul F 50 TL may be installed into a masonry fireplace constructing the hole in the chimney liner as the tiles can with a minimum opening height of 30 1/2”... -
Page 10: Prefabricated Chimneys
The cross-sectional area of the flue of a chimney with one or more walls exposed to the outside below the roofline The Jøtul F 50 TL is approved for installation in may be no more than two times the cross-sectional area of manufactured mobile homes provided the following the stove flue collar. -
Page 11: Clearances To Combustibles
139262 Rev_H 9 / 11 / 2012 4.0 Clearance to Combustibles 4.1 Floor Protection The Jøtul F 50 TL includes a bottom heat shield which must be installed unless the stove is on a concrete floor poured 2” on earth. -
Page 12: Alcove Installation
(1511 mm) Figure 13. Alcove with Unprotected Walls. Figure 14. Alcove with Wall Protection. 4.4 Alcove Installation The Jøtul F 50 TL can be installed in an alcove as diagrammed in figs. 13.-14. 1. The stove must be installed only with double-wall chim- ney connector. 2. Wall and ceiling protection, if used, must extend over the entire area. -
Page 13: Clearance Diagrams
139262 Rev_H 9 / 11 / 2012 4.6 Jøtul F 50 TL Clearance Specifications PROTECTED WALLS UNPROTECTED WALLS PER NFPA211 OR CAN/CSA -B365-M93 SIDE REAR CORNER SIDE REAR CORNER Single Wall Connector 14” / 356 mm 18” / 457 mm 12” / 305 mm 12” / 305 mm 8”... -
Page 14: Operation
ALWAYS WEAR STOVE GLOVES WHILE TENDING THE FIRE. NEVER ALLOW THE FIRE TO REST DIRECTLY ON THE GLASS. KEEP THE LOGS SPACED AT LEAST ONE INCH FROM Please read the following section before building the first THE GLASS TO ALLOW FOR PROPER AIR FLOW WITHIN THE fire in your new Jøtul F 50 TL. STOVE. AVOID STRIKING THE GLASS WITH LOGS. OPERATE THIS STOVE ONLY WITH THE FRONT DOOR 5.1 Use Solid Wood Fuel Only AND ASH DOOR FULLY CLOSED. OPERATION WITH THE This stove is designed to burn natural wood only. Wood DOOR PARTIALLY OPEN MAY RESULT IN OVER-FIRING. -
Page 15: Air Control Settings
139262 Rev_H 9 / 11 / 2012 5.4 Air Control / Blower Settings 5.6 Break-In Procedure Although your Jøtul F 50 TL is constructed of welded, 1/4” Use the following guide for best performance. steel plate, it also incorporates cast iron components. This... -
Page 16: Starting And Maintaining A Fire
139262 Rev_H 9 / 11 / 2012 5.7 Starting and Maintaining a Fire 5.8 Adding Fuel Burn only solid wood directly on the bottom grate of the Follow this procedure when reloading the stove while it is stove. Do not elevate the fire in any way. still hot and a bed of hot embers remains: WARNING: DO NOT OPERATE THIS STOVE WITH THE ASH •... -
Page 17: Creosote And The Need For Removal
139262 Rev_H 9 / 11 / 2012 5.10 Creosote Formation and the 5.11 Ash Removal Need for Removal Ashes will drop through the bottom grate into the inter- nal ash pan during normal operation. Empty the ash pan When wood is burned slowly, it produces tar and other periodically, depending on how frequently the stove is used. -
Page 18: Maintenance
Important: Replace glass only with ceramic glass panel and fly ash off of the glass. If these deposits are allowed PN 224158 specifically designed for the Jøtul F 50 TL to remain on the glass for an extended period of time, the Do not use substitutes. -
Page 19: General Care
6.6 Chimney System As with your car, regular maintenance will assure good The Jøtul F 50 TL is designed to burn cleanly and efficiently performance and prolong the life of your stove. The when used according to the guidelines in this manual. In... -
Page 20: Appendix
139262 Rev_H 9 / 11 / 2012 2. Attach the Air Deflector: See figs. 21 and 22 /#3. 7.0 Appendix Use pliers to bend the deflector tabs at the perforation lines as shown. Attach the deflector to the interior side of the rear shroud using two #8 X 12 sheet metal screws from the exterior side. 7.1 Optional Blower 156431 BEND Tools Required... - Page 21 139262 Rev_H 9 / 11 / 2012 Figure 23. Blower Parts Identification. Lower Air Deflector Blower Assembly Snapstat Blower Mounting Bracket Snapstat Bracket Air Deflector M6 Flange Hex Nut (3) Control Box Assembly M6 Wingnut (2) Control Box Bracket 10. #8 x 1/2” sheet metal screws (9) 8.
-
Page 22: Outside Air Kit Installation
139262 Rev_H 9 / 11 / 2012 Front Manifold Main Manifold M6 Hex Nuts, M6 Hex Nuts 4” Duct Collar #8 x 12 Sheet M6 Hex Nuts, Metal Screws Outside Air Bottom Heat Shield Figure 25. Outside Air Kit parts identification and orientation. 7.2 Outside Air Kit 157320 Contents: •... -
Page 23: Mobile Home Floor Bracket
139262 Rev_H 9 / 11 / 2012 4. Orient the Front Manifold Panel as shown in figs. 25 and 26. Set it in place above the ash housing between the front legs of the stove. 5. Attach the Main Manifold to the four studs on the stove bottom and the two studs on the Front Manifold using the hex head nuts provided. -
Page 24: Illustrated Part List
139262 Rev_H 9 / 11 / 2012 Figure 29. F 50 TL Illustrated Parts... - Page 25 139262 Rev_H 9 / 11 / 2012 8.0 Jøtul 50 TL Rangeley Part List Description Part Number Description Part Washer, Hinge M6 - 12mm OD x 6mm ID x 0.5mm Zinc 117588 Air Baffle Manifold Assembly 157345 200024 Gasket, LD2, .500 Ø Fiberglass Rope, SS Jacket 223828 Gasket, LD 250 Fiberglass Rope Nut, M8, Serrated Flange...
-
Page 26: Warranty Statement
139262 Rev_H 9 / 11 / 2012 9.0 Jøtul F 55 Carrabassett Product Limited Warranty Effective January 1, 2012 This warranty policy applies to wood-burning products identified by 4) Damage due to, or repair of, rust. Use of stove-top steamers may Jøtul trade names, as set forth below. cause rust. - Page 27 139262 Rev_H 9 / 11 / 2012 This page is intentionally blank.
- Page 28 139262 Rev_H 9 / 11 / 2012 Jøtul pursues a policy of continuous product development. Products supplied may therefore differ in specification, colour and type of accessories from those illustrated and described in this manual. Quality Jøtul AS utilizes quality controls conforming to NS-EN ISO 9001 for product development, manufacturing, and distribution of stoves and fireplaces.
Need help?
Do you have a question about the F 50 TL and is the answer not in the manual?
Questions and answers