
Related Manuals for XMark Fitness XM-4419


Summary of Contents for XMark Fitness XM-4419
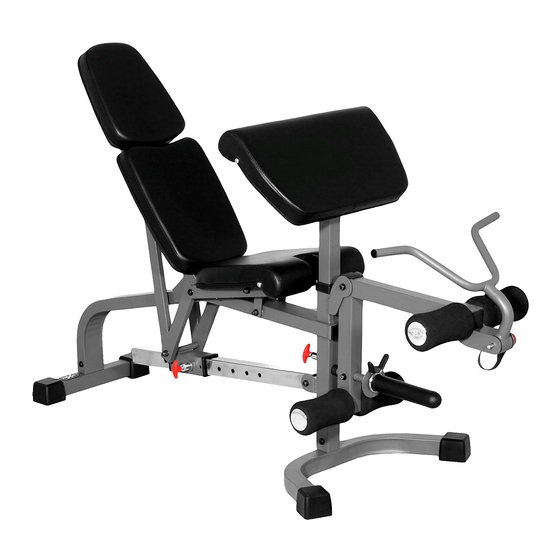
- Page 1 XM-4419 FID BENCH with LEG & PREACHER Owner’s Manual Read all precautions and instructions in this manual before using this equipment. 8/09...
-
Page 2: Table Of Contents
Table of Contents Important Safety Information Assembly 5-11 Parts List Exploded View Warranty Information... -
Page 3: Before You Start
This manual will guide you through the assembly process. If at any time you are having trouble with the assembly or use of this product, then please contact us at our XMARK Fitness help line. We have trained service technicians on site to take care of you, our valued customer. -
Page 4: Important Safety Information
SAFETY PRECAUTIONS • This unit should only be used on a level surface and is intended for indoor use only. XMARK Fitness recommends an equipment mat be placed under the unit to protect the floor or carpet and for easier cleaning. -
Page 5: Assembly
Assembly NOTE: Hand tighten bolts and locknut until machine is fully assembled. STEP 1 Attach the U-Shaped Front Base (2) to the front part of the Main Frame (1), and secure with three M10 washers (39), three M10X15 Allen Bolts (31). Insert the Rear Base (3) into the rear part of the Main Frame (1) with two M10X15 Allen Bolts (31) and two... -
Page 6: M10 Lock Nut (41
Assembly NOTE: Hand tighten bolts and lock nuts until machine is fully assembled. 41 39 STEP 3 Push two Spacers (23) into each Seat Supports (6). Attach one Backrest Support (7) to one Seat Support (6). Align the holes with one M10X45 Allen Bolt (32) and one M10 Washer (39). -
Page 7: Step
Assembly NOTE: Hand tighten bolts and locknuts until machine is fully assembled. STEP 4 Connect the Sliding Block (9) and the Backrest Supports (7) with one M10 x160 Allen Bolt (35), two M10 Washers (39) and one M10 Lock Nut (41). -
Page 8: Do Not Over Tighten The Lock Nut And Bolt
Assembly NOTE: Hand tighten bolts and lock nuts until machine is fully assembled. STEP 5 Push two Spacers (23) into the Seat Adju- stment Bracket (8). Attach the Seat Adjustment Bracket (8) to the Seat Supports (6) with M10X205 Allen Bolt (36), two M10 Washers (39) and one M10 Lock Nut (41). -
Page 9: Step
Assembly NOTE: Hand tighten bolts and lock nuts until machine is fully assembled. STEP 7 Connect the Seat Supports (6) and the Seat Adjustment Bracket (8) with one M10 x 120 Allen Bolt (34) and one M10 Lock Nut (41). -
Page 10: Step
Assembly NOTE: Hand tighten bolts and lock nuts until machine is fully assembled. STEP 8 Attach the Curl Pad (21) to the Arm Curl Stand (17) using two M10X15 Allen Bolts (31). Insert Arm Curl Stand (17) into the Main Frame (1) and secure in place using the Locking Pop Pin (20). -
Page 11: Step
(13) to the weight tube on the Leg Lift Bar (5) using the set screw (pre-assembled). Make sure the set screw is on the bottom of the sleeve. Secure the weight plates (not included) with the 2" Spring Clip (19). Congratulations! You have completed assembly of you XM-4419! -
Page 12: Parts List
Parts List XM-4419 Parts List Key NO. Part No. Description Main Frame 204056202503 U-Shaped Front Base 204043401503 204043402503 Rear Base 204043418503 Arm Curl Handle Leg Lift Bar 204056101503 Seat Support 204043405503 204056201503 Backrest Support 204043407503 Seat Adjustment Bracket Sliding Block... -
Page 13: Exploded View
Exploded View... -
Page 14: Warranty Information
Should any product submitted for warranty service be found ineligible, an estimate of repair cost will be furnished and the repair will be made if requested by you upon XMARK Fitness’... - Page 15 XMARK Fitness 7501 Trammel Drive Shreveport, LA 71108 Customer Service: 1-800-719-4605...
Need help?
Do you have a question about the XM-4419 and is the answer not in the manual?
Questions and answers
How can I order the front u bottom base of x mark 4419