Table of Contents
Advertisement
Quick Links
Great Planes
®
Model Manufacturing Co. guarantees this kit to be free from defects in both material and workmanship at the date of
purchase. This warranty does not cover any component parts damaged by use or modification. In no case shall Great Planes' liability
exceed the original cost of the purchased kit. Further, Great Planes reserves the right to change or modify this warranty without notice.
In that Great Planes has no control over the final assembly or material used for final assembly, no liability shall be assumed nor
accepted for any damage resulting from the use by the user of the final user-assembled product. By the act of using the user-assembled
product, the user accepts all resulting liability.
If the buyer is not prepared to accept the liability associated with the use of this product, the buyer is advised to return this
kit immediately in new and unused condition to the place of purchase.
READ THROUGH THIS MANUAL BEFORE
STARTING CONSTRUCTION. IT CONTAINS
IMPORTANT WARNINGS AND INSTRUCTIONS
CONCERNING THE ASSEMBLY AND USE OF
THIS MODEL.
© Copyright 2003, Printed in China
INSTRUCTION MANUAL
WARRANTY
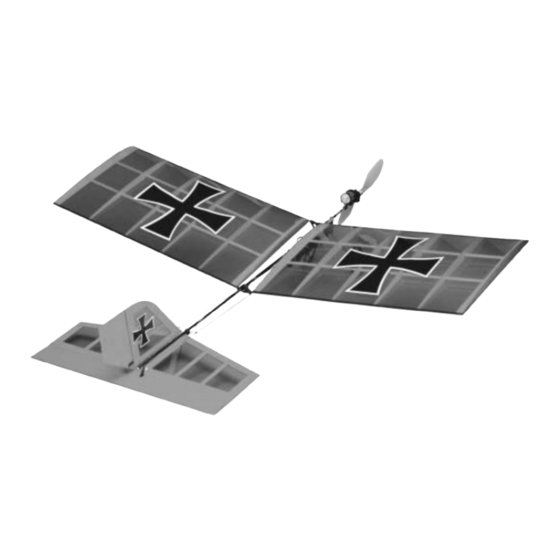
Wingspan: 41 in [1040mm]
Wing Area: 496 sq in [32 dm
Weight: 12 oz [340 g]
Wing Loading: 3 oz/sq ft [9 g/dm
Length: 38.5 in [980mm]
Radio: 3-channel w/2 micro servos,
micro receiver and electronic speed control
Champaign, Illinois
(217) 398-8970, Ext 5
airsupport@greatplanes.com
GPMZ0209 for GPMA1100 V1.1
TM
2
]
2
]
Advertisement
Table of Contents

Subscribe to Our Youtube Channel
Related Manuals for GREAT PLANES Yard Stik


Summary of Contents for GREAT PLANES Yard Stik
-
Page 1: Instruction Manual
Further, Great Planes reserves the right to change or modify this warranty without notice. In that Great Planes has no control over the final assembly or material used for final assembly, no liability shall be assumed nor accepted for any damage resulting from the use by the user of the final user-assembled product. -
Page 2: Table Of Contents
4. You must properly install all R/C and other components so that the model operates properly on the ground and in the air. The Yard Stik is a slow flying model that is about as simple- to-build as they get. However, if you have never flown an R/C 5. -
Page 3: Decisions You Must Make
DECISIONS YOU MUST MAKE a high band or low band crystal to match the receiver. Following is a list of items required to finish the Yard Stik that must be purchased separately. For some of these items there is more than one option which will require a bit of decision making ahead of time. -
Page 4: Battery
ORDERING REPLACEMENT PARTS To order replacement parts for the Yard Stik, use the order numbers in the Replacement Parts List that follows. Replacement parts are available only as listed. Not all parts are available separately. Replacement parts are not available from Product Support, but can be purchased from hobby shops or mail order/Internet order firms. -
Page 5: Kit Contents
If any parts are missing or are not of acceptable quality, or if you need assistance with assembly, contact Great Planes Product Support. When reporting defective or missing parts, use the part names exactly as they are written in the Kit Contents list on this page. -
Page 6: Assembly
ASSEMBLY Assemble the Tail 4. Cut a narrow slot in the elevator to accommodate one of the control horns 15/16" [24mm] from the edge of the slot in the stab and 3/16" [5mm] from the leading edge of the elevator. 1. -
Page 7: Mount The Fuselage Parts
7. Use medium CA to glue the rudder to the stab. Use a 3. Use medium CA to glue the fuselage boom to the small builder’s square to make certain the fin is perpendicular stabilizer and fin. to the stabilizer. Mount the Fuselage Parts 4. - Page 8 Connect the pushrods to the second-from-the-outer holes in the control horns. Later, after the elevator and rudder have been centered and the control throws have been set, retainers will be installed on the wires so they cannot come out of the control horns. 6.
-
Page 9: Mount The Motor
tapered slightly and the “easy way” is the way the gear is to Mount the Motor be permanently installed. 1. Without using any tools, use your fingers to press the motor all the way into the gearbox. Spin the shaft on the 5. -
Page 10: Final Set Up
FINAL SET UP Set Up the Radio It will be a little easier to set up the radio before mounting the wings. 9. Mount the motor to the fuselage with the front and rear mounting straps and two #2 x 1/2" [13mm] screws (the larger strap goes in front). -
Page 11: Set The Control Throws
3. If you haven’t already done so, plug the receiver crystal 3-CHANNEL RADIO SETUP into the receiver. Be certain the crystal matches the band (STANDARD MODE 2) (high or low) for the receiver you are using. 4. Make certain the throttle control on the transmitter is all the way down. -
Page 12: Apply The Decals
the pushrod to a hole closer in (to the elevator) will increase Mount the Wings and Check the C.G. the throw. Moving the pushrod to a hole farther out will decrease the throw. Moving the pushrod on the servo arms has the opposite effect. -
Page 13: Checklist
CHECKLIST Before taking your Yard Stik out to the flying field for the first time (or to your back yard or the park), review the check list to make sure it is truly ready to fly. -
Page 14: Charge The Batteries
Balance the Propeller • The electric motor and motor battery used in the Yard Stik are very powerful. The spinning propeller has a lot of momentum; therefore, if you touch the propeller while it is spinning it may inflict severe injury. -
Page 15: Ama Safety Code
The Yard Stik may be hand launched or it can R.O.G. (rise spectators until I become a qualified flyer, unless assisted by off ground). It is best to hand launch the Yard Stik for the first an experienced helper. flight and if flying over rough fields outdoors. The model should be tossed directly into the wind in a controlled 3. - Page 16 (just 10g!) and range* make them perfect for the Yard Stik and other small electrics. Designed for park, slow and indoor flyers, Mini FM Receivers feature SMT components for maximum dependability in an ultralight, compact unit.
Need help?
Do you have a question about the Yard Stik and is the answer not in the manual?
Questions and answers