Shoprider Paris GK9 User Manual
Hide thumbs
Also See for Paris GK9:
- Owner's manual (5 pages) ,
- User manual (20 pages) ,
- Owner's manual (19 pages)

Related Manuals for Shoprider Paris GK9


Summary of Contents for Shoprider Paris GK9
-
Page 1: User Manual
Paris USER MANUAL Please ensure that this manual is read and understood before using the scooter. Nov 2011... -
Page 2: Table Of Contents
Contents Page Introduction Intended Use Technical Specification Feature Guide Safety Advice Adjustments Tiller angle Folding the tiller (for transportation) Seat swivel / removal Seat height Arm width adjustment Tiller Controls Brake Release / Freewheel Operation Starting to Drive ... -
Page 3: Introduction
Introduction ® Congratulations on your purchase of the Shoprider Paris scooter. This scooter incorporates the latest innovative designs. The Paris can be used in confined spaces both indoors and out. Direct drive rear transaxles and electromagnetic brakes give a safe and efficient ride. The scooter can be easily disassembled without tools and will fit into the boot of most vehicles for easy transport. -
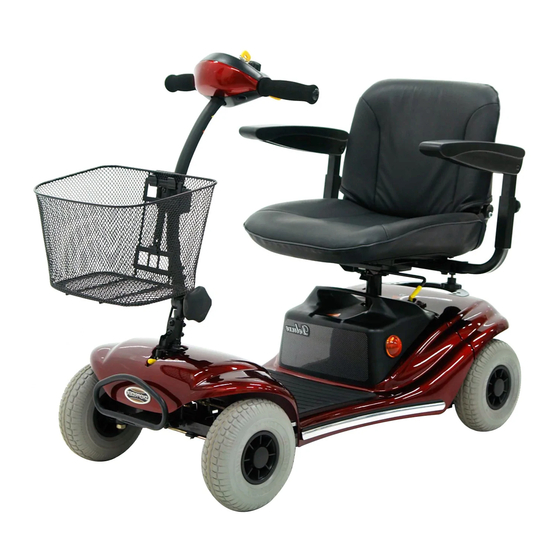
Page 4: Feature Guide
Feature Guide ‘Paris’ 1. Tiller control head 2. Detachable padded swivel seat with fold down back 3. Detachable basket 4. Detachable battery pack 5. Tiller angle adjustment knob 6. Tiller lock 7. Anti-tip wheels 8. Puncture proof wheels 9. Front bumper... -
Page 5: Safety Advice
Safety Advice Read this manual carefully before using your scooter Turn the power off when transferring to and from the scooter Select a slow speed when going down gradients (max 8°) or over uneven ground Keep your feet on the scooter whilst driving ... -
Page 6: Adjustments
Adjustments Fig 1 Tiller Angle Adjustment (Fig. 1) At the base of the tiller is a round knob. Turn the knob anti-clockwise to loosen the tiller. Select the desired tiller angle and re-tighten the knob until securely in place. Folding the Tiller Assembly Fig 2 (For transport purposes) (Fig. -
Page 7: Seat Height
Continued….. Seat Post Fig 4 Seat Height Adjustment (Fig. 4) Remove the seat as previously described and remove the battery pack (see page 11). Use two 13mm spanners and undo the locking bolt and nut. Adjust the seat post up or down to the desired height and relocate the locking bolt through the hole and replace the washer and nut and re-tighten. -
Page 8: Tiller Controls
Tiller Controls (Fig. 6) Fig 6 Thumb Lever Controls The thumb lever controls the reverse and forward motion of the scooter. Pressing the right lever will drive the scooter forward, pushing the left lever will reverse the scooter. The amount of pressure applied to the levers will determine the speed the scooter travels up to the maximum speed selected. -
Page 9: Brake Release / Freewheel Operation
Brake Release / Freewheel Operation (Fig. 7 & 8) Fig 7 The brake release lever is situated under the seat at the left rear of the scooter (yellow lever Fig. 7). This lever allows you to disengage the drive mechanism and push scooter ‘freewheel’... -
Page 10: Moving Off
Continued….. Moving Off Turn the key clockwise to turn on the power. Initially set the speed control to a low setting. Push your right thumb lever (yellow) and the scooter will move forward slowly. The further you push the lever the faster the scooter will travel, but only to the maximum speed that has been selected. -
Page 11: Transport And Storage
Transport and Storage The Paris is designed to be quickly and easily disassembled without tools into sections for transportation and storage: Guidelines for Disassembly Follow the following for the easy disassembly of your scooter: (Ensure the scooter is switched off before disassembling) 1. -
Page 12: Batteries And Battery Charger 12
Batteries and Battery Chargers Batteries Charge the batteries completely (8-12 hours) prior to first use. The Paris is supplied with a closed battery pack which contains two 21 Amp, 12 Volt sealed lead acid batteries#. The battery pack is situated under the front of the seat and can be removed by lifting them away from the chassis.* Low temperatures, rough terrain and the weight of the user can affect battery performance. -
Page 13: Maintenance 13
Continued….. Battery Charger The battery charger is a 3-amp switch type off board. The battery charging port is located on the battery pack (Fig. 11). This special feature allows the batteries to be charged independently of the main scooter. Before using our scooter for the first time be sure to fully charge the batteries, this may take up to 12 hours. - Page 14 Continued….. Routine Maintenance We suggest that your scooter should undergo a full service at least once a year by an authorised dealer. Please check the following on a weekly basis: Tyres are in good condition Wheels spin freely ...
-
Page 15: Circuit Breaker
Continued….. We also recommend that the connectors between the battery pack and the main chassis are also treated at the same time to prevent any carbon build up (round plate connectors and pins). Simply re-assemble the scooter as per user manual after these procedures have been undertaken. Note: Should any part of your scooter need replacing or repairing please contact your local dealer to undertake any maintenance. -
Page 16: Further Information
Further Information Safety Information Regarding Electromagnetic Interference (EMI) Scooters and powerchairs are designed to operate under certain conditions. However, radio waves or electromagnetic fields may affect the operation of the scooter. The source of EMI could be radio or television transmitters or portable devices such as mobile phones, portable CB radios etc. - Page 17 Continued….. Product Stability Scooters and powered wheelchairs are designed to allow the user flexibility of movement in restricted areas. Driving at maximum speed and attempting sharp turns can create a situation where the product becomes unstable. Therefore it is essential that the user pay attention the guidance set out in this manual.
- Page 18 New Split Battery Pack Instructions Your new Shoprider Paris mobility scooter is now fitted with a cable free split battery pack design which enables the batteries to be carried individually. The images and instructions below show the seat removed from the scooter.
- Page 19 Continued….. In the image opposite you will see three white lines. To ensure the battery pack is properly assembled, surfaces must be level at these points. Failure to do do so may result in no power to the scooter or a break in charge circuit which...
- Page 20 York Road, Bridgend Industrial Estate, Bridgend CF31 3TB Tel: 01656 674488 Fax: 01656 674499 Email: sales@romamedical.co.uk www.romamedical.co.uk Shoprider reserve the right to change specifications without prior notice Manufactured by: Phisiang Machinery MFG. CO. LTD No. 108 Hsin-He Rd, Hsin-Feng Hsiang, Hsinchu County, Taiwan...
Need help?
Do you have a question about the Paris GK9 and is the answer not in the manual?
Questions and answers