Table of Contents
Advertisement
Advertisement
Table of Contents

Subscribe to Our Youtube Channel
Related Manuals for Shoprider GK4


Summary of Contents for Shoprider GK4
- Page 1 GK4/GK7-3/GK9 Portable Scooter User Manual...
- Page 2 Welcome to the family...
-
Page 3: Table Of Contents
TABLE OF CONTENTS INTRODUCTION ............................3 SMART FEATURE GUIDE (Fig 1) ......................3 SAFETY ADVICE ............................4 EMI WARNING ............................5 WARNINGS .............................. 6 ADJUSTMENTS ............................7 ADJUSTMENTS FOR TRANSPORT (FIG 2) ..................... 7 SEAT REMOVAL AND UPGRADES (FIG 3) ..................... 8 SCOOTER TILLER CONTROLS (FIG 4) .................... -
Page 4: Introduction
Congratulations on your purchase of the Shoprider GK4/GK7-3/GK9 Portable Scooter. The GK4/GK7-3/GK9 is the ultimate combination of style, comfort, and portability. The GK4/GK7-3/GK9 goes with you wherever you go and can be assembled or disassembled in just seconds with wireless quick-connect components. The GK4/GK7-3/GK9 is super light and compact and can be stored in small areas such as the trunk or back seat of your car. -
Page 5: Safety Advice
Make sure the tiller is properly adjusted to the user or damage and injury could result. DO NOT transport in a vehicle WHILE seated on the scooter. Shoprider® will not be responsible for any injury or damage that might result. -
Page 6: Emi Warning
EMI WARNING Shoprider® scooters may be susceptible to electromagnetic interference (EMI), which is a kind of interfering electromagnetic energy (EM) emitted from sources such as radio stations, TV stations, amateur radio (HAM) transmitters, two-way radio, and cellular phones. The interference (from radio wave sources) can cause the scooter to release its brakes, move by itself, or move in unintended directions. -
Page 7: Warnings
5. Report all incidents of unintended movement or braking to your Shoprider® provider and note whether there are sources of EMI nearby. WARNING! Shoprider® is not responsible for damage or injury incurred due to improper and unsafe use of your scooter. -
Page 8: Adjustments
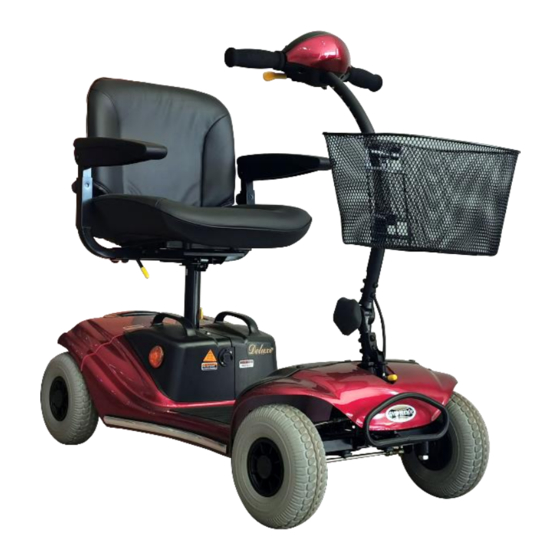
ADJUSTMENTS ADJUSTMENTS FOR TRANSPORT (FIG 2) First remove the basket by lifting basket up and off bracket. Next release the seat (Refer to fig. 3). Disconnect the battery pack by pushing release button in; the button is located under the side of the round metal connection plug in socket. Release the round plug connector by pulling round plug out of box while depressing button. -
Page 9: Seat Removal And Upgrades (Fig 3)
SEAT REMOVAL AND UPGRADES (FIG 3) To remove the seat; there is a tightening knob at the bottom of the seat that needs to be loosened in order to slide the seat off. An available seat upgrade includes adjustable armrests. The armrests flip up for easy sideways transfer. Flip-up Armrest Adjustment... -
Page 10: Scooter Tiller Controls (Fig 4)
SCOOTER TILLER CONTROLS (FIG 4) Speed Controls The speed control allows you to set as speed between slow (turtle) and fast (rabbit). Battery Level Indicator Gauge Where the needle sits, shows the amount of charge in your batteries. The amount of charge will only show at its true level when the scooter is in drive. -
Page 11: Drive/Freewheel Operation (Fig 5)
The Anti-Tip Wheels are located at the rear of the scooter (Fig 5). The scooter should not be used unless the anti-tip wheels are in place. Shoprider ® is not responsible for damage or injury incurred due to improper or misuse of the scooter. -
Page 12: Battery Pack (Fig 6)
SCOOTER SERIAL NUMBER (FIG 7) The scooter serial number is located under the seat. It is an alphanumeric combination of 13 numbers and letters. Shoprider recommends that you write the serial number down on the back of this manual for further reference. -
Page 13: Starting To Drive Your Scooter
STARTING TO DRIVE YOUR SCOOTER First Time Use Prior to using your GK4/GK7-3/GK9 Portable Scooter for the first time, you must charge the batteries fully (refer to Battery Charging Procedures). Charging may take up to 12 hours. Charging the batteries completely prior to first time use will benefit battery efficiency. Failure to do so may cause permanent damage. -
Page 14: Extra Guidelines In The Control Of Your Scooter (Fig 8)
EXTRA GUIDELINES IN THE CONTROL OF YOUR SCOOTER (FIG 8) Ramps The stability of your scooter is governed by several factors such as the seating position, the angle of the slope and your height and weight. When approaching an incline, do so directly and not at an angle and wherever possible avoid making turns. -
Page 15: Batteries And Battery Charging
Keeping the batteries charged will extend the life of the batteries. Battery Charger The battery charger is a 2-amp off board. The GK4/GK7-3/GK9 Portable Scooter has a built- in charger port on the rear side of the battery pack. This special feature allows the batteries within the battery pack to be charged without the scooter. -
Page 16: Maintenance
If the batteries are weak, severely discharged, or old, a variety of problems may occur with the unit including charging problems, reduced speed, loss of range, and others. Please contact your local Shoprider® provider for battery replacement. -
Page 17: Technical Specifications
Please consult your dealer if your scooter does not run after checking these points. TECHNICAL SPECIFICATIONS UNIT SPECIFICATIONS GK7-3 1030 x 510 x 850 990 x 560 x 900 1070 x 570 x 900 Overall Dimensions: L x W x H 7”... -
Page 18: Quarterly Inspection
NOTE! Regular (Yearly) inspection is strongly recommended by the manufacturer to ensure ultimate performance of the scooter. Service Record: Date of Purchase: Purchaser: ___________________________________________________ Model #: GK4/GK7-3/GK9 Serial #: ________________________________ Provider Unit Was Purchased From: ______________________________ M / D / Y...
Need help?
Do you have a question about the GK4 and is the answer not in the manual?
Questions and answers