Cisco SPA 504G Setup And User Manual
Hide thumbs
Also See for SPA 504G:
- Quick start manual ,
- User manual (74 pages) ,
- Owner's manual (54 pages)
Table of Contents
Advertisement
Advertisement
Table of Contents

Subscribe to Our Youtube Channel
Related Manuals for Cisco SPA 504G


Summary of Contents for Cisco SPA 504G
- Page 1 Cisco SPA 504G Setup and User Guide Version Created: April 2012 Last Updated:...
- Page 2 ________________________________________________________________ Copyright Copyright © 2005, 2006, 2007, 2011, 2012. Information in this document is subject to change without any notice. No part of this document may be reproduced, transmitted or stored in a retrieval system, in any form or by any means, electronic or mechanical, for any purpose, without written permission.
-
Page 3: Table Of Contents
________________________________________________________________ Contents 1. Introduction ......................4 1.1. Purpose of this Document ..............4 1.2. Related Documents................4 2. Getting Started ...................... 5 2.1. Equipment Required ................5 2.2. Phone Assembly ................5 2.3. Router ..................... 6 2.4. Making the Connection ............... 2 2.5. -
Page 4: Introduction
1. Introduction 1.1. Purpose of this Document This guide is to show you how to install and use your Cisco SPA504G phone which you will use in conjunction with your Altos portal website (www.telephony- cloud.com), therefore the functionality and features described are an appropriate subset of those available. -
Page 5: Getting Started
________________________________________________________________ 2. Getting Started 2.1. Equipment Required Cisco SPA504G phone Power Supply – either unit with plug or a PoE (Power over Ethernet) switch Ethernet Broadband Router Operational Ethernet LAN Ethernet cable to connect telephone to router ... -
Page 6: Router
If you are using an external power source plug the power supply cable into the power port on the phone base. NOTE. The Cisco SPA 504G does not ship with a power supply. If you are not using Power over Ethernet (PoE), you must order the PA-100 power supply separately. -
Page 7: Making The Connection
Plug in the network and power connections. The phone will then perform a boot-up sequence. During this sequence the line lights (on the top right of your phone) will initially glow orange and then the phone with screen will display the Cisco logo followed by ‘Initializing Network’. - Page 8 ________________________________________________________________ If you experience any problems call Customer Services. The number to call can be found by hovering over the telephone icon at the top right of the Home page, or clicking on ‘Talk to Customer Services Now’ Copyright © 2005-2012 3/14...
-
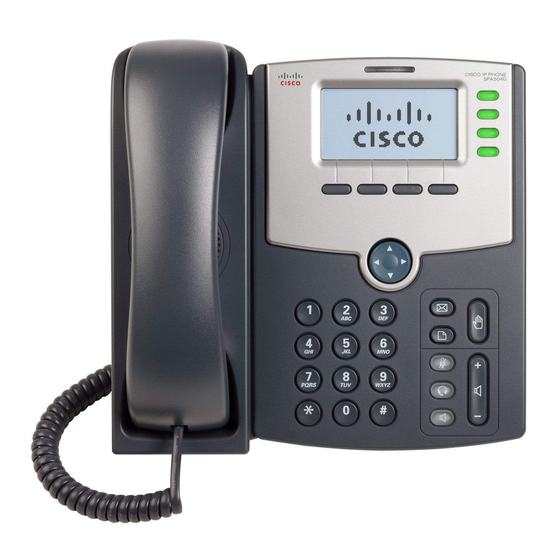
Page 9: Know Your Phone
________________________________________________________________ Know Your Phone 3.1. Phone Features Diag Phone Feature Description Handset Pick up to place or answer call Message Displays solid red when you have a new voice mail Waiting message Indicator Flashes red during an incoming call LCD Screen Displays date and time, Phone numbers and soft key options Line Buttons... - Page 10 ________________________________________________________________ Diag Phone Feature Description Soft Keys Press a soft key to perform the action shown on the lable on the LCD Screen above Navigation Pad Press an arrow key to scroll left, right, up or down through items shown on the LCD screen Messages Button Press to access Voice mail Hold Button...
-
Page 11: Using Your Phone
________________________________________________________________ 4. Using Your Phone 4.1. Phone Operation You may use the handset, the inbuilt speaker or an approved headset to make and receive calls. Making the connection Picking up the handset, pressing the dial soft key or pressing the speaker button will connect the phone to the first line on your phone. -
Page 12: Phone Functions
________________________________________________________________ 4.2. Phone Functions The main functions of the phone are enabled by the four buttons at the top of the phone under the LCD screen which are known as soft keys and can have varying actions associated with them depending on the status of the phone at any particular time. -
Page 13: Receiving A Call
________________________________________________________________ the required number and dial it by lifting the handset, pressing the speaker key or pressing the dial soft key which will invoke the speaker. Alternatively you can delete the entry, edit the number or save it in your local phone address book. Choosing this latter option will prompt you to enter a name under which the number will be stored. -
Page 14: Making A Call
*code Allows you to choose to activate some special function ‘star codes’. Full details can be found in the Cisco Small Business Pro IP Phone SPA 50X User Guide which can be obtained from the Cisco web site. However, you should be aware that the portal... -
Page 15: Putting A Call On Hold
________________________________________________________________ Putting a Call on Hold Pressing hold makes the soft keys: resume endCall newCall redial cfwd park resume Resumes a call on hold. endCall No action newCall Allows you to call another number while keeping the original call on hold. -
Page 16: Transferring A Call
________________________________________________________________ Transferring a Call xfer Attended Transfer - To transfer an attended call to another phone press the xfer soft key on the phone. This puts the call into hold and you will hear a dial tone. Call the person you wish to transfer the call to either by entering their number or by using the soft key options now presented and when they answer you may speak privately to them before transferring the call. -
Page 17: Voice Mail
________________________________________________________________ Voice Mail If you have configured your system to take Voice mail messages via your account on the portal website – see Setup and User Guide – you can access the messages directly from your phone without having to go online. A full description of all the options available can be found in the Setup and User Guide under the Picking up messages via an external phone section. -
Page 18: Advanced Phone Features
________________________________________________________________ 4.3. Advanced Phone Features Call Waiting Call Waiting On To turn Call Waiting on dial service code *56 on your phone handset. There is no confirmation given, but Call Waiting will remain active until turned off. If you are on another call when a third party calls, Call Waiting will let you know there is an incoming call by momentarily ringing your phone and flashing the Voice Mail Notification strip at the top of the phone handset and if you have another line available it will also flash that line button. -
Page 19: Call History
________________________________________________________________ Parking a call Answer a call on your phone Put the call on hold by pressing the hold soft key on your handset The caller will either hear music if you have selected the Music on Hold option for the particular phone or they will hear a message requesting them to “Please wait while your call is being transferred”.
Need help?
Do you have a question about the SPA 504G and is the answer not in the manual?
Questions and answers