Table of Contents
Advertisement
Quick Links
Advertisement
Table of Contents

Related Manuals for MacroAir Technologies WhisperFoil


Summary of Contents for MacroAir Technologies WhisperFoil
- Page 1 ……………………… Owners Manual Installation Manual...
-
Page 2: Table Of Contents
2.6 Guards ----------------------------------------------------------------------------------------------------------- 9 2.7 Universal Mounting Hardware -------------------------------------------------------------------------------- 10 2.8 Maintenance -------------------------------------------------------------------------------------------------- 10 Control Panel ---------------------------------------------------------------------------------------------------------------------------- 10 Power Unit --------------------------------------------------------------------------------------------------------------------------------- 10 Mounting Hardware ------------------------------------------------------------------------------------------------------------------- 10 2 Installation Procedures ---------------------------------------------------------------------------------------------------- 11 MacroAir Technologies Inc. www.macro-air.com Toll Free: 866-668-3247 Build: January 9 2009... - Page 3 EMI | Electromagnetic Interference --------------------------------------------------------------------------------------------------- 25 Multi Fan Wiring Diagram ---------------------------------------------------------------------------------------------------- 26 Mounting Dimensions Diagram --------------------------------------------------------------------------------------------- 27 Motor Control Panel and Assembly Drawing ------------------------------------------------------------------------------ 28 Contact Information --------------------------------------------------------------------------------------------------------- 29 MacroAir Technologies Inc. www.macro-air.com Toll Free: 866-668-3247 Build: January 9 2009...
-
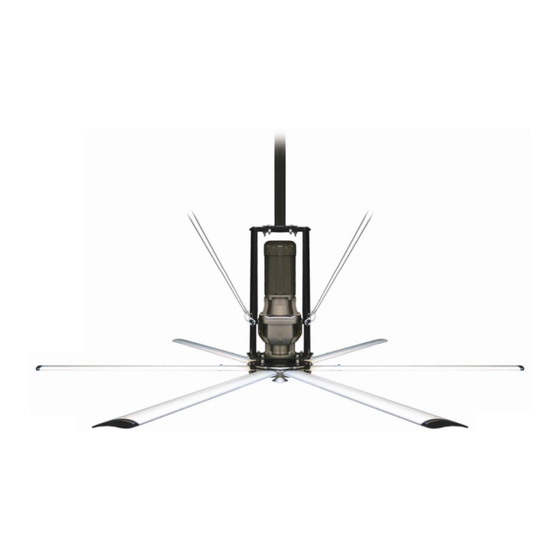
Page 4: Anatomy Of A Fan
Page Anatomy of a Fan MacroAir Technologies Inc. www.macro-air.com Toll Free: 866-668-3247 Build: January 9 2009... -
Page 5: Check Your Shipment, What's Included For 10 & 6 Blade Fans
Pair of ¾ inch wrench and sockets Pair of ½ inch wrenches or wrench and sockets 5/16 inch sockets or wrench Call MacroAir at 866.668.3247 if you have any questions MacroAir Technologies Inc. www.macro-air.com Toll Free: 866-668-3247 Build: January 9 2009... -
Page 6: Check Your Shipment, What's Included For Eco6 Guard Fan
If the fan is ordered with screens, they will be on a separate pallet. Blades will be on a separate pallet, although they can be theoretically included in the main power unit crate. Call MacroAir at 866.668.3247 if you have any questions MacroAir Technologies Inc. www.macro-air.com Toll Free: 866-668-3247 Build: January 9 2009... -
Page 7: Important Information, Please Read First
When mounting a fan in an area where materials may be elevated into its path, MacroAir recommends marking or painting the floor with a large crosshatched circle to alert personnel of the overhead location of fans. MacroAir Technologies Inc. www.macro-air.com Toll Free: 866-668-3247... -
Page 8: Sprinkler Systems And Fan Placement
MacroAir. Before installing fans, check with the contractor, building owner, or architect to ensure the building structure is sound and will support the weight of the fan. MacroAir Technologies provides guidelines for mounting fans; however, it is the sole responsibility of the building owner and installer to ensure the safety of the mounting system, that the building structure is sound, and that the installation complies with all federal, state, and local codes. -
Page 9: Weight
(4) inches of the moving device, the fan blades in this case. Refer to OSHA guidelines, paragraph 1910.212(a) (5) for more information. MacroAir Technologies Inc. www.macro-air.com Toll Free: 866-668-3247... -
Page 10: Universal Mounting Hardware
Loose guy wires are more likely to break than tight ones, and broken guy wires may fall into the fan. If a guy wire is loose, carefully check to be sure it is not damaged, and re-tighten it. MacroAir Technologies Inc. www.macro-air.com Toll Free: 866-668-3247... -
Page 11: Installation Procedures
Loop supplied safety cable (1/4 inch steel braided cable) over the beam and let it hang. It will be attached once the power unit is installed. If using an extension, be sure to use the longer safety cable supplied with the extension. MacroAir Technologies Inc. www.macro-air.com Toll Free: 866-668-3247... -
Page 12: Step 2, Attach Power Unit To Mounting Hardware
The MCP should be mounted in the upright position, vertically, with the door opening to the left. Do not mount so that the door opens downward. The mounting surface must be non-flammable, away from sources of heat, dust, moisture, and vibration. MacroAir Technologies Inc. www.macro-air.com Toll Free: 866-668-3247... -
Page 13: Step 5, Mount Remote Switchbox
7, Make Motor Lead Connections Verify controller voltage; this can be found on the lower left corner of the MCP, as well as the sticker on the side of the VFD (see “input”). MacroAir Technologies Inc. www.macro-air.com Toll Free: 866-668-3247... - Page 14 Slide the gland nut up and tighten it securely onto the gland. Connect the ground wire to the green screw located inside of the motor junction box. MacroAir Technologies Inc. www.macro-air.com Toll Free: 866-668-3247 Build: January 9 2009...
-
Page 15: Step 8, Install Guy Wires
Feed that end of the wire through the eye bolt and back through the cable clamps. iii) Tighten the cable clamps securely, keeping the u-bolt side over the free end of the cable — see figure 4 (in step 3 on page 12). MacroAir Technologies Inc. www.macro-air.com Toll Free: 866-668-3247 Build: January 9 2009... -
Page 16: Step 9, Install Fan Blades, Blade Safety Links, & Safety Link Extenders
Be sure to orient the blades correctly — they should curve toward the floor (thin edge down). Whisperfoil XL blades (our standard blade) will slide on easily either way; Whisperfoil and Wickerbill blades are harder to install upside down, but can be forced. -
Page 17: Step 10, Check Clearances And Guy Wire Tension For Safety
They should be very difficult to move. If there is visible slack in any guy wire or if any moves easily, re-tension them before proceeding. MacroAir Technologies Inc. www.macro-air.com Toll Free: 866-668-3247... -
Page 18: Step 11, Install Guards If Necessary
Verify proper rotation with the For-Off-Rev switch in the For position: the rotor should be turning in the counter-clockwise direction when viewed from the floor — see figure 9. Fig 9 MacroAir Technologies Inc. www.macro-air.com Toll Free: 866-668-3247 Build: January 9 2009... - Page 19 Adjust the speed control to 9 and verify full speed operation with no Fault or Warning indicators lit on the VFD. Contact factory if fault/warning condition occurs. Close up the MCP. Adjust fan speed and direction for desired operation. MacroAir Technologies Inc. www.macro-air.com Toll Free: 866-668-3247 Build: January 9 2009...
-
Page 20: Installation Procedures For Eco6 Guard Fan
Insert 1/2” lag bolts (not included) into the holes, using washers to maximize the hold. Be sure that you use bolts long enough to support the weight of the fan. Tighten the bolts securely, but do not over-tighten them. MacroAir Technologies Inc. www.macro-air.com Toll Free: 866-668-3247... -
Page 21: Step 2, Attach Motor Assembly To Mounting Assembly Eco6
For single-speed fans, wire up the included circuit breaker/starter according to the instructions printed on the inside of the box. For either fan, use the wiring diagrams in figure 12 (next page) to make the proper MacroAir Technologies Inc. www.macro-air.com Toll Free: 866-668-3247... -
Page 22: Step 4, Attach Rear Safety Screen Eco6
Insert the cone-shaped keyless bushing adapter over the shaft and into the hole in the hub center bushing. Line up the four non-threaded holes in the keyless bushing adapter with the four threaded holes in the hub center bushing. MacroAir Technologies Inc. www.macro-air.com Toll Free: 866-668-3247 Build: January 9 2009... -
Page 23: Step 6, Attach Fan Blades Eco6
Completely tighten one screw at the top, bottom, and each side to hold the screens in place, then tighten all the screws. Be careful not to strip them out. MacroAir Technologies Inc. www.macro-air.com Toll Free: 866-668-3247... -
Page 24: Step 8, Make Final Adjustments And Attach Safety Cable Eco6
12 of the standard instructions to properly secure the cable. MacroAir recommends using an eyebolt securely attached to the wall or ceiling to anchor the safety cable; this is not included with the fan. MacroAir Technologies Inc. www.macro-air.com Toll Free: 866-668-3247... -
Page 25: Regulatory Notice
Note; MacroAir Technologies has a policy of continuous product improvement and reserves the right to change design and specifications without notice. Thank you for selecting The Original Big Fans from MacroAir Technologies. If you have any questions please call technical support at 866.668.3247. We are happy to assist you. -
Page 26: Multi Fan Wiring Diagram
Page Multiple Fan Wiring Diagram MacroAir Technologies Inc. www.macro-air.com Toll Free: 866-668-3247 Build: January 9 2009... -
Page 27: Mounting Dimensions Diagram
Page Mounting Dimensions Diagram MacroAir Technologies Inc. www.macro-air.com Toll Free: 866-668-3247 Build: January 9 2009... -
Page 28: Motor Control Panel And Assembly Drawing
Page Motor Control Panel And Assembly Drawing MacroAir Technologies Inc. www.macro-air.com Toll Free: 866-668-3247 Build: January 9 2009... -
Page 29: Contact Information
MacroAir Technologies, Inc. The information in this document is subject to change without notice. MacroAir Technologies shall not be liable for errors contained herein or for consequential damages in connection with the furnishing, performance, or use of this material.
Need help?
Do you have a question about the WhisperFoil and is the answer not in the manual?
Questions and answers