Blackmagicdesign ATEM Camera Converter Installation And Operation Manual
Hide thumbs
Also See for ATEM Camera Converter:
- Installation and operation manual (225 pages) ,
- Nstallation and operations manual (21 pages) ,
- Installation and operation manual (20 pages)

Related Manuals for Blackmagicdesign ATEM Camera Converter


Summary of Contents for Blackmagicdesign ATEM Camera Converter
- Page 1 Installation and Operation Manual ATEM Camera Converter ATEM Studio Converter Mac OS X ™ Windows ™ November 2011...
- Page 2 HDMI cameras using low cost optical fiber! Imagine connecting to cameras at remote locations on racing tracks, live sporting venues or even massive golf courses! With ATEM Camera Converter you can have more cameras closer to the action for the most amazing shots in live production! ATEM...
-
Page 3: Table Of Contents
Plugging in Your Headset ATEM Camera Converter Plugging in Your Monitor Connectors Plugging in and Reversing Optical Fiber Cables Status Indicators Mounting ATEM Camera Converter Buttons Standalone Converter Operation Mounts Blackmagic Converter Utility Installing Blackmagic Converter Utility on Mac OS X... -
Page 4: Getting Started
ATEM Camera Converter connects to any camera with SDI or HDMI output. It is used to send video, audio, tally and talkback signals via optical fiber, between the camera unit and a remote unit, for connection to a switcher. -
Page 5: Plugging In Your Camera
The first thing you'll want to do is to plug in your cameras! All you need to do is connect an HDMI or SDI cable from the camera video output and then connect it to an input on the ATEM Camera Converter. If your camera has both SDI and HDMI outputs, use an SDI cable as SDI is a more robust, industrial standard and can be reliably used with long cables of up to 300 feet or 100 meters in length. -
Page 6: Plugging In Your Monitor
If the camera operator wants to monitor the camera video or the program video from the switcher, connect a monitor to the SDI or HDMI outputs of the ATEM Camera Converter. Both outputs show the same video so either can be used. -
Page 7: Mounting Atem Camera Converter
For stationary shots, ATEM Camera Converter can be mounted on a tripod arm with either of its standard 3/8" or 1/4" thread inserts. If you want to sit ATEM Camera Converter on a desk using its rubber feet, undo the two 2.5 hex socket screws and remove the belt clip. -
Page 8: Blackmagic Converter Utility
Getting Started Blackmagic Converter Utility Blackmagic Converter Utility is used to configure settings and update the internal software in your ATEM Camera and Studio Converters. Installing Blackmagic Converter Utility on Mac OS X After downloading the Converter Utility software and unzipping the downloaded file, open the resulting disk image to reveal its contents. -
Page 9: Setting The Camera Number
If the camera number is set correctly, the tally lights will illuminate on your ATEM Camera Converter. Similarly if you want to work out to what camera number your ATEM Camera Converter is set, ask the ATEM switcher operator to successively send camera inputs to the program output of the ATEM switcher until the tally lights illuminate on your unit. -
Page 10: Connection And Control Reference Guide
This arrangement should only be considered for connecting one or two cameras via optical fiber. An audio de-embedder can be attached to the SDI output, of the upper ATEM Camera Converter, to send camera audio to a mixer and then to the audio input of the switcher. If more cameras need to be connected via optical fiber, each ATEM Camera Converter should be connected to an ATEM Studio Converter rather than using pairs of ATEM Camera Converters. -
Page 11: Connecting Up To 4 Cameras To A Switcher
Connection and Control Reference Guide Connecting Up to 4 Cameras to a Switcher This example shows four cameras connected to a switcher via four ATEM Camera Converters partnered with an ATEM Studio Converter. The AES/EBU outputs of ATEM Studio Converter can send camera audio to a mixer and then to the audio input of the switcher. -
Page 12: Connecting More Than 4 Cameras To A Switcher
Connection and Control Reference Guide Connecting More than 4 Cameras to a Switcher If you have over four cameras that need to be connected to your switcher, you can expand the number of camera connections by linking ATEM Studio Converters together. This example shows three ATEM Studio Converters connected together so up to 12 cameras can be used. -
Page 13: Atem Camera Converter
A tally border can also be displayed by enabling a software Connect single mode optical fiber cables to the included SFP 1/4" thread inserts. If you want to sit ATEM Camera Converter setting. module using LC connectors. The other end connects to an on a desk using its rubber feet, undo the two 2.5 hex socket... -
Page 14: Status Indicators
The VIDEO indicator lights up when an optical fiber SDI video 20. PTT 17. Power On/Off signal is detected by ATEM Camera Converter. Press to talk (PTT) allows camera operators to talk to the Instantly power on. Hold for 1 second to power off. -
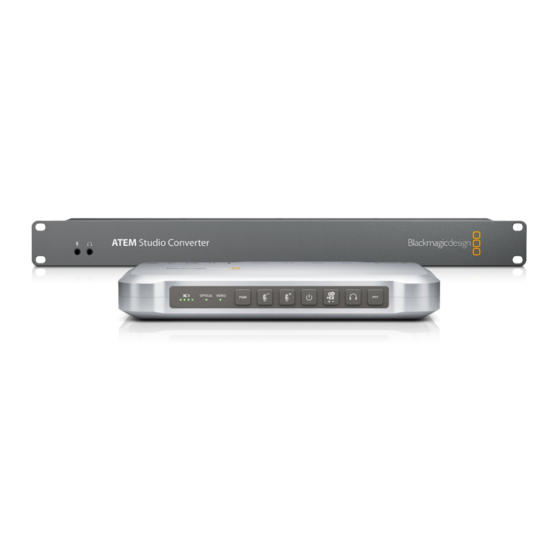
Page 15: Atem Studio Converter
SFP module using LC connectors. The other end connects connector supports an input range of 12V to 31V. IN on the same unit. to an ATEM Camera Converter. These ports are also used for 14. Talkback headset SDI and optical fiber conversion when using ATEM Studio 9. -
Page 16: Getting Help
Help Getting Help The fastest way to obtain help is to go to the Blackmagic Design online support pages and check the latest support material available for your ATEM converter. Blackmagic Design Online Support Pages The latest manual, software and support notes can be found at the Blackmagic Support Center at www.blackmagic-design.com/support. - Page 17 Warranty 12 Month Limited Warranty Blackmagic Design warrants that this product will be free from defects in materials and workmanship for a period of 12 months from the date of purchase. If a product proves to be defective during this warranty period, Blackmagic Design, at its option, either will repair the defective product without charge for parts and labor, or will provide a replacement in exchange for the defective product.
Need help?
Do you have a question about the ATEM Camera Converter and is the answer not in the manual?
Questions and answers