TSC M23 User Manual
Direct thermal portable printer
Hide thumbs
Also See for M23:
- Programming manual (252 pages) ,
- Programming manual (206 pages) ,
- Programming manual (434 pages)
Table of Contents
Advertisement
Quick Links
Advertisement
Table of Contents

Related Manuals for TSC M23


Summary of Contents for TSC M23
- Page 1 Direct Thermal Portable Printer USER’S MANUAL...
-
Page 2: Table Of Contents
Contents Copyright Declaration ...................1 Compliances ....................1 1. INTRODUCTION ..................2 1.1 Documentation..................2 1.2 Unpacking and Inspection ..............2 1.3 Equipment Checklist ................2 1.4 Front View....................3 1.5 Rear View....................5 2. GETTING STARTED ...................6 2.1 Install the Battery..................6 2.2 Using the Strap ..................7 2.2.1 Hand Strap..................7 2.2.2 Shoulder Strap ( Option ) ..............8 2.3 Loading Media..................9 2.3.1 Loading Continuous Labels for Receipt Paper ......9... - Page 3 4.1.4 RF Network ( Optional ) ...............35 4.1.5 Bluetooth ( Optional ) ..............39 4.1.6 Display ..................40 4.1.7 Power Manager (Low Power, Shut Down)........41 4.2 File Manager ...................42 4.2.1 File List ..................42 4.2.2 Avail. Memory................43 4.2.3 Del. All Files..................43 4.3 Diagnostics ....................44 4.3.1 Print Config.
-
Page 4: Copyright Declaration
Information in this manual is subject to change without notice and does not represent a commitment on the part of TSC Auto ID Technology Co., Ltd.. No part of this manual may be reproduced or transmitted in any form by any means, for any purpose other than the purchaser’s personal use, without the expressed written permission of TSC... -
Page 5: Introduction
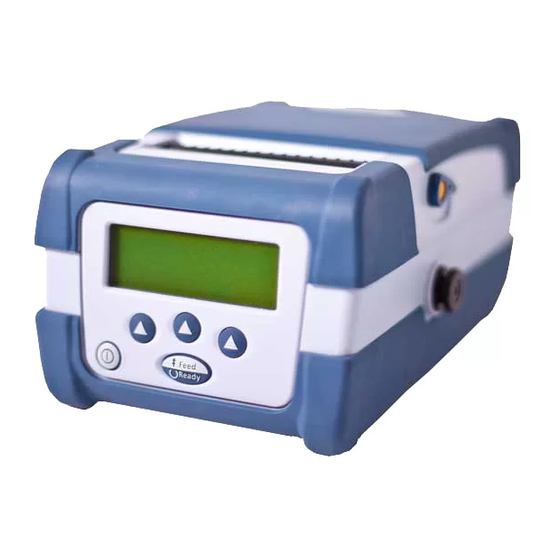
1. Introduction Thank you for purchasing TSC M23 direct thermal printer. M23 is a portable printer, which can accept varieties of media, such as labels, receipt, tag, and fan-fold paper. With LCD display, it is more user friendly for operation and more easily for understanding printer status. -
Page 6: Front View
1.4 Front View Context-sensitive keys Supply door release button Paper exit chute Caution: Hazardous parts. Keep fingers and other body parts away. Tear plate (for label) Peel roller Tear bar (for liner) - Page 7 Platen Gap/black mark sensor Supply holder Peel-off enabler Li-ion battery Strap button Graphic LCD with back lit display...
-
Page 8: Rear View
1.5 Rear View Hinged cable door Fan-fold paper entrance chute Power jack chute RS-232 interface 5V/DTR switch USB interface... -
Page 9: Getting Started
2. Getting Started 2.1 Install the Battery 1. Open the supply door by pulling outward on the release buttons located on either side of the printer.The supply door should swing open. Supply door Release button 2. Insert the connector end of the battery into the printer. Li-ion battery Release button 3. -
Page 10: Using The Strap
2.2 Using the Strap 2.2.1 Hand Strap Clip both rings of the hand strap onto the strap buttons by placing each O-ring over the strap button and gently pulling up on the strap until the strap until the strap locks into place. Hand strap Strap button O -rings... -
Page 11: Shoulder Strap ( Option )
2.2.2 Shoulder Strap ( Option ) Shoulder strap... -
Page 12: Loading Media
2.3 Loading Media 2.3.1 Loading Continuous Labels for Receipt Paper 1. Open the supply door by pulling outward on the release buttons on both sides of the printer. 2. Pull supply holder tabs apart and insert a new roll of media. Make sure the media is positioned so it unwinds from the top as shown. -
Page 13: Loading Die-Cut Labels
4. Close the supply door until the release buttons click into place. Paper exit chute Note: Please set the sensor type as Continuous. 2.3.2 Loading Die-cut Labels Open the supply door by pulling outward on the release buttons on both sides of the printer. - Page 14 2. Lift up the peel off enablers on both sides. Push down the peel off enablers Lift up the peel off enablers 3. Pull supply holder tabs apart, and insert a roll of labels. Make sure the supply unwinds from the top as shown. Note: Calibrate the gap/black mark sensor when changing media.
-
Page 15: Loading Fan-Fold Labels
5. Close the supply door. 6. Press the button once or twice to advance the labels until the liner is separates from the label. Label Liner 2.3.3 Loading Fan-fold Labels 1. Open the supply door by pulling outward on the release buttons on both sides of the printer. - Page 16 Fan-fold paper entrance chute Fan-fold media 4. Adjust the paper guides by sliding to fit the paper width. Paper guides 5. Close the supply door. 6. Calibrate the media if necessary. Note: Please calibrate the gap/black mark sensor when changing media.
-
Page 17: Connecting The Communication Cable
2.4 Connecting the Communication Cable 1. Open the hinged cable door by loosening the two screws. Lift up on the door. Hinged cable door Screws 2. Plug the null modem cable into the RS232 port. (Or plug the USB cable into the USB port.) USB port RS232 port... -
Page 18: Using The Bluetooth Wireless (Optional)
2.5 Using the Bluetooth Wireless (Optional) 1. Open the hinged cable door by loosening the two screws and lifting up on the door. 2. Set the +5V / DTR switch to the +5V position. 5V/DTR switch 3. Plug in the Bluetooth dongle into the RS-232 port. Hinged cable door Bluetooth 4. -
Page 19: Charging The Battery
2.6 Charging the Battery 1. Open the printer supply door and remove the battery. 2. Insert the battery into the charger station. Battery Power Status LED Power LED Description Power is on Power is off Status LED Description Charging battery Amber Battery is 70% charged Green (Solid) - Page 20 lifetime of the battery is 300 times for charge/discharge cycles.
-
Page 21: Using The Display And Buttons
3. Using the Display and Buttons 3.1 LCD Display and Buttons Navigation buttons LCD display On/Off button Feed/Ready button Icon Description Turns the printer on and off. Advances label or returns the display to the previous menu. Three buttons that selecting options on the display. -
Page 22: Lcd Display Icon Description
3.2 LCD Display Icon Description Icon Description Enter the menu Enter cursor located option Scroll up Scroll down Cursor location Increase the setting value + Decrease the setting value - × Cancel OK/select Return the display to the next higher menu. Pause and display the battery voltage... -
Page 23: Lcd/Keyboard Operation
3.3 LCD/Keyboard Operation Option 3.3.1 Turn on/off the Printer Hold the button to turns on/off printer. 3.3.2 Arrow Keys Press the button under the LCD icon to scroll down the menu list Press the button under the LCD icon to scroll up the menu list. Press the button under the ] LCD icon to enter cursor located option... -
Page 24: Lcd Menu Overview
4. LCD Menu Overview Ready 001 (default) 1.5 ips Setup Printer Setup Speed 2.0 ips (default) 2.5 ips 3.0 ips 3.5 ips Density 7 (default) SW E Direction 0 (default) SW I Print Mode Tear Off Mode 850 (default) Batch Mode (default) Peeler Mode Exit Offset... -
Page 25: Main Menu
Main Menu File Setup - Diagnostics - Language - Service Exit Manager 1. Turn on the printer by pressing and holding the button until the display turns on. The display flashes printer version information, battery voltage gauge, and then you see: State Ready... -
Page 26: Setup
4.1 Setup - File Manager - Diagnostics - Language - Service Exit Setup Printer Serial Power - Sensor - - Bluetooth - Display - Exit Setup Comm. Network Manager 4.1.1 Printer Setup Printer setup Print Reference Reference Code Speed - Density - Direction - - Offset - - Country - Exit Mode... - Page 27 4.1.1.2 Density: Density Use this option to setup printing darkness. The available setting is from 0 to 15, and the step is 1. Printer default density is 7.You may need to adjust your density based on selected media. Press button under “+” / “-” icons to increase/decrease the printing darkness.
- Page 28 4.1.1.4 Print Mode: (Tear Off Mode/Batch Mode/Peeler Mode) Batch Mode Peeler Mode This option is used to set the print mode. Printer default setting is Batch Mode. When enter this list, the print mode in the right side of icon is the printer current setting.
- Page 29 4.1.1.7 Code Page: Use this option to set the code page of international character set. For more information about code page, please to refer the programming manual. When enter the code page list, the code page in the right side of icon is the printer current setting.
-
Page 30: Sensor
Code Country Code Country Code Country Code Country Spanish United Brazil (Spain) Kingdom English 002 Canadian-French 036 Hungarian Danish (International) Spanish 038 Yugoslavian 046 Swedish Portuguese (Latin America) Dutch Italian 047 Norwegian 358 Finnish Belgian 041 Switzerland 048 Polish 033 French (France) 042 Slovak German 4.1.2 Sensor... - Page 31 When enter the [Auto Gap] option, you will see following message. Normally, we use this option to calibrate the sensor sensitivity. Insert liner ... Then hit Enter Insert liner between the gap sensors, and press the button under “V” icon to start sensor calibrate.
- Page 32 3. After insert liner between the see through type gap sensor, press the button under “V” icon to continue. 4. Press the button under “+” icon to increase Stock AD value by 50 increment. And press the button under “V” icon to calibrate the sensor sensitivity.
- Page 33 4.1.2.2 Black Sensor: Auto Bline Manual Bline Press the button under icon to select the sensor calibration mode, and press the under “ ” icon to start sensor calibration. 4.1.2.2.1 Auto Bline: When enter the [Auto Bline] option, you will see following message. Normally, we use Auto Bline to calibrate sensor sensitivity.
- Page 34 (without black mark) is placed on the black mark sensor. FAILED Stock AD = 190 If yes, please follow the following steps to calibrate sensor sensitivity agian. 1.Press the button under “ ” icon to return to Bline Sensor menu. 2.
- Page 35 When enter the [Continuous] option, you will see following message. Insert label ... Then hit Enter Insert media between the gap sensor and press the button under “V” icon to start sensor calibration Calibrate Press the button under “+” and “-“ icon to increase and decrease Stock AD value, and press the under “V”...
-
Page 36: Serial Comm
sensitivity. Calibrate 4.1.3 Serial Comm. Serial Comm. Baud Rate - Parity - Data Bite Stop Bits Exit Options Parameters Default Baud Rate 1200 bps/ 2400 bps/ 4800 bps/ 9600 bps 9600 bps / 19200 bps/ 38400 bps/ 57600 bps/ 115200 bps Parity None/ Odd/ Even None... - Page 37 This option is used to set the RS-232 parity. The default setting is None. Press button under to select the different parity, and press button under “V” to set the value into printer. When you enter this list, the parity in the right side of is the printer current setting.
-
Page 38: Rf Network ( Optional )
4.1.4.1 Status: (Checking the Status) 00A0F8E2AD9E 000.000.000.000 Press any button Protocol: TCP Version 1.2 State: Unknow M23 WiFi Radio: IEEE 802.11b TSC Wireless The WiFi module local IP The MAC Address, Protocol, Address, firmware version, current state, and radio type printer mode, board version, are displayed. - Page 39 Press button under icon to select the different options, and press button under “ ” icon to enter the option. 4.1.4.2.1 IP Address IP Address 000.000.000.000 Press the button under icon to move the cursor from left to right, and press the button to set the value from “0”...
- Page 40 mode uses battery power quickly. If you select PSP, you are prompted to enter a PSP algorithm between 1~5. 1 is the shortest sleep time (uses battery power quicker, but responds faster); 5 is the longest sleep time (optimal battery conservation, but responds slower). PSP:3 PSP:4 Press...
- Page 41 4.1.4.2.7 Escape Char Escape Char +035 Use this option to set or view the Command Escape Character (CEC). Run-time messages from the radio begin with the CEC and the default is the pound sign (#), which has a decimal value of 035. You may need to change the default CEC character if it conflicts with other data, because unexpected operation could occur.
-
Page 42: Bluetooth ( Optional )
4.1.5 Bluetooth ( Optional ) Use this menu to enable or disable Bluetooth security, change the PIN, modify the local name, and to show the Bluetooth information. For move Information, please refer to section 2.5 & 5.2. Note: Before using Bluetooth dongle, please set the RS-232 baud rate to 115200 bps. -
Page 43: Display
Press the button under icon to move the cursor from left to right, and press the button to set the value. Press the button under “V” icon to save the setting. 4.1.5.3 Local Name: Use this option to view and set the Bluetooth local name. The local name is used for identification purposes with host, not authentication. -
Page 44: Power Manager (Low Power, Shut Down)
4.1.6.2 Backlight: Use this option to disable or enable the LCD backlight. Printer default setting is Disable. Disable Enable Press button under icon to select the different modes, and press button under “V” icon to set it. 4.1.7 Power Manager (Low Power, Shut Down) Use this menu to set the amount of time before the printer goes into sleep mode. -
Page 45: File Manager
press button under “V” icon to set it. 4.1.7.2 Shut Down: When the printer is inactive for a certain period of time, it goes into shut down. You can set the printer to go this mode from 5 minutes up to 3 hours. Disable 5 Minutes Press... -
Page 46: Avail. Memory
Cursor selected file File name R: TEST1.BAS File saved in DRAM R: TEST2.BAS File saved in flash ROM F: TEST3.BAS Open selected file R: TEST1.BAS Delete this file File size 5 Bytes Run selected file Return to previous menu. 4.2.2 Avail. Memory Use this menu to show available memory space. -
Page 47: Diagnostics
4.3.1 Print Config. To print out the self test data to a label. PRINTER INFO. Print head test pattern Printer model name MODEL: M23 Main board firmware version MAIN VERSION: V0.90 Main board firmware checksum MAIN CHECKSUM: 12BF , 740B , 0 Second processor firmware version AUX. -
Page 48: Dump Mode
4.3.2 Dump Mode Captures the data from the communications port and prints out the data received by printer. DOWNLOA 0D 0A 44 4F 57 4E 4C 4F 4I D "TEST2. 44 20 22 54 45 53 54 32 2E DAT",5,CL 44 41 54 22 2C 35 2C 43 4C S DOWNLO 53 0D 0A 44 4F 57 4E 4C 4F AD F,"TES 41 44 20 46 2C 22 54 45 53... -
Page 49: Display
4.3.5 Display To see the backlight is working or if pixels are missing on the display. Display Press the button under icon to check if there is any white dot on the LCD. The LCD will turn to black, and press any button to return to Display menu. Press the button under icon to check if there is any black dot on the LCD. - Page 50 Display Buttons...
-
Page 51: Language
4.4 Language Language English Exit This option is used to setup LCD display interface language. English Exit... -
Page 52: Service
4.5 Service Service Initialization Mileage Info. Exit This option is used to restore printer settings to defaults and display printer mileage information Initialization Mileage Info. 4.5.1 Initialization The printer settings are restore to defaults as below once printer is initialized. Parameter Default setting Speed... -
Page 53: Mileage Info
sensor Bline Intension Will be reset. Need to re-calibrate the bline sensor LCD Contrast Back Light off Time 10 sec Low Power Time Shut Down Time Note : When printer initialization is done, please calibrate the gap or black mark sensor again. -
Page 54: Printing Labels
5. Printing Labels 5.1 Connect with a Cable to Print 1. Install the provided printer driver and labeling software to the Windows operating system. 2. Connect the printer to a computer mainframe with RS-232 or USB cable. (Please to refer the section 2.4.) 3. -
Page 55: Stand-Along Printing
3. Loading and calibrate supplies. 4. Then, refer as follow to calibrate the bluetooth. (1) Please to refer the section 2.5 to plug the Bluetooth device into the printer. Make sure the +5V/DTR switch is setting to the +5V position. (2) Please to refer the section 4.1 to make sure the communication values are set to 115200, None, 8, 1. -
Page 56: Troubleshooting
Download a format and batch. Refer the Programmer's manual. (Can be downloaded from service and support web site.) Start Stand-along Printing: 1. Pull out the connecting cable. 2. To print the supplies (Refer the Programmer's manual.) 3. Remove the printed supplies. 6. - Page 57 Recharge or replace a new Make sure the battery is fully battery charged Close front door completely Check if front door is closed completely Check if supply is loaded correctly Reload the supply Clean the print head Poor Print Check for dust or adhesive Quality accumulation on the print head.
-
Page 58: Maintenance
7. Maintenance This session presents the clean tools and methods to maintain your printer. 1. Please use one of following material to clean the printer. Cotton swab Lint-free cloth Vacuum 100% ethanol 2. The cleaning process is described as following Printer Part Method Interval... - Page 59 3. Illustration for recommended cleaning parts: Tear edge (for label) Printhead Peel bar Peel roller Black mark Platen sensor roller On-Demand sensor...
- Page 60 Note: Do not touch printer head by hand. If you touch it careless, please use ethanol to clean it. It’s industry alcohol. Please do not use regular alcohol, which may damage the printer head. You may have to clean the supply sensors more often if you frequently receive supply error messages.
-
Page 61: Firmware Update Procedure
(1) Set the PC’s COM port setting. Please issue following command in command prompt mode to setup PC RS-232 communication parameters. C:\>mode com1 baud=115200 parity=n data=8 stop=1 octs=on rts=on <Enter> (2) Copy firmware file to M23 with binary copy parameter. C:\>copy M23_v06.NEW /b com1... - Page 62 (3) M23 will show the following message on LCD when firmware update. Main Update BIOS Main Update BIOS Write Flash … Receive Data … (4) Printer will reset automatically when firmware is upgrade completely. Method 2: Use the utility “CommTool.exe” to update printer firmware (1) Start “CommTool”...
- Page 63 (2) Click “Send File” button and select firmware file to upgrade firmware from RS-232 interface. (3) Printer will reset automatically when firmware update is completed.
-
Page 64: Update Firmware Via Usb Port
2. Select “USB Printing Support” in USB Device option 3. Click “Send File” button to select firmware file and send selected firmware through USB interface to update printer firmware. 4. M23 will show the following message on LCD when firmware update. Main Update BIOS Main Update BIOS Write Flash …... -
Page 65: Power On Utilities
9. Power on utilities There are two power-on utilities to set up and test printer hardware. These utilities are activated by pressing button and by turning on the printer power simultaneously. The utilities are listed as below: Printer initialization Ignore AUTO.BAS Middle button Left button Right button... - Page 66 Gap Setting 0.12"(3.0mm) Print Direction Reference Point 0,0(upper left corner) Offset Tear Mode Peel off Mode Serial Port Settings 9600 bps, none parity, 8 data bits, 1 stop bit Code Page Country Code Clear Flash Memory No Shift Gap Intension Will be reset.
-
Page 67: Ignore Auto.bas
9.2 Ignore AUTO.BAS If AUTO.BAS file is downloaded in printer flash memory, printer will run this program automatically when turns on printer power. Please follow the steps below to skip the AUTO.BAS file. 1. Turn off the printer power. 2. Hold down the right button and turn on the printer power. 3. - Page 69 No. 35, Sec. 2, Ligong 1st Rd., Wujie Town 11F, No. 205, Sec. 3, Beishin Rd., Shindian City, , I-Lan County 268, Taiwan, R.O.C. Taipei 231, Taiwan, R.O.C. TEL: +886-3-990-6677 TEL: +886-2-8913-1308 FAX: +886-3-990-5577 FAX: +886-2-8913-1808 Web site: www.tscprinters.com E-mail: printer_sales@tscprinters.com TSC Auto ID Technology Co., Ltd. tech_support@tscprinters.com...
Need help?
Do you have a question about the M23 and is the answer not in the manual?
Questions and answers