Beam Iridium SatDOCK 9555 Installation & User Manual
Suitable for the iridium 9555 portable satellite telephone
Hide thumbs
Also See for Iridium SatDOCK 9555:
- Installation & user manual (48 pages) ,
- Quick start manual (2 pages)
Table of Contents
Advertisement
Quick Links
Advertisement
Table of Contents

Related Manuals for Beam Iridium SatDOCK 9555


Summary of Contents for Beam Iridium SatDOCK 9555
-
Page 1: User Manual
SatDOCK 9555 Installation & User Manual Suitable for the Iridium 9555 Portable Satellite Telephone REMOTE SATELLITE SYSTEMS 1455 North Dutton Ave Suite A Santa Rosa, CA 95401 (888) 989-8199 www.remotesatellite.com Beam Communications Pty Ltd support@remotesatellite.com... - Page 2 8 Anzed Court, Mulgrave, Victoria, 3170, AUSTRALIA Information furnished by BEAM Communications Pty Ltd (BEAM) is believed to be accurate and reliable. However, no responsibility is assumed by BEAM for its use, or for any infringement of patents or other rights of third parties, which may result from its use. No license is granted by implication or otherwise under any patent or patent rights of BEAM.
-
Page 3: Package Contents
Package Contents Check that your SatDOCK 9555 package contains: 1 x SatDOCK 9555 Docking Station 1 x Hands Free Interface (HFI) module 1 x Speaker 1 x Microphone 1 x 3-wire Power cable harness / 2 Fuses 1 x RAM bracket 3 x M4 Screws Mounting Adhesive / Velcro User Manual... - Page 4 BLANK PAGE...
-
Page 5: Table Of Contents
SatDOCK 9555 Installation & User Manual Contents Safety Information About Beam Communications About this Equipment SATDOCK 9555 FEATURES Installation Guidelines EQUIPMENT OVERVIEW UNPACKING & TESTING INSTALLATION PROCEDURE INSTALLING THE SATDOCK CRADLE SATDOCK INSTALLATION STEPS INSTALLING HANDSFREE INTERFACE UNIT (HFI) ANTENNA CONNECTION... -
Page 6: Safety Information
Safety NOTE: Information Please read the following information carefully before installing and using the Beam SatDOCK 9555. Failing to follow instruc- tions may compromise the safety of the product and may result in personal injury and/or equipment damage. Please consult your supplier if you have any further questions. - Page 7 SatDOCK 9555 Installation & User Manual Safety – Iridium Transceiver 9555 • Your 9555 handset is a low power radio transmitter and receiver. When it is ON, it receives and also sends out radio frequency (RF) signals. • The Iridium 9555 handset has an in-built Iridium transceiver which is designed to be used with an external antenna.
-
Page 8: Antenna Care
IMPORTANT: Cellular & Satellite terminals or mobiles operate using radio sig- nals and communication networks. Because of this, connection cannot be guaranteed at all times under all conditions. There- fore, you should never rely solely upon any wireless device for essential communications, for example emergency calls. -
Page 9: Posted Facilities
SatDOCK 9555 Installation & User Manual Vehicles RF signals may affect improperly installed or inadequately shielded electronic systems in motor vehicles. Check with the manufacturer or its representative regarding your vehicle. You should also consult the manufacturer of any equipment that has been added to your vehicle. -
Page 10: Conventions In This Manual
Conventions in this Manual Warnings, cautions and notes appear throughout this manual and are represented by following conventions. WARNING / CAUTION: This symbol and associated text indicate a warning note providing information to prevent damage to equipment or personal injury. NOTE / IMPORTANT / TIP: This symbol and associated text indicate a note providing general operating information. -
Page 11: About Beam Communications
SatDOCK 9555 Installation & User Manual About Beam Communications Beam Communications, a wholly owned subsidiary of World Reach Limited (WRR), listed on the Australian Stock Exchange, is a world leader in design, manufacture and distribution of specialized communications equipment for the Iridium Satellite Network. -
Page 12: About This Equipment
About this This guide outlines the details for installing the Beam SatDOCK 9555 in conjunction with an Iridium 9555 Portable Handset. Equipment This kit must not be used with any other device other than the Iridium 9555 Handset. SATDOCK 9555 •... -
Page 13: Rs232 Data Port
SatDOCK 9555 Installation & User Manual Suitable for Marine installation Not only is the SatDOCK 9555 suitable for various vehicle applications but also is suited to marine applications. Install in a small boat, right up to a large vessel and have your 9555 handset ready for use. -
Page 14: Installation Guidelines
Installation Wherever you install your equipment, follow these guidelines: Guidelines • The units must be protected from dirt and moisture. • Ensure that each mounting surface is strong enough to support the component being mounted to prevent the component from loosening over time. -
Page 15: Equipment Overview
SatDOCK 9555 Installation & User Manual EQUIPMENT SatDOCK 9555 Installation Set Up OVERVIEW To Iridium Antenna SMA - Radio Mute 100mA max, O/C sink to ground. 3A Fuse DC Input 10 - 32V DC 10A Fuse (Optional) Horn 100mA max O/C sink to USB Data Port ground... -
Page 16: Guidelines For Electrical Connections
Guidelines for Electrical Connections The System is designed to operate in negative ground 10 to 32 Volt DC electrical systems only. • The best power connection point for the positive primary power leads is the positive terminal of the vehicle battery. Often, direct connection to the battery is inconvenient, and you may find it easier to connect the positive leads to the starter solenoid. -
Page 17: Unpacking & Testing
SatDOCK 9555 Installation & User Manual UNPACKING & Preliminary Testing TESTING Unpack all components and assemble them on a service bench. Position the antenna several meters from the other components to avoid potential interference. Using a bench power supply in place of the vehicle battery, verify that all components are functioning properly. -
Page 18: Installation Procedure
INSTALLATION Install the components in the following order: PROCEDURE Mount/Install SatDOCK cradle Mount/Install HFI box Installing interface/antenna cables Install directional microphone Install speaker Install External Iridium Antenna Connect Power Test installation INSTALLING THE When selecting a location for the SatDOCK cradle, consider these guidelines: SATDOCK CRADLE •... -
Page 19: Satdock Installation Steps
SatDOCK 9555 Installation & User Manual SATDOCK INSTALLATION STEPS 1. Remove base 2. Mount base 3. Affix other plates by plate in desired base to Sat- loosening wing location DOCK with M4 screws 4. Rejoin the two 5. SatDOCK is 6. For wall bases using the now ready to be mounting use... - Page 20 To install the HFI box, follow these steps: Using the Hands Free Interface as a template, mark the hole locations. Remove the bracket, and use an awl or similar device to start the holes at the marked locations. Drill the holes & mount the HFI unit using six suitable screws. CAUTION: Always use the supplied mounting hardware for mounting the units.
-
Page 21: Antenna Connection
SatDOCK 9555 Installation & User Manual Connecting the SatDOCK Cradle to the HFI Unit Make sure the cable is routed correctly and will not be crushed or damaged during normal operation of the vehicle. Plug the interface cable coming from the bottom of the SatDOCK into the Hands Free Interface Unit and fasten both thumbscrews to keep it secure. -
Page 22: Installing The Directional Microphone
INSTALLING THE Selecting a Location for the Microphone DIRECTIONAL The hands-free directional microphone must be properly positioned MICROPHONE in the vehicle to ensure optimum performance. When selecting a location for the microphone, consider these guidelines: • Mount the microphone near the centre of the vehicle, either on the driver-side sun visor or on the head-liner above the driver. -
Page 23: Installing The Speaker
SatDOCK 9555 Installation & User Manual INSTALLING THE Follow these steps to mount the speaker: SPEAKER Mount the speaker to the transmission hump or underneath the dashboard on the passenger side. Do not mount the speaker so that it faces the microphone directly or this will cause heavy feedback within the system. -
Page 24: Wiring For A Marine Application
When installed in a marine application this accessory input (green wire) should be wired to a suitable panel switch that will allow the SatDOCK 9555 to be turned on and off when not in use or to dock or undock the 9555 handset. Wiring For a Marine Application When installed in a marine application the green wire (accessories) should be wired to a suitable panel switch which will allow the... -
Page 25: Satdock 9555 Usage
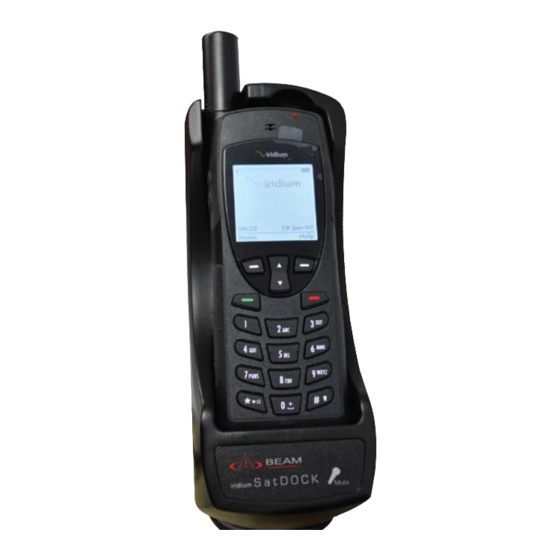
SatDOCK 9555 Installation & User Manual SatDOCK 9555 CAUTION: Usage Ensure that the external antenna grommet at the rear of the 9555 handset is removed prior to inserting the handset into the SatDOCK cradle. To dock the 9555 handset place the base of the 9555 handset into the seat if the SatDOCK ensuring that the pins on the bottom of the 9555 handset line up with that on the seat of the Sat DOCK cradle as illustrated below. -
Page 26: Operation Of The Satdock
OPERATION OF THE Ensure the 9555 handheld is switched OFF, and the vehicle igni- tion is OFF. SATDOCK Retract the antenna on the 9555 handheld phone. Place the handset into the SatDOCK as per the previous instructions. Switch the vehicle ignition to ACC or ON position: phone and SatDOCK will automatically power up. -
Page 27: Mute Functionality & Earpiece-Jack Mode
SatDOCK 9555 Installation & User Manual MUTE FUNCTIONALITY Mute functionality: & EARPIECE-JACK The mute function of the SatDOCK, MODE allows the user to mute the uplink (microphone) audio to the 9555 handset whilst docked SatDOCK. Press the Mute button on the face of the SatDOCK, a red light will illuminate the Mute button to visually... -
Page 28: Data Communications
If during operation of the SatDOCK unit the 9555 does not turn ON or OFF try: Turn vehicle Accessories OFF Turn the 9555 OFF Remove the 9555 from the SatDOCK (switch OFF if it was not possible to previously) Wait 10 seconds Return the 9555 to the SatDOCK Turn ON the vehicle Accessories. - Page 29 SatDOCK 9555 Installation & User Manual AT Commands When utilizing the data communication ports (USB and Serial DB9) the SatDOCK must ensure that users do not enter in AT commands that could interrupt the SatDOCK’s synchronization with the 9555 handset. Therefore the SatDOCK will block or limit AT commands that could cause any adverse effects to the functional operation of the cradle.
-
Page 30: Using The Rs232 Communication Port
USING THE RS232 An RS232 serial data port is available via the “Comm Port” allowing data calls, or tracking / alerting modules or a PC to be connected. COMMUNICATION The DB9 Comm Port enables data devices to be connected to the PORT Hands-free Interface unit. -
Page 31: Using The Usb Data Port
SatDOCK 9555 Installation & User Manual USING THE USB The SatDOCK 9555 provides a USB data port interface that allows a PC/Laptop to connect through to the docked 9555 for data DATA PORT communications. Mini-USB Data Port To connect a PC/Laptop to this USB port you will require a mini-USB-B to USB-A data cable. -
Page 32: Using The Line In/Out
USING THE The Line In/Out pluggable screw-terminal allows interfacing to the vehicles’ existing communications system. The Line audio level of LINE IN/OUT this interface is that of typical equipment being -10dBV, which is about 0.3V RMS (2V Peak to Peak Max) Input Impedance: 50k ohm Output Impedance:... -
Page 33: Connecting An Intelligent Handset (Optional)
SatDOCK 9555 Installation & User Manual CONNECTING The Hands-free interface is capable of supporting the use of an optional Intelligent handset. AN INTELLIGENT An optional Beam RST970 Intelligent Handset will simply connect to HANDSET (OPTIONAL) the Hands Free Interface Unit. When connecting the RST970 Intelligent Handset, make sure that the Vehicle Accessories is off and the 9555 handset is off prior to powering on the Intelligent Handset. -
Page 34: Iridium 9555 Display Definitions
IRIDIUM 9555 Display Status Indicators and Icons: DISPLAY DEFINITIONS The following icons will appear in your display to provide you with various information about the phones activity. MAIN SCREEN COMPONENTS MENU COMPONENTS... -
Page 35: Power-On Messages
SatDOCK 9555 Installation & User Manual POWER-ON Once your phone is power on, you may see: MESSAGES Message Description Searching... The phone is attempting to establish communications with satellite network. Registering... Your phone is registering with the network. When the process is complete, you will see Registered. -
Page 36: Assuring Quality Of Iridium Service
Assuring Iridium is committed to providing subscribers around the world consistent, reliable, quality voice and data access all day every day. Quality of The Iridium satellite system is monitored for call performance from numerous locations 24 hours a day, 7 days a week in order to achieve Iridium Service this. -
Page 37: Symptoms Of Rf Interference
SatDOCK 9555 Installation & User Manual 3. RF Interference All wireless devices, including satellite telephones, are susceptible to RF (radio frequency) interference from other electronic devices. This problem is more evident when numerous antennas and broadcasting devices are located within close proximity to each other. Symptoms of RF Interference Symptoms of RF interference often resemble those that arise when an Iridium phone is being operated with an obstructed view of the... -
Page 38: Specification Summary
Specification Electrical Power 10-32V DC 2.5A Summary Average Power Current Power Consumption # @ 12V Watts (HFI & 9555 Cradle) ELECTRICAL & Standby Mode (Charged) 0.23 A 2.8W ENVIRONMENTAL Standby Mode (Charging) 1.0 A 11.9W SPECIFICATIONS Talk/Transmit Mode 1.5A Sleep Mode 35mA # Optional DPL Handset Add +2.5 Watts... -
Page 39: Rs232 (Com Port) Specification
SatDOCK 9555 Installation & User Manual RS232 (COM PORT) The HFI is provided with a RS232 serial port for data connection. It is a 9-pin D-type (female) socket, wired DCE for connection to a SPECIFICATION standard PC with a 1:1 cable. RS232 Port Pin-outs: Signal Direction... -
Page 40: Cradle Mounting Dimensions (Millimeters)
CRADLE MOUNTING DIMENSIONS (Millimeters) 46.05 23.01 61.92 30.17 15.08 5.53 19.05 19.05... -
Page 41: Hands Free Interface (Hfi) Mounting Dimensions (Millimeters)
SatDOCK 9555 Installation & User Manual HANDS FREE INTERFACE (HFI) MOUNTING DIMENSIONS (Millimeters) -
Page 42: Trouble Shooting
Trouble This chapter provides information to help you troubleshoot problems you may encounter while running the HFI and/or SatDOCK. Shooting No power on HFI Check power is connected to the interface unit Check the vehicle ignition is in ACC or IGN or ON position Ensure the 9555 Handset had been powered on Ensure the Connector cable to the SatDOCK is firmly fitted Check all the connection cables to and from the interface... - Page 43 SatDOCK 9555 Installation & User Manual There a buzzing coming from the in-vehicle unit Check the car radio is switched off whilst on a call Check there is no external interference from outside the vehicle, trains, large machinery, other communication equipment Check the microphone and antenna cabling Check the DC power input...
- Page 44 Phone powers off once the ignition is switched off or the key is removed after 20 minutes. This is normal operation; however connecting the ACC cable to a constant power source on the vehicle will rectify this, if such an operation scenario is required. There is no Audio from the Speaker Check that the speaker connector is installed directly to the HFI kit.
- Page 45 Check the cable between the HFI and the SatDOCK cradle is secure. Check that the SatDOCK has power. Check that the 9555 handset is seated correctly in the SatDOCK. For additional product support: BEAM Communications Pty Ltd 8 Anzed Court, Mulgrave Victoria, 3170, AUSTRALIA Web: www.beamcommunications.com Info: info@beamcommunications.com...
-
Page 46: Beam Warranty Conditions
BEAM Communications will not accept responsibility for any invoiced goods or services that are not covered by a BEAM Communications written pur- chase order. Under no circumstances does BEAM Communications agree to pay for labour or other related expenses associated with the troubleshooting and/or repair of our product without prior specific written authorization. - Page 47 SatDOCK 9555 Installation & User Manual NOTES...
- Page 48 WEB: www.beamcommunications.com REMOTE SATELLITE SYSTEMS 1455 North Dutton Ave Suite A Santa Rosa, CA 95401 EMAIL: info@beamcommunications.com (888) 989-8199 www.remotesatellite.com PHONE: +61 3 8588 4500 support@remotesatellite.com FAX: +61 3 8588 4599 AFRICA | ASIA | AUSTRALIA | EUROPE | MIDDLE EAST | NORTH AMERICA | SOUTH AMERICA...
Need help?
Do you have a question about the Iridium SatDOCK 9555 and is the answer not in the manual?
Questions and answers