
Subscribe to Our Youtube Channel
Related Manuals for Campbell IPn3Gb


Summary of Contents for Campbell IPn3Gb
-
Page 1: Cellular Modem
IPn3Gb Cellular Modem July 2014 Copyright © 2014 Campbell Scientific (Canada) Corp. -
Page 4: Table Of Contents
PDF reader bookmarks tab for links to specific sections. 1. Introduction ..............1 2. Cautionary Statements ..........1 3. Initial Inspection............1 4. Specifications.............2 5. Installation ..............3 Base Station Requirements for IPn3Gb Cellular Modem ....4 Datalogger Site Equipment ..............4 Configuration ..................5 5.3.1 Support Materials................5 5.3.2 Getting Started ................5... - Page 5 7. Troubleshooting............26 Figures Figure 5—1 SC932A interface..............20 Figure 6—1 Front view of the IPn3Gb Cellular Modem ......22 Figure 6—2 Rear view of the IPn3Gb Cellular Modem ....... 23 Figure 6—3 Antennas for use with the IPn3Gb Cellular Modem....25 Tables Table 5-1.
-
Page 6: Introduction
This manual provides information for interfacing the Microhard IPn3Gb Cellular Modem to Campbell Scientific dataloggers. Please note that this manual will focus on the use of the IPn3Gb cellular modem on the Bell, Telus, and Rogers networks. The IPn3Gb Cellular Modem is a high-speed interface optimized for use on 3G architecture. -
Page 7: Specifications
Specifications Supported bands: UMTS/HSPA FDD Bands [MHz] – Six band Band I (2100MHz), Band II (1900MHz), Band IV (1700MHz), Band V (850 MHz), Band VI (800MHz), Band VII (900MHz) 3GPP Release 7 5.76 Mb/s uplink, 21.1 Mb/s downlink, or 5.76 Mb/s uplink, 7.2 Mb/s downlink Data features: HSDPA cat 14, up to 21.1 Mb/s DL for LISA-U230... -
Page 8: Installation
Ethernet: 10/100 BaseT, Auto – MDI/X, IEEE 802.3 SIM Card: 1.8 / 3.0V PPP Characteristics: Dial on Demand, Idle Time Network Protocols: TCP, UDP, TCP/IP, TFTP, ARP, ICMP, DHCP, HTTP, HTTPS , SSH , SNMP, FTP, DNS, Serial over IP, QoS Management: Local Serial Console, Telnet, WebUI, SNMP, FTP &... -
Page 9: Base Station Requirements For Ipn3Gb Cellular Modem
L28900 Ethernet Cable – connect the modem Ethernet port to a PC or other Ethernet device. Commonly used to configure the modem. The IPn3Gb Ethernet port is auto-sensing so a cross-over cable can also be used. (optional) C2809 USB Cable – connect the modem USB port to a PC in order to... -
Page 10: Configuration
C2675 IPn3Gb Mount Kit – Used to mount the modem in the datalogger enclosure with the use of DIN rail and DIN rail adaptors. SC932A Interface – required if connecting the modem to the CS I/O port of a datalogger. -
Page 11: Connecting For Configuration
Connect the power cable between the Vin & GND terminals on the modem and the power source. Connect the USB (C2809), Ethernet (L28900) or equivalent Ethernet cable between the modem and the PC to start the configuration process. 5.3.3 Connecting for Configuration Note Be sure to allow the modem to warm up before trying to connect. -
Page 12: Network Provision
5.3.4 Network Provision The network provision configurations are specific to the Service Provider. The NOTE remaining configuration steps are the same for Bell, Telus, or Rogers users. Details related to Dynamic and Static IP configurations are listed below. To provision the modem on the service provider network the following information will need to be entered into the “Config”... -
Page 13: Dynamic Ip
5.3.4.1.2 Dynamic IP Access Point Name (APN): public.bell.ca Across Canada, the APN for a Dynamic IP is public.bell.ca User Name: 10-digit phone#@public.bell.ca Password: not required Submit. (Save) 5.3.4.2 Telus 5.3.4.2.1 Static IP APN: For example, static.telus.com Static APNs differ across Canada; ask Telus Service Provider for appropriate APN User Name: 10-digit phone#@static.telus.com Password: required;... - Page 14 When provision details are saved to the modem, it should provision on the network. This can be confirmed under System | Summary. Active Status = Call in progress Network = Name of Service Provider SIM Card = Ready Check RSSI value for signal strength. Signal strength should be greater than- 105dBm;...
-
Page 15: Dynamic Dns (Ddns)
5.3.5 Dynamic DNS (DDNS) If your modem is configured with a Static IP, skip this step and move on to NOTE Section 5.3.6. If your modem is configured with a Dynamic IP, complete this step. In order to complete this step of the configuration, you must sign-up online for a Dynamic Domain Name System (DDNS) service. -
Page 16: Ddns Example
Choose from one of the following providers: Enable “DDNS Status” Select “Service name” of the provider you have signed up with. Enter related domain, User ID, and Password Submit 5.3.5.1 DDNS Example The following is an example of how to setup a free DDNS service. The steps listed are specific to this DDNS provider and may not reflect the steps required to setup a DDNS from a different provider. - Page 17 Select the DNS manager link Add an appropriate domain name and choose a suffix from the drop down list. Click “Add Domain”. If the combination is available the domain will be added to your account. If the domain is not available select again until you find a domain.
-
Page 18: Com1
Enter details into the modem configuration 5.3.6 COM1 In order for the modem to communicate with a Campbell Scientific datalogger, the COM1 (data) port must be properly configured. The parameters discussed here are relevant for serial communications; however, settings may vary depending on the datalogger used. -
Page 19: Firewall
In order to avoid confusion or unwanted communication, it is recommended to NOTE change this port to match the last 4 digits of the modem’s cellular telephone number. This must be done in the modem (COM1 & Firewall), the datalogger, and LoggerNet. -
Page 20: Security
With the Firewall enabled it is possible to define specific traffic that will be allowed. Navigate to the ‘Rules’ tab Enter a name for the rule Configure the ‘Destination PORT’ to match that of the datalogger (i.e. 6785). This must be the same as the PakBus port and the local listing port configured in Section 6.3.6. -
Page 21: Configuration Backup
Under Security navigate to the Password tab Change passwords as needed. Be sure to maintain a sercure record so that a reference is available. Submit 5.3.9 Configuration Backup It is possible to backup the configuration of a modem after completion. Under Tools navigate to the Maintenance tab. -
Page 22: Load Configuration
Internet IP Address field, followed by the Port number. This number (6785) is the datalogger’s default port number. It is also used to configure the “Com1” and “Firewall” settings of the IPn3Gb Cellular Modem. Whenever possible it is recommended to change this... - Page 23 Extra response time should be 10 - 12 seconds. Click “Apply”. 4. For PakBus dataloggers, add 10 seconds of Extra Response Time. “PakBus Port Always Open” should not be checked.
-
Page 24: Wiring And Connections
For PakBus dataloggers, set the PakBus address to match that of the datalogger (default address in the datalogger is 1). Click the “Apply” button to save changes. Wiring and Connections Power for the modem can be sourced directly from the datalogger. Refer to Table 5-1 for details. -
Page 25: Modem Connection Using The L18663 Null Modem Cable
In order to connect to a CR1000, CR3000, CR800, or CR200X series RS-232 port you will require a Null Modem Cable, Campbell Scientific part number L18663. Connect one end of the Null Modem Cable to the IPn3Gb Cellular Modem and the other to the datalogger’s RS-232 port. -
Page 27: Operation
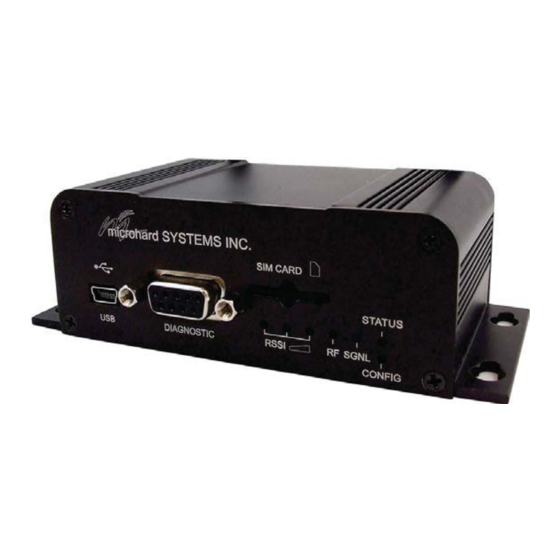
(assuming cellular coverage) rather than in the field. Connectors and Indicators 6.2.1 Modem Front The front of the IPn3Gb Cellular Modem includes the USB port, Diagnostic port, SIM card slot, Indicator LEDs, and Config button. Figure 6—1 Front view of the IPn3Gb Cellular Modem The USB port can be used to configure the modem. -
Page 28: Modem Back
The back of the modem includes the Antenna SMA(F) connector, power connection, Data (RS-232) port, and Ethernet port Figure 6—2 Rear view of the IPn3Gb Cellular Modem The Antenna required for the application is connected to the Antenna connector. The GPS and RX DIV are not used. -
Page 29: Hardware
C2675 IPn3Gb Mounting Kit – includes mounting hardware for securing the modem to below referenced environmental enclosure. IPn3Gb should be mounted in a position that allows easy access for the cables so they are not bent, or constricted. Antenna – the following antennas are available from Campbell Scientific. -
Page 30: Figure 6-3 Antennas For Use With The Ipn3Gb Cellular Modem
L18285 1 dBd Omni Directional Antenna C2444/C2445 9dBd Directional Yagi Antenna L21831 Half-Wave Dipole Whip Antenna Figure 6—3 Antennas for use with the IPn3Gb Cellular Modem Power Supply (See Section 6.5 Wiring and Connections). Environmental Enclosure— ENC 10/12, ENC 12/14, or ENC 16/18. -
Page 31: Troubleshooting
Troubleshooting If LoggerNet/PC400W software is unable to establish a connection with the modem: Check your account information (you may have to call your provider for this or look at your agreement). Verify there is coverage at your location. Check the RF and SGNL Indicator LEDs on the front of the modem. Ensure that the modem has successfully connected to the cellular network. - Page 32 Campbell Scientific (Canada) Corp. | 14532 131 Avenue NW | Edmonton AB T5L 4X4 | 780.454.2505 | www.campbellsci.ca AUSTRALIA | BRAZIL | CANADA | COSTA RICA | FRANCE | GERMANY | SOUTH AFRICA | SPAIN | UNITED KINGDOM | USA...
Need help?
Do you have a question about the IPn3Gb and is the answer not in the manual?
Questions and answers