Table of Contents
Advertisement
Advertisement
Table of Contents

Related Manuals for Titan SF10N1


Summary of Contents for Titan SF10N1
- Page 1 SAFETY AND OPERATING MANUAL 10” TABLE SAW SF10N1...
- Page 2 Congratulations on your purchase of a power tool from Screwfix Direct Ltd. We want you to continue getting the best performance from it so this handbook includes information on safety, handling and care. Please retain this handbook in case you need to refer to any of the information in the future. Your power tool comes with a 12-month guarantee,so should it develop a fault within this period contact Screwfix Direct Ltd on Freephone 0500 41...
-
Page 3: Safety Instructions
Inspect extension cords periodically and replace if damaged. Keep handles dry, clean and free of oil or grease. 15. Disconnect tools. When not in use, before servicing and when changing accessories such as blades, bits 10” TABLE SAW SF10N1... -
Page 4: Health Advice
and cutters, disconnect tools from the power supply. 16. Remove adjusting keys and wrenches. From the habit of checking to see that keys and adjusting wrenches are removed from the tool before turning it on. 17. Avoid unintentional starting. Ensure switch is in the “off” when plugging in. 18. - Page 5 During transportation the upper part of the saw blade must be covered by the guard. h)All persons using this product must read the instructions and familiarise themselves with the machine workings. SYMBOLS Read the manual Warning Wear gloves Wear dust mask,eye & ear protection Conforms to relevant safety standards 10” TABLE SAW SF10N1...
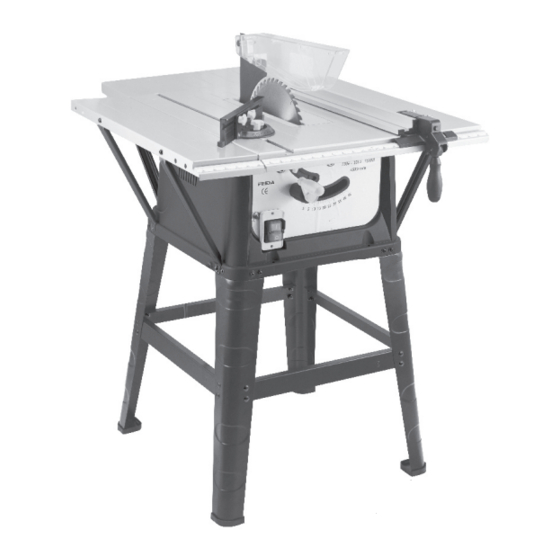
- Page 6 1. ON/OFF SWITCH 2. TILTING HANDLE 3. TILTING HANDLE LOCK KNOB 4. PUSH STICK 5. MITRE GAUGE 6. BLADE 7. RIVING KNIFE 8. BLADE GUARD 9. RIP FENCE 10. RIP FENCE LOCK HANDLE 11. ELEVATING & LOWERING HANDLE...
-
Page 7: Technical Data
Sound pressure level: 99.3 dB(A) Sound power level: 112.3 dB(A) ACCESSORIES Rip Fence: Mitre Gauge: Push Stick: Spanner for Blade Change: 2pcs Allen Key: 2pcs Support bracket : 4pcs Support leg: 4pcs Extension table support bar: 6pcs 10” TABLE SAW SF10N1... -
Page 8: Operation Instructions
OPERATION INSTRUCTIONS Warning: Before using your table saw, read the instruction manual carefully. ASSEMBLY OF THE TABLE SAW Assembly of the table saw 1. Support leg 1)Take the assembly out of packaging.Pick out two Fig 1 main legs ,one bracket, then fix bracket onto the legs with the bolts provided, but do not tighten (see Fig1). -
Page 9: Operation Controls
Before turning the table saw ON, be sure it is securely tightened so that the blade will not shift during the table saw operation. (See Fig19) 5) Riving knife Fig 8 This separates the saw kerf in a workpiece. This prevents possible binding and kickback. 10” TABLE SAW SF10N1... - Page 10 6) Rip fence This fence is used for all ripping operations. Never rip freehand without the fence in place and securely locked. 7) Mitre gauge The head is locked in the desired position for crosscutting or mitring by tightening the lock handle.
-
Page 11: Maintenance Changing The Blade
(See Fig26) 8) Bevel ripping When bevel ripping material 150mm (6”) or Rip fence narrower use the fence on the right side of the blade only. (See Fig26) MAINTENANCE Fig 15 CHANGING THE BLADE 10” TABLE SAW SF10N1... -
Page 12: Maintenance
1. Unplug the saw. 2. Remove the blade guard. 3. Remove the table insert. (See Fig27) 4. After loosening the lock knob, turn the elevating handle to raise the blade to its highest position. Locking Use both wrenches to loosen the arbor nut. (See handle Fig28) 5. -
Page 13: Environmental Protection
Waste electrical products should not be disposed of with household waste. Please recycle where facilities exist. Check with your Local Authority or retailer for recycling advice. Fig 18 Tilting handle lock Fig 19 Fig 20 Fig 21 10” TABLE SAW SF10N1... - Page 14 Fig 22 Fig 26 Center cover Fig 23 Fig 27 Fig 24 Fig 28 Fig 29 Fig 25...
- Page 15 10” TABLE SAW SF10N1...
-
Page 16: Plug Replacement
PLUG REPLACEMENT The fuse in the main plug of your power tool should always be replaced with one of identical rating. Check the voltage given on your power tool matches the supply voltage. The power tool is supplied with a fitted plug, however if you should need to fit a new plug follows the instruction below. -
Page 17: Declaration Of Conformity
Houndstone Business Park Yeovil BA 22 8RT Declare that the product TABLE SAW SF10N1 Complies with the essential health and safety requirements of the following directives: 89/336/EEC, 93/68/EEC–EMC Directive. 73/23/EEC, 93/68/EEC–Low Voltage Directive 98/37/EC–Machinery Directive. Standards and technical specifications referred to:...
Need help?
Do you have a question about the SF10N1 and is the answer not in the manual?
Questions and answers