Korenix JetCon 3401G User Manual
Industrial gigabit ethernet media converter
Hide thumbs
Also See for JetCon 3401G:
- Quick installation manual (4 pages) ,
- Quick installation manual (2 pages)

Related Manuals for Korenix JetCon 3401G


Summary of Contents for Korenix JetCon 3401G
- Page 1 JetCon 3401G Industrial Gigabit Ethernet Media Converter User’s Manual Version: 1.1 Date:2-DEC-2008...
- Page 2 Korenix JetCon 3401G Industrial Gigabit Ethernet Media Converter User’s Manual Copyright Notice Copyright © 2008 Korenix Technology Co., Ltd. All rights reserved. Reproduction in any form or by any means without permission is prohibited.
- Page 3 Declaration of CE This product has passed the CE certification for environmental specifications. Test conditions for passing included the equipment being operated within an industrial enclosure. In order to protect the product from being damaged by ESD (Electrostatic Discharge) and EMI leakage, we strongly recommend the use of CE-compliant industrial enclosure products.
-
Page 4: Table Of Contents
Index 1. Introduction................... 1 1-1. Features ..................2 1-2. Package Checklist ................. 2 2. Hardware Description ................3 2-1. Dimensions ..................3 2-2. Front Panel ..................4 2-3. Bottom View .................. 5 2-4. Wiring the DC Power Inputs ............6 2-5. -
Page 5: Introduction
3401G Industrial Gigabit Ethernet media converter, includes installation the specifications that it has. Following this user manual, you can get fully imagination about JetCon 3401G and all information to help you construct the network infrastructure. The following are brief introduction of JetCon 3401G. -
Page 6: Features
-25~70℃ Hazardous Operating Temperature 1-2. Package Checklist JetCon 3401G package includes the following items: JetCon 3401G x1 One DIN-Rail clip (already screwed on the back of JetCon 3401G) x1 One CD-ROM for User’s manual JetCon 3401G User’s Manual CD-ROM Quick Installation Guide... -
Page 7: Hardware Description
2. Hardware Description 2-1. Dimensions The dimension of JetCon 3401G is 120 mm(H) x 55 mm (W) x108 mm (D) ( with DIN rail clip) -
Page 8: Front Panel
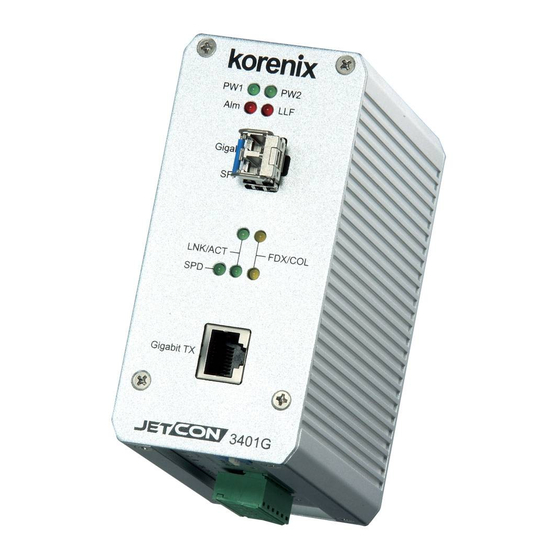
2-2. Front Panel The Front Panel of the JetCon 3401G Industrial Gigabit Ethernet Media Converter is shown in Figure A. Power LED Alarm Relay indicator Link Loss Forwarding LED Hot swappable SFP socket LED for SFP port LED for RJ-45 port... -
Page 9: Bottom View
Terminal Block Relay Output 3-Pin DIP Switch The power range of JetCon 3401G is from DC 12~48V with redundancy and polarity reverse function. To prevent interference and get better performance, it is strongly suggest make a well earth grounding by the “Earth Ground Screw”. -
Page 10: Wiring The Dc Power Inputs
2-4. Wiring the DC Power Inputs Follow the steps below to wire JetCon 3401G redundant DC power inputs. [Note] The suitable electric wire ranges from 12 to 24 AWG. Insert the positive and negative wires into the V+ and V- contacts respectively of the terminal block connector Tighten the wire-clamp screws to prevent the DC wires from being loosened. -
Page 11: Connect The Dry Relay Output
About the relay function, please refer session 4-3 2-6. LED Indicators The front panel of JetCon 3401G includes 2 Power LEDs, 1 LED for Alarm Relay ,1 LED for Link Loss Forwarding status and 5 LEDs for port link status. -
Page 12: Ports
N/A: Not Available. 2-7. Ports The JetCon 3401G supports IEEE 802.3 10Base-T, IEEE 802.3u 100Base-T, IEEE 802.3ab 1000Base-T and IEEE 802.3z for Gigabit Fiber. This session will introduce how to wiring, install the Ethernet Cable for RJ-45 connector and Gigabit SFP transceiver. - Page 13 Fig. D Cross over cable schematic for 1000Mbps schematic for 1000Mbps The RJ-45 ports of JetCon 3401G supports auto-MDI/MDI-X function without any cable change when you use an Ethernet cable to connect other devices, such as computers, switches or hubs.
-
Page 14: Mounting Installation
3. Mounting Installation 3-1. DIN-Rail Mounting The DIN-Rail clip is already attached on the rear side of JetCon 3401G. JetCon 3401G supports EN 50022 standard DIN Rail, in the following diagram includes the dimension of EN 55022 DIN Rail for your reference. -
Page 15: System Configuration
1 low priority packets. IEEE 802.1Q tag based CoS The JetCon 3401G will examine the 3 bits of priority field carried by a VLAN tag and map it to the corresponding priority. A packet with priority field ranging from 0 to 3 will be treated as a low priority packet, and will be stored in low priority queue. - Page 16 IEEE 802.1Q Type of Service for IPv4 /IPv6 packet JetCon 3401G provides the IP layer ToS function by recognizing the priority octet and mapping it to the corresponding priority. For an IPv4 packet, it is embedded in the TOS (type of Service) Octet. For an IPv6 data packet, the Traffic Class Octet is used to differentiate the Class of Service.
-
Page 17: Packet Filtering
4-2. Packet Filtering To prevent broadcast packet flooding on the network, the JetCon 3401G have implemented broadcast packet control function. The port begins to drop incoming broadcast packets if the received broadcast packet counts reach the threshold as different link speed -- 20000 frames/per second for 1000Mbps, 2000 frames/per second for 100Mbps and 200 frames/per second for 10Mbps. -
Page 18: Event Alarm Relay Configuration
The Alarm Relay can be triggered by the port or power event which is configured by Dipswitch #1 and #2 where is allocated on the bottom side of JetCon 3401G. You can select the relay trigger type for port link down or power event and just click the switch to “ON”. - Page 19 Switch #3 On: Enable LLF function Off: Disable If LLF is enabled and port link down event occurred, the normally port will be turn off. The reaction time for RJ-45 is about 2~3 seconds and SFP fiber port is below 1 second. Note: all of the configuration change will activate without system reboot.
-
Page 20: System Installation
5-1. Installation and Testing 1. Take out your JetCon 3401G Industrial Gigabit Media Converter from the package box. 2. Check if the DIN-Rail clip is attached to the JetCon 3401G. If the DIN-Rail clip... - Page 21 JetCon 3401G, refer to DIN-Rail Mounting section for DIN-Rail installation. 3. To place the JetCon 3401G on the DIN-Rail track or wall, refer to the Mounting Installation section. 4. Pull the terminal blocks off the JetCon 3401G and wire the power lines. Refer to the Wiring the DC Power Inputs section for how to wire the power inputs.
- Page 22 11. Repeat step 10 to make sure that the connection of each device connected to the JetCon 3401G is successfully established. 12. Power on the host, activate the Command Line mode, and ping the connected Ethernet device by typing “ping –t 192.168.1.1”...
- Page 23 13. The parameter-”t” allow you to continue to ping the network device, as shown in the figure below. Before you continue, make sure that both PWR1 and PWR2 are successfully connected to power sources. When PWR1 fails, the LED for PWR1 will go out. At that moment, if the ping command is still replying, then it proves that redundant power input function works normally.
-
Page 24: Troubles Shooting
5. Troubles shooting Make sure you are using the correct DC power suppliers (DC12~ 48 V) or power adapters. Select Ethernet cables with specifications suitable for your applications to set up your systems. Ethernet cables are categorized into unshielded twisted-pair (UTP) and shielded twisted-pair (STP) cables. -
Page 25: Technical Specifications
6. Technical Specifications Technology Standard IEEE802.3 10Base-T IEEE802.3u 100Base-TX IEEE802.3ab 1000Base-T IEEE802.3z Gigabit Ethernet Fiber IEEE802.3x flow control and back-pressure. IEEE802.1p Class of Service IEEE802.1Q Quality of Service Performance Forwarding Technology Store and Forward technology with 64 ~1536 bytes packet forwarding ability. System Throughput 1.49 Mpps Packet buffer... - Page 26 Weight 904g with package 655g without package Environmental Operating Temperature -25℃ ~70℃ Operating Humidity 0% ~ 95% non-condensing -40℃ ~ 80 ℃ Storage Temperature Storage Humidity 0%~ 95% non-condensing Regulatory Approvals Hi-Pot 1.5KV on port to port and port to power. FCC Class A, CE/EN55022.
-
Page 27: Sfp Fiber Transceiver Order Information
SFP Fiber Transceiver Order Information Part Number Description SFPGSX Gigabit SX SFP Transceiver, 850nm, multi-mode/LC, 550m SFPGSX-w Gigabit SX SFPTransceiver, 850nm, multi-mode/LC,550m, -40~85℃ Wide Temp. SFPGLX10 Gigabit LX SFP Transceiver, 1310nm, single-mode/LC,10km SFPLX10-w Gigabit LX SFP Transceiver, 1310nm, single-mode/LC,10km, -40~85℃ Wide Temp. SFPGSX2 Gigabit SX SFP Transceiver, 850nm, multi-mode/LC, 2km SFPGSX2-w... -
Page 28: Revision History
Revision History Edition Date Modifications V0.01 18-Aug,2008 New edition V0.02 2-Sep,2009 1. Modify feature. 2. Modify LED description V0.03 15-Sep-2008 1. Add LLF function. V0.04 17-Sep-2008 1. add CoS WRR ratio. 2. Add Broadcast storm filtering ratio. V1.0 16-Oct-2008 1. Add product weight. 2. - Page 29 Core Strength---Competitive Price and Quality With our work experience and in-depth know-how of industrial communications and networking, Korenix Technology is able to combine Asia’s research / development ability with competitive production cost and with quality service and support. Global Sales Strategy Korenix’s global sales strategy focuses on establishing and developing trustworthy relationships...
Need help?
Do you have a question about the JetCon 3401G and is the answer not in the manual?
Questions and answers