
Related Manuals for Korenix JetCon 2301 V2 Series


Summary of Contents for Korenix JetCon 2301 V2 Series
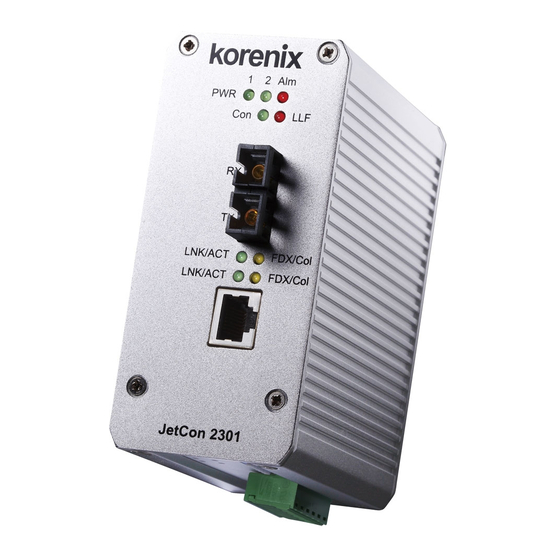
- Page 1 JetCon 2301 V2 Series Industrial Fast Ethernet to Fiber Media Converter Quick Installation Guide www.korenix.com V1.0...
-
Page 2: Package Checklist
JetCon 2301 V2 on the DIN rail. For information about the DIN Rail installation, please refer to user’s manual.The user manual can be downloaded from the Korenix Web site as below: http://www.korenix.com/downloads.htm Grounding JetCon 2301 V2 There is one grounding screw on the bottom side of JetCon 2301 V2 . -
Page 3: Wiring The Power Inputs
Wiring the Power Inputs 1. Insert the positive and negative wires into the V+ and V- contact on the terminal block connector. Accept 24AWG wire. JetCon 2301 V2 provides auto-polarity reverse 2. Tighten the wire-clamp screws to prevent the power wires from being loosened. Note: The recommended working voltage is DC 24V (Input range: DC10~ 60 V) Wiring the Relay Output The relay output contacts are in the middle of the terminal block connector as shown in... -
Page 4: Connecting To Network
Connecting to Network 1. Connecting the Ethernet Port: Connect one end of an Ethernet cable into the UTP port of JetCon 2301 V2, while the other end is connected to the attached networking device. UTP port supports auto MDI/MDIX function. The LNK / ACT LED will turn on and start flashing to indicate RJ-45 port links and the packets received and transmitted from RJ-45. - Page 5 Note: After adjusting the DIP-switch, please reboot the unit to activate the new settings. Korenix Customer Service KoreCARE is Korenix Technology’s global service center, where our professional staffs are ready to answer your questions at any time. Korenix global service center’s e-mail is KoreCARE@korenix.com...
- Page 6 JetCon 2301 V2支持DC10~60V宽范围冗余电源输入,配备6-pin可拆卸接线槽。光口支持单 模或多模两种机型满足不同传输距离的要求,最大传输距离可达30KM。 包装清单 打开包装,核对产品清单 JetNet 2301 V2 Series Industrial Fast Ethernet to Fiber Rail Media Converter Quick Installation Guide 4JetCon 2301 V2工业信号转换器 V1.0 www.korenix.com 4快速安装向导 设备安装 导轨安装:将导轨夹固定在JetCon 2301 V2的背 面,然后卡上导轨。更多导轨安装信息,请参考用 户操作手册。 您可以登录Korenix网站到如下地址下载用户手册: http://www.korenix.com/downloads.htm JetCon 2301 V2设备接地 在JetCon 2301 V2的底部有一个接地螺母。...
- Page 7 电源连接 1. 将电源的正负极分别接入设备底部接线槽的V+ 和V- 接口。 接线槽支持12~24AWG 电源线。 JetCon 2301 V2支持电源正负 极性反接保护 2. 拧紧电源接线螺丝,防止电源线脱落。 备注: 建议工作电压为DC 24V (供电范围: DC10~ 60 V) 继电器报警连线 如图3所示,继电器报警触点位于电源接线槽的中间位置。将报警线路接入固定,并将DIP拨 码开关置“ON”启动报警功能,继电器报警系统会自动检测端口及电源断连情况并组成一个 闭合回路。继电器报警线路默认是开路。欲了解更多信息,请参看用户手册chapter 2-5。 Alarm System Maximum 1A Current / DC 24V Extra Power System 备注:继电器报警触点仅支持1A 电流,DC 24V电 压。不建议在此线路中使用更高电压和电流。...
- Page 8 网络连接 1. 网口连线: 将UTP双绞线的一端连接到JetCon 2301 V2的电口,另一端连接到相关网络设 备。UTP端口自适应MDI/MDIX。LNK / ACT LED指示灯会亮起并闪烁,表示RJ-45端口已连 接并正在收发数据。 2. 光口连线: 如图所示,将光纤的一端连接到JetCon 2301 V2,另一端连接到相关设备,进行 交叉互连。错误的连线会导致光口无法工作。 备注 此为Class 1 Laser/LED光口产品, ! 切勿直视激光束 Cable Wiring(SC to SC) TX A RX B RX A TX B 3. 针对不同传输距离,JetCon 2301 V2提供“JetCon 2301 V2-m”多模光口机型和 “JetCon 2301 V2-s”单模光口机型。...
- Page 9 JetCon 2301 V2 DIP拨码开关设定 Pin No. # 状态 描述 启动LLF(Link Loss Forwarding)功能. DIP 1 关闭LLF(Link Loss Forwarding)功能 (默认) 将TX端口设置为10 Mbps半双工模式 DIP 2 将TX端口设置为自动协商模式(默认) 启动电源报警 DIP 5 关闭电源报警 (默认) 启动端口报警 DIP 6 关闭端口报警 (默认) 关闭流控制 DIP 7 启动流控制(默认) DIP 3 DIP 4 存储转发模式(默认模式) 纯转换模式...
- Page 11 Patent No. (Taiwan): Granted Invention: I 321415 Granted Invention: I 313547 Utility Model: M339840 Utility Model: M339841 台灣專利 發明第 I 321415 號 發明第 I 313547 號 新型第 M 339841 號 新型第 M 339840 號...
- Page 12 Tel:+886-2-89111000 Fax:+886-2-29123328 Business service:sales@korenix.com Customer service:koreCARE@korenix.com CPQ000V2301000...
Need help?
Do you have a question about the JetCon 2301 V2 Series and is the answer not in the manual?
Questions and answers