Advertisement
INSTALLATION AND OPERATION INSTRUCTIONS
IF YOU CANNOT READ OR UNDERSTAND THESE INSTALLATION INSTRUCTIONS DO
INTRODUCTION
This remote control system was developed to provide a safe, reliable, and user-friendly remote control system for gas heating appli-
ances or other compatible appliances. The system can be operated manually from the transmitter.
Review COMMUNICATION SAFETY under TRANSMITTER section and THERMO SAFETY under REMOTE RECEIVER sec-
tion. These signal/temperature safety features shut down the fireplace system when a potentially unsafe condition exists.
TRANSMITTER
PROG
MODE
SET
FRONT
PROG MODE
KEY AND TOUCHSCREEN SETTINGS
1.
MODE
- Switches the appliance on/thermo/off.
2.
PROGRAM
- Turns on and off the program function.
3.
SET
- Used in different functions to confirm settings.
4.
UP
and DOWN - Used to change the time, set temp, and programming functions.
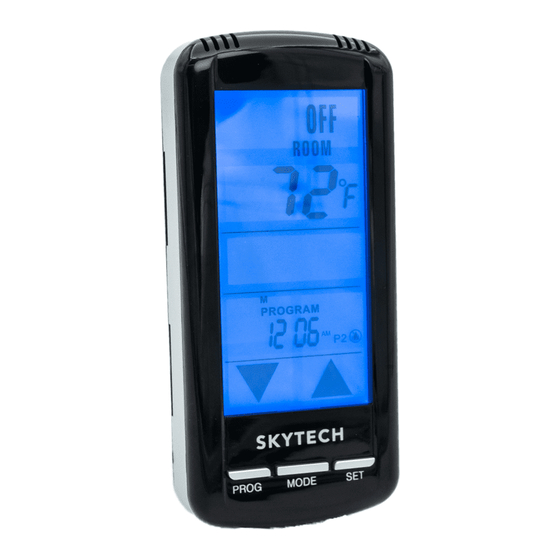
LCD - LIQUID COLOR DISPLAY
6
9
11
10
NOT ATTEMPT TO INSTALL OR OPERATE
The transmitter operates on 4 AAA 1.5V batteries that are included. Install the bat-
teries supplied with the unit into the battery compartment. It is recommended that
ALKALINE batteries always be used for this product. Be sure the batteries are
installed with the (+) and (-) ends facing the correct direction.
BATTERY
COMPARTMENT
When you start up the remote, if a low battery signal appears or if they LCD screen
does not illuminate when you touch it, check battery position and if the batteries are
fully charged.
BACK
SET
5
1.
BATTERY ICON
2.
ROOM
- Indicates CURRENT room temperature.
3.
SET
- Indicates desired SET room temperature for THERMO operation.
4.
FAHRENHEIT/CELSIUS -
1
5.
FLAME
- Indicates burner/valve in operation.
6.
MODE
– Indicates operation mode of system.
2
3
7.
UP and DOWN
8.
TIME and PROGRAM TIME
4
gram settings.
9.
LOCK
- Child lock out.
8
10.
PROGRAM ON/OFF
2 (P2) is on or off.
7
11.
DAY of WEEK
tings.
- Battery power is low. Replace Batteries in 2 - 4 weeks.
Indicates degrees Fahrenheit or Celsius.
– These are used to adjust the Time, Set temperature, and Program functions.
– Indicates current time or program time setting when editing pro-
– Indicates when Program 1 (P1) is on or off, and indicates when Program
- Indicates current day of week, or program segment when editing program set-
5301P
PROG
MODE
SET
1
3
2
REV. 3/5/09 Page 1
1
3
2
4
Advertisement
Table of Contents

Related Manuals for Skytech 5301P


Summary of Contents for Skytech 5301P
- Page 1 5301P INSTALLATION AND OPERATION INSTRUCTIONS IF YOU CANNOT READ OR UNDERSTAND THESE INSTALLATION INSTRUCTIONS DO NOT ATTEMPT TO INSTALL OR OPERATE INTRODUCTION This remote control system was developed to provide a safe, reliable, and user-friendly remote control system for gas heating appli- ances or other compatible appliances.
-
Page 2: Mode Function
MODE FUNCTION NOTE: Touch anyplace on the screen and the back light will light up and stay lit for 5 seconds. To select an operational mode, press the MODE button or touch the MODE SECTION on Mode: Touch Portion the touch screen. •... -
Page 3: Program Function
PROGRAM FUNCTION This remote has two program segments: A weekday segment and a weekend segment. To enter program mode, push the PROG button or touch the program portion of the touchscreen; the word PROGRAM will appear above the display time to indicate program operation is active. - Page 4 SETTING THE TEMPERATURE SWING (TEMPERATURE DIFFERENTIAL) The Thermo Mode on the transmitter operates the appliance whenever the room temperature varies a certain number of degrees from the set temperature. This variation is called the “SWING” or TEMPERATURE DIFFER- ENTIAL. The factory preset swing temperature is 2 ºF (1 ºC). To change the “Swing Setting:” •...
-
Page 5: Installation
WARNING This remote control system must be installed exactly as outlined in these instructions. Read all instructions completely before at- tempting installation. Follow instructions carefully during installation. Any modifications of this remote control or any of its compo- nents will void the warranty and may pose a fire hazard. Do not connect any gas valve or electronic module directly to 110-120VAC power. -
Page 6: Security Codes
WIRING INSTRUCTIONS A qualified electrician should install the remote control system. WIRING MILLIVOLT VALVES TERMINAL BLOCK ON MILLIVOLT GAS VALVES • Connect one wire from the remote receiver to the TH terminal on the gas valve. • Connect the other wire from the remote receiver to the TH/TP terminal on the gas valve. -
Page 7: Wall Mount
FICATIONS TO THE EQUIPMENT. SUCH MODIFICATIONS COULD VOID THE USER’S AUTHORITY TO OPERATE THE EQUIPMENT For Technical Service, call: U.S. INQUIRIES CANADIAN INQUIRIES 877/472-3923 888/672-8929 or 260/459-1703 Web site: www.skytechsystem.com MANUFACTURED EXCLUSIVELY FOR SKYTECH II, INC REV. 3/57/09 Page 7... - Page 8 Replacement parts will be available at no charge for the first (5) five years of this warranty, and will be available at market cost for the Lifetime of the product to that original owner. If SKYTECH II does not have the parts for an individual model, then a replacement SYSTEM will be provided.
- Page 9 SANTA’S HELPER This special offer is only provided to customers of Skytech II, Inc. that have purchased a remote control for their Hearth Product. This remote control system can be used for any 110Volt appliance, but perfect your Christmas Tree Lights or any other appliance that is difficult to reach or plug in.
Need help?
Do you have a question about the 5301P and is the answer not in the manual?
Questions and answers