ATEN CE700A User Manual
Usb kvm extender
Hide thumbs
Also See for CE700A:
- User manual (20 pages) ,
- Quick start manual (2 pages) ,
- User manual (24 pages)
Table of Contents
Advertisement
Advertisement
Table of Contents

Related Manuals for ATEN CE700A


Summary of Contents for ATEN CE700A
- Page 1 USB KVM Extender USER MANUAL CE700A...
-
Page 2: Fcc Information
User Notice This ATEN product is specifically designed and manufactured for the operation and management of computer mainframe and communications equipment used in network management centers. As such, it may not be completely appropriate for those environments and sites where special standards for performance and high reliability are required –... -
Page 3: Online Registration
CE700A User Manual Online Registration International http://support.aten.com North America http://www.aten-usa.com/product_registration Telephone Support International 886-2-8692-6959 China 86-10-5255-0110 Japan 81-3-5615-5811 Korea 82-2-467-6789 North America 1-888-999-ATEN ext 4988 United Kingdom 44-8448-158923 Technical Support For international online technical support – including troubleshooting, documentation, and software updates: http://support.aten.com... -
Page 4: Package Contents
Copyright © 2009–2012 ATEN International Co., Ltd. Manual Part No. PAPE-1341-AT2G Manual Date: 2012-02-06 ATEN and the ATEN logo are trademarks of ATEN International Co., Ltd. All rights reserved. All other trademarks are the property of their respective owners. - 4 -... - Page 5 Setup is as easy as can be – simply connect the computer system box and local console to the Local CE700A Module; run the Cat 5 cable to the Remote CE700A Module (up to 150 meters away); and plug the remote console into the Remote Module.
- Page 6 Features Local and Remote Units connect at distances up to 150 m using Cat 5e cable Dual console operation – control your system from both the local and remote USB keyboard, monitor, and mouse consoles Built-in ASIC for greater reliability and compatibility Auto Signal Compensation (ASC) USB Keyboard and USB Mouse Ports USB overcurrent detection and prevention...
-
Page 7: System Requirements
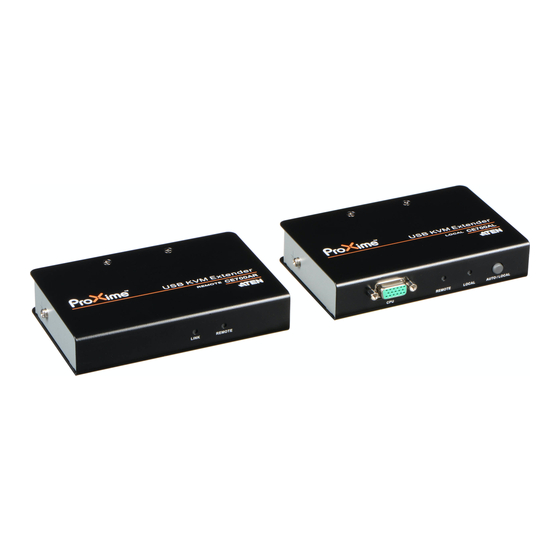
USB KVM Cable that is provided with this package. Cat 5e cable is the minimum required to connect the local and remote CE700A units. Cable of a lesser standard will result in degrading the video signal. For best performance, we strongly recommend Cat 5e cable. - Page 8 Components CE700AL (Local Unit) Front View AUTO / LOCAL CE700AR (Remote Unit) Front View REMOTE Component Description KVM Port The custom USB KVM cable that links the unit to the computer plugs in here. Remote LED The CE700AL has two LEDs to indicate operating status.
- Page 9 CE700AL / CE700AR Rear View CE700AL / CE700AR Side View Component Description Console Ports The local and remote console’s USB keyboard, USB mouse, and monitor plug into these ports. Power Jack The power adapter cable plugs into this jack. Remote I/O The Cat 5e cable that connects the local and remote units plugs in here.
-
Page 10: Hardware Setup
Hardware Setup Make sure that the power to any device that you connect to the installation has been turned off. You must unplug the power cords of any computers that have the Keyboard Power On function. Rack Mounting For convenience and flexibility, the CE700AL and CE700AR can be mounted on system racks. -
Page 11: Installation
Installation Grounding To prevent damage to your installation it is important that all devices are properly grounded. 1. Use two grounding wires to ground both units by connecting one end of the wire to the grounding terminal, and the other end of the wire to a suitable grounded object. - Page 12 3. For increased grounding protection, use STP (shielded twisted pair) cable to connect the Local and Remote Units. There are two methods that can be used: a) In addition to the eight paired wires, STP cable also contains a grounding wire. Solder this wire to the RJ-45 connector as shown in the diagram below: b) The second method is to use the STP cable shielding for grounding.
-
Page 13: Connecting The Cables
3. Plug the connectors on the other end of the USB KVM cable into the appropriate ports on the local computer. Note: If you are combining the CE700A with a KVM switch, the other end of the USB KVM cable plugs into the appropriate ports on the KVM switch. - Page 14 Installation Rear View CE700AL Cat 5e cable CE700AR - 14 -...
- Page 15 Installation Front View AUTO / LOCAL Local PC USB KVM Cable Set - 15 -...
-
Page 16: Operating Modes
Operating Modes The CE700A USB KVM Extender system has three operating modes: Local, Auto, and Remote, as shown in the table, below: Mode Description Local Only the local console has KVM access. The remote console’s keyboard and mouse input is disabled. -
Page 17: Led Display
LED Display The Local and Remote Units each have two LEDs to indicate their operating status, as shown in the tables, below: CE700AL (Local Unit) Indication Local (Green) Lights to indicate that the local console is active (Remote LED is off) Off when remote console is active Flashes to indicate Auto mode (neither console is active) -
Page 18: Specifications
Specifications Function CE700AL CE700AR Connectors Console Keyboard 1 x USB Type A Female (White) Ports Video 1 x HDB-15 Female (Blue) Mouse 1 x USB Type A Female (White) KVM Ports KB / Video / 1 x SPHD-17 Mouse Female (Green) Unit to Unit 1 x RJ-45 Female (Black) Power... -
Page 19: Tp Pin Assignments
TP Wiring Diagrams WHITE/ORANGE /VOUTB ORANGE VOUTB WHITE/GREEN /VOUTG GREEN VOUTG BLUE /VOUTR WHITE/BLUE VOUTR WHITE/BROWN BROWN PAIR 3 PAIR 2 PAIR 1 PAIR 4 1 2 3 4 5 6 W-O O W-G Bl W-Bl G W-Br Br JACK POSITIONS T568B AT&T 258A TP Pin Assignments... -
Page 20: Troubleshooting
Troubleshooting Problem Action No video Make sure that all cables are securely plugged into their sockets. Poor video quality. The video quality can be improved by reducing the refresh rate. About SPHD Connectors This product uses SPHD connectors for its KVM and/or Console ports.
Need help?
Do you have a question about the CE700A and is the answer not in the manual?
Questions and answers