HP Media Center PC User Manual
Media center pc
Hide thumbs
Also See for Media Center PC:
- Reference manual (175 pages) ,
- User manual (138 pages) ,
- Getting started manual (120 pages)
Table of Contents
Advertisement
Quick Links
Advertisement
Table of Contents
Troubleshooting

Related Manuals for HP Media Center PC


Summary of Contents for HP Media Center PC
- Page 1 HP Media Center PC User’s Guide...
- Page 2 HP shall not be liable for errors contained herein or for incidental or consequential damages in connection with the furnishing, performance, or use of this material.
-
Page 3: Table Of Contents
Welcome ... 1 Safety Information ... 2 Before you get started, please read this important safety information about your HP Media Center PC ... 2 AC Power Safety Warnings ... 2 How to Use this Guide ... 3 Safety and Comfort ... 3 Where Can I Find Information? ... - Page 4 Finding and Playing an Album ... 134 Creating a Playlist ... 135 Selecting a Visualization ... 136 HP Media Center PC User’s Guide My Pictures ... 137 What Can I Do in My Pictures? ... 137 Using Supported File Types for My Pictures ... 138 Using Remote Control in My Pictures ...
- Page 5 Adding Memory ... 193 Removing Add-In Cards ... 195 Replacing Add-In Cards ... 195 Installing an HP Camera Docking Station ... 196 Application and System Recovery ... 199 Using Application Recovery and System Recovery ... 199 Application Recovery ... 204 System Recovery ...
- Page 6 HP Media Center PC User’s Guide...
-
Page 7: Welcome
Welcome to the exciting new HP Media Center PC experience! HP has combined the features of the HP Pavilion home PC with the Microsoft ® Windows Center Edition operating system to create a powerful entertainment center for you. This PC includes an impressive sound system, a DVD+RW/+R player, a 7-In-1 memory card reader, and powerful 3-D graphics capability. -
Page 8: Safety Information
Before you get started, please read this important safety information about your HP Media Center PC. This product has not been evaluated for connection to an “IT” power system (an AC distribution system with no direct connection to earth, according to IEC 60950). -
Page 9: How To Use This Guide
All Programs, PC Help & Tools, and then click Safety & Comfort Guide. You can find important ergonomic information on the Internet. Just type http://www.hp.com/ergo into your Web browser address box, and then press Enter on the keyboard. Follow the setup poster to connect your computer. -
Page 10: Where Can I Find Information
Windows Media Player program. HP Media Center PC User’s Guide Online Information and technical support for your PC is available at the HP Web site. Press the HP button on your keyboard, or type http://www.hp.com into your Web browser address box, and then press Enter on the keyboard. -
Page 11: Help And Support
Help and Support HP provides many kinds of information and help for your PC. Go to the HP Utility programs in the PC ■ Help & Tools folder to run an application or a system recovery. Go to the Help and Support Center when you ■... -
Page 12: Inventory
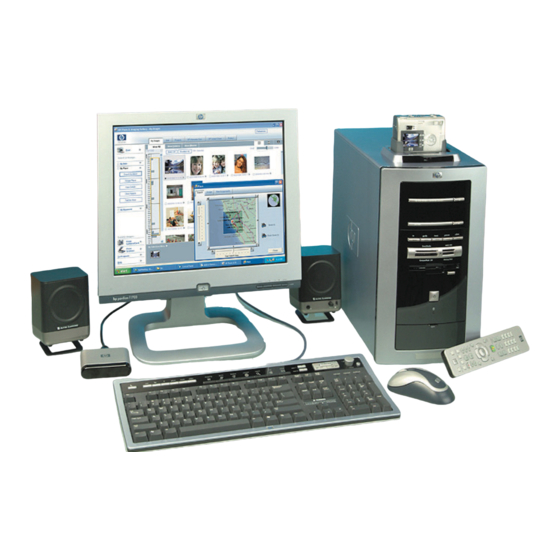
B Power Cord C Modem Cable D Documentation Wireless Mouse (select models only) Mouse G Keyboard/Wireless Keyboard (wireless receiver not shown) HP Media Center PC User’s Guide what’s inside: ✔ hp pavilion home pc where to get help ✔ warranty and license... -
Page 13: 2.1 Speaker System Components
2.1 Speaker System Components Your Media Center PC came with either the Klipsch or Altec Lansing set of 2.1 Speakers. If your PC came with 5.1 speakers, refer to “Connecting the Speakers” on page 27. A 2.1 Klipsch Subwoofer (power cord attached) B 2.1 Klipsch Speakers... -
Page 14: Getting The Most Out Of Media Center
Before using Media Center, make sure: HP Media Center PC is set up correctly. For ■ setup information, refer to the setup poster and to “Setting Up My PC” on page 9. -
Page 15: Setting Up My Pc
Follow the steps in the setup poster to set up the computer. Connect the keyboard, mouse, speaker system, and remote sensor to the connections on the back of the PC. Match the colors. Your connector locations and system components may vary. Checklist The following items are not provided with your PC. -
Page 16: Front Of Pc
B 2nd Optical (CD or DVD+RW/+R) drive Eject button C Media Center Shortcut buttons (see following page for more information) HP Media Center PC User’s Guide D 7-In-1 memory card reader (Some PCs come with a 6-In-1 card reader) Diskette (floppy) drive... - Page 17 Media Center Shortcut Buttons Your Media Center PC has five shortcut buttons on the front of the PC. Each button opens a window in Media Center. Button Media Center Shortcut Opens My TV window where you can watch and record TV programs.
-
Page 18: Front Connector Ports
S-video Input_2 connector Composite video Input_2 connector (yellow) Left Audio Input_2 connector (white) Right Audio Input_2 connector (red) HP Media Center PC User’s Guide FireWire (IEEE 1394) connector 2 USB 2.0 ports G Headphone (Audio Out) connector (green) -
Page 19: Back Of Pc
Back of PC (Features and Locations May Vary) Power LED Voltage selector Power Cord connector PS/2 Mouse connector PS/2 Keyboard connector Serial port G Parallel port FireWire (IEEE 1394) port 4 USB 2.0 (Universal Serial Bus) ports LAN (Ethernet) Microphone connector M Audio Line Out N Modem (Line In RJ-11) O Digital Audio Out (select models only) -
Page 20: Connecting The Monitor
PC desktop appears by pressing Alt+F5. Each time you press the Alt+F5 key combination, the PC display appears on the next device. HP Media Center PC User’s Guide If Alt+F5 does not work, restart the PC and try again. -
Page 21: Connecting The Printer Or Scanner
Connecting the Printer or Scanner Connect peripheral devices to the PC one at a time. The printer or scanner is not included with the PC. Refer to the documentation that came with your device. Connecting to the Internet Through a Modem Connection Connect the telephone line to the modem, which is inside the computer. -
Page 22: Connecting To The Internet Through A Network Port (Lan)
PC. Plug the other end of the network cable into a 10BaseT or 100BaseT port on the network hub. The green LED (light-emitting diode) indicates a valid connection. HP Media Center PC User’s Guide... -
Page 23: Connecting The Remote Sensor
Connecting the Remote Sensor The remote sensor is a small device that connects to the PC and allows the remote control to work with the Media Center program. For information on using the control cable in an existing setup, see “Optional Connections” on page 19. -
Page 24: Connecting The Signal Source
You may want to extend the ends of the cable to improve your FM radio signal reception. HP Media Center PC User’s Guide You can also plug audio cables (not provided) from your set-top box or VCR into the Audio in right (red) (A) connector and the Audio in left (white) (B) connector on the back of the PC. -
Page 25: Connecting The Television Signal
Connecting the Television Signal Optional Connections Connecting the TV is optional and not required to enjoy Media Center. Using the TV Cables Your PC comes with the following cables for the TV signal: One coaxial cable (10 feet) (A). Use a ■... -
Page 26: Connecting The Tv
Choose the cable type you TV needs. Location and number of connectors may vary by model. hp media center pc user’s guide Plug the other end of the cable into the TV IN (Video In or Video Input) connector on your TV. -
Page 27: Connecting The Tv Signal Source When You Have An Existing Setup
Connecting the TV Signal Source When You Have an Existing Setup This section describes how to connect the PC to an existing setup for your TV signal source. Wall to VCR to TV using coaxial cable Remove the coaxial cable at the input to the VCR, and connect it to the input of a coaxial cable signal splitter (not included;... -
Page 28: Wall To Cable Tv Set-Top Box Or Satellite Box To Vcr To Tv Using Coaxial Cable
This allows the PC to change the channel on the box. See “Connecting the Remote Sensor” on page 17. hp media center pc user’s guide Not shown in diagram: To view your images from your TV, use an S-video In or a composite video In cable to connect the TV to the PC. - Page 29 Existing Setup Add the PC with a splitter Wall Cable Coaxial Cable Set-top box/satellite In Set-top box/satellite Out VCR In G VCR Out TV In Splitter In Splitter Out TV (in) On back of PC Connecting the Television Signal...
-
Page 30: Wall To Cable Tv Set-Top Box Or Satellite Box To Vcr And Tv Using S-Video Cable Or Composite Video Cable Between The Box And The Vcr Or Tv
Connect an additional cable: ■ ■ hp media center pc user’s guide Using S-video cable (not included): Connect an additional S-video cable to a second output on the set-top box or satellite box. Plug the other end of the cable into the S-VID IN connector on the back of the PC. - Page 31 Existing Setup Add the PC with a splitter Wall Cable Set-top box/satellite In Set-top box/satellite Out S-video or composite cable VCR In G VCR Out TV In Add an S-video or composite cable with adapter S-VID IN on back of PC Remote sensor control cable Connecting the Television Signal...
-
Page 32: Enabling Tv Out Image For Nvidia Graphics Card
Right-click an empty part of the PC desktop and click Properties. Click Settings tab. hp media center pc user’s guide Click the tab that has the video adapter name (for example, GeForce FX 5600). Click the nView Display Mode from the menu that appears on the left. -
Page 33: Connecting The Speakers
Speaker Systems Speaker systems are not included with all PC models. Always turn on the PC before you turn on the speaker system. The 2.1 speaker system and the 5.1 speaker system are powered by the sound card that has a suite of software applications from Creative. - Page 34 Creative Speaker Settings. Select a speaker setting from the Speaker/ Headphone Selection drop-down menu. hp media center pc user’s guide (light orange) for the central/subwoofer (black) for rear speakers, connects to an (lime green) connects to an active stereo...
-
Page 35: 2.1 Klipsch Speaker System
2.1 Klipsch Speaker System Put the rubber feet on the bottom of the speakers. Place the two speakers on the left and right of your monitor or TV. Connect the green (or black) connector from the speakers to the Line-Out connector (A) on the back of the PC. -
Page 36: 2.1 Altec Lansing Speaker System
“Connecting Multi- channel Audio Speakers to the PC” on page 32. hp media center pc user’s guide Refer to the setup poster for connecting the 2.1 speaker system. You can test the speaker system. Click Start, choose All Programs, Creative, Sound Blaster Audigy 2, and then click Creative Speaker Settings. -
Page 37: 5.1 Speaker System
5.1 Speaker System Your PC may have a sound card with connectors on the back of the PC for analog and digital audio outputs (Line out – 1; Line out – 2; and Line out – 3); a microphone; and an audio input (Line in). If your PC has a sound card with these connectors, perform the procedures in the next section. - Page 38 (plugs) Front speakers Rear speakers Center/subwoofer speakers hp media center pc user’s guide Turn off the PC. Connect the three audio cable plugs from the speaker system to the connectors on the back of the PC (see the table).
- Page 39 Configure Multi-Channel Audio for Sound Manager To configure multi-channel audio output for PCs with Multi-channel Sound Manager: Click Start on the taskbar. Choose All Programs. Choose Music and then click Multi- channel Sound Manager. The Multi- channel Audio Configuration window opens. Enable Digital Audio Output (Optional) Follow steps 1–5 of the previous procedure.
-
Page 40: Media Center
Volume buttons on the Media Center navigation bar or on the remote control. hp media center pc user’s guide Select your speakers from the drop-down list. Click Channel to test the speakers. Click Calibrate to adjust the speaker volume settings. -
Page 41: Using The Microphone
For the 5.1 speaker system, look for the headphones connector on the right side of the control tower. If the control tower displays HP, the headphones are enabled; the sound to the speakers and the subwoofer is muted. Push and hold the On button on the control tower for several seconds to enable sound from the speakers. - Page 42 guide...
-
Page 43: Starting My Pc
Starting the PC for the First Time After you’ve completed connecting the components of your PC by using the setup poster steps, you are ready to turn on the computer. Press the Power button on the monitor. Press the On button (A) on the front of the PC. Follow the onscreen instructions for the initial Microsoft Windows setup. -
Page 44: Media Center Pc Desktop View
Media Center PC Desktop View The Media Center PC desktop has shortcut icons that make it easy to find the things you need. To find out more information about a program, click its icon. Your Media Center PC desktop may not... -
Page 45: Using The Start Menu
Desktop shortcuts (select models only) Icon Opens Windows XP Start menu Help and Support Media Center Easy Internet Signup wizard HP Image Zone program Internet Explorer window Windows Media Player HP Recovery Run a program. ■ To view or change settings, open the ■... -
Page 46: Software Programs
You organize your own videos with menus, and by using the hp dvd writer drive (select models), create a DVD disc to watch in a home DVD player. -
Page 47: Using Pc Help And Tools
Norton AntiVirus 2003 (Symantec/ NAV2002) is the Symantec Norton AntiVirus™ program that scans for viruses and protects your PC by removing them. Norton offers free virus definition updates through your Internet connection for 60 days after your PC purchase. You can purchase a subscription service for updates after your initial free period expires. -
Page 48: Manual Standby Mode
PC into standby mode (instead of turning it off or using hibernation) so that the PC can “wake” at the proper time to record TV programs. hp media center pc user’s guide Click Start on the taskbar. -
Page 49: Manual Hibernation Mode
Manual Hibernation Mode Hibernation differs from standby. When the PC enters standby, it is still active and able to respond to scheduled activities. When the PC enters hibernation, it copies everything currently displayed and on the desktop to the hard disk and then turns itself off. -
Page 50: Automatic Standby Or Hibernation Mode
Schemes box, select a power scheme from the drop-down list. Choose the timers: ■ ■ Click OK. hp media center pc user’s guide on the taskbar. To turn on auto-standby for the computer, click a time (such as After 20 mins) in the System standby list. -
Page 51: Installing Software
Installing Software After you turn on the PC the first time and restart it, you can install any software programs that came on CDs or DVDs included in the PC box (select models only). You may wish to install additional software programs or hardware devices on your PC. - Page 52 guide...
-
Page 53: Using The Pc Hardware
Using the Keyboard Your PC may include a standard keyboard or a wireless keyboard. A standard keyboard connects to the keyboard connector in the back of the PC. A wireless keyboard (select models only) uses a receiver/transmitter, instead of a connector cable, to communicate with your PC. -
Page 54: Special Keyboard Buttons
Special Keyboard Buttons Access buttons Icon user photo music video hp media center pc user’s guide user Feature Description Standby Puts PC into or out of power-saving mode. May take 10–30 seconds before screen reappears. User Log off or switch between PC users. -
Page 55: Internet Buttons
Opens a Web page designed to search the Internet. Can be reconfigured to open any Web site or software program. Chat Opens an HP-related Web site for chatting. Can be reconfigured to open any Web site or software program. E-mail Opens an e-mail program. - Page 56 Media Control or Playback Buttons The Volume knob can continue to be turned, even after maximum sound has been reached. play/pause volume knob hp media center pc user’s guide eject1 eject2 prev Button Function eject1 Opens or closes upper optical drive tray.
-
Page 57: Configuring The Keyboard Buttons
Configuring the keyboard buttons Click Start on the taskbar, choose Control Panel and then click Printers and Other Hardware, if it is present. Double-click Keyboard. In the Keyboard Properties window that opens, click the Buttons tab. Double-click the button you want to change. The button configuration window opens. -
Page 58: Dragging And Dropping
You can use the scrolling mouse to scroll, to autoscroll, or to pan. hp media center pc user’s guide If you press and hold down the right mouse button when you click and drag, a menu appears when you release the button to drop the item. - Page 59 Autoscrolling Place the cursor in the document next to the text where you want to begin scrolling and press the wheel button once. An autoscroll icon appears. Panning Place the cursor in the document. Press and hold down the mouse wheel button. Slowly move the mouse in the direction you want to scroll.
-
Page 60: Wireless Keyboard Set
A light on the receiver indicates receiver activity. Number lock on Caps lock on Scroll lock on Receiver activity hp media center pc user’s guide For more information about installing your wireless keyboard set, refer to the specific wireless keyboard documentation included in the PC box. -
Page 61: Remote Control
MENU RADIO MUSIC PICTURES VIDEOS RECORD PLAY STOP PAUSE REPLAY SKIP BACK GUIDE LIVE TV RECORDED CHANNEL/ VOLUME PAGE MORE INFO MUTE PQRS WXYZ CLEAR ENTER PRINT hp media center 45˚ 26 feet (8m) Using the PC Hardware... -
Page 62: Install The Remote Control Batteries
Install the remote control batteries Slide the battery cover off the back of the remote control. Use alkaline batteries in the remote control. Insert the two AA batteries (provided). Replace the battery cover. hp media center pc user’s guide... -
Page 63: Cd And Dvd Drives
CD and DVD Drives Your PC comes with one or two of the following optical drives: CD-RW (cd writer plus) ■ DVD-ROM ■ Handling a CD or DVD To avoid damaging CDs or DVDs, follow these guidelines: Return the disc to the case when you are ■... -
Page 64: Dvd-Rom Drive
If you insert a music CD, a program opens so ■ you can play the CD. hp media center pc user’s guide If you insert a DVD movie, a program opens ■ so you can play the DVD. -
Page 65: Dvd Writer
DVD Writer The dvd writer is a DVD+RW/+R drive. It can play movie DVDs and music CDs, read data CDs and DVDs, and record files to DVD+RW, DVD+R, CD-R, and CD-RW discs. Using the DVD Writer When you insert a disc into the dvd writer drive, the computer automatically detects the type of disc. -
Page 66: Opening The Recordnow! Program
PC is not writing to the diskette; then press the Eject button on the PC and remove the diskette. hp media center pc user’s guide Choose RecordNow! Click RecordNow! again. For information about recording onto CDs, refer to... -
Page 67: 7-In-1 Memory Card Reader
7-In-1 Memory Card Reader (Select Models Only) The 7-In-1 memory card reader can read and write seven types of memory media. You can use these memory cards to import pictures from digital cameras or to share data between other card readers. -
Page 68: Formatting A Memory Card
Select Format, and then type a label name into the label field. For best compatibility, select FAT as the File System Settings. Click Start. Click OK on the Format Complete window, and then click Close. hp media center pc user’s guide... -
Page 69: Troubleshooting The Memory Card Reader
Using the 7-In-1 memory card reader If you have not used the memory card, you may need to format it first. See “Formatting a memory card” on page 62. Insert the media into the correct card slot on the reader until it stops and locks into place. The light on the reader lights, and the computer automatically detects the media. -
Page 70: In-Use Light
Memory Stick (MS) — 4 MB to 128 MB (10 pins) Memory Stick Pro — 4 MB to 128 MB (10 pins) hp media center pc user’s guide The light turns on when a media card is inserted into a slot. The light blinks when data is being... -
Page 71: Using The Digital Camera Dock
Using the Digital Camera Dock (Select Models Only) Some HP Media Center PCs come with a camera docking bay designed to hold an HP camera docking station (model 8886) and several HP digital cameras which are purchased separately. To install the HP camera docking station refer to “Installing an HP Camera Docking Station”... - Page 72 guide...
-
Page 73: Using Media Center
Getting Started with Microsoft Windows XP Media Center Edition With Media Center you can play all kinds of audio, video, and picture media by using a specially designed remote control. When using the remote control and the Media Center program, you can: Watch, record, and play back television ■... -
Page 74: Media Center Overview
Media Center; otherwise, many of the program features won’t be available to you. Before opening Media Center, make sure: HP Media Center PC is set up correctly. For ■ setup information, refer to the setup poster. -
Page 75: Opening Media Center
Opening Media Center To open the Media Center program: Press the Start button on your remote ■ control. Click Start on the taskbar, and ■ then click Media Center. Click the Media Center ■ icon on your desktop. You can create a Media Center shortcut icon by clicking and dragging the Media Center icon in the... -
Page 76: Navigating Media Center
To select items in Media Center, use the arrow buttons on the remote control, and then use the OK button to enter your selection. hp media center pc user’s guide If you have media playing, such as music or television, it appears in an inset window in the lower left corner. -
Page 77: Media Center Start Menu
Other menus not shown: Online Spotlight — link to the Media Center ■ Web site for the latest information about your Media Center PC and software. Link to an Internet radio Web site, ■ MusicMatch Radio MX (select models only). -
Page 78: Setting Pc Location For Program Guide
PC country/region location. Media Center uses this information to select the country/region for the Program Guide. The Media Center PC uses United States as the PC location by default. If you did not select your correct location and if this location does not match the ZIP... -
Page 79: Media Center Setup
Media Center Setup The first time you open Media Center, a setup wizard opens. Use the setup wizard to test your remote control and to configure your Internet connection, TV signal, and Program Guide. The Media Center setup wizard may take approximately 10 to 40 minutes to complete. -
Page 80: Using The Media Center Setup Wizard
■ your area. ■ ■ ■ hp media center pc user’s guide on the remote control. Make sure the remote control has two AA alkaline batteries installed. Make sure the remote control sensor is plugged into a USB port on the PC. - Page 81 Select download method for your Internet connection In this step, you select options for your Internet connection so that Media Center can download and update your Program Guide and display information about your music CDs and other media. You can have Media Center automatically download the Guide when connected, or you can manually download the Guide when you connect to the Internet.
- Page 82 To set this up later, select Settings from the Media Center Start menu, select TV, and then select Set up TV signal. hp media center pc user’s guide Select your TV service. Select if you have a set-top box. Sometimes a set-top box receives a TV signal.
- Page 83 Set up Program Guide An Internet connection is needed to complete this step. If your computer isn’t connected to the Internet or if Media Center hasn’t configured your ISP information in step 2, you will see No data available in the Program Guide.
-
Page 84: Media Center Menu Bars
To return to Media Center, use the mouse to click the Media Center icon on the taskbar. Menu bar icon hp media center pc user’s guide Action Media Center Start icon Open Media Center Help files in a separate window... -
Page 85: Setting Media Center As The Automatic Cd Player
Setting Media Center as the Automatic CD Player When you insert a CD while Media Center is active, your CD plays automatically after a few seconds. If you are not in Media Center, Windows asks you what you want to do with the CD. To avoid this message, you can select Media Center as the primary program to play CDs. - Page 86 Media Center program. Refer to “Using the Keyboard” on page 47 for more information about your keyboard shortcut keys. hp media center pc user’s guide The shortcut buttons on the front of the PC are TV, Guide, Music, Pictures, and Videos. The front of your PC may display text or icons.
-
Page 87: Remote Control
VOLUME PAGE MORE INFO MUTE PQRS WXYZ ENTER CLEAR PRINT hp media center Your remote control can send a strong signal to the remote sensor from within a range of about 26 feet. Make sure there is nothing blocking the... -
Page 88: Remote Control Buttons Overview
Allows you to rotate a picture in My Pictures. Clear deletes selection and works as the backspace button does on a keyboard. hp media center pc user’s guide puts the PC into and out of a MENU RADIO... - Page 89 Q TV opens My TV window. Pictures opens My Pictures window. Videos opens My Videos window. Play plays selected media. Stop stops media currently playing. FWD (Fast forward) moves media forward at 3 speeds. W Skip moves media forward, for example, 30 seconds in videos and live TV, or one music track.
- Page 90 If you have completed the Media Center setup wizard, the Media Center Start menu opens. Use the arrow keys on the remote control to select an item, and then press OK to select an option and to begin using Media Center. hp media center pc user’s guide...
-
Page 91: Remote Control Buttons
Remote Control Buttons Direct access buttons The direct access buttons open the main Media Center windows. Button Function Opens the Play DVD main menu where you can play your DVD movies. Menu Opens the My TV window where you can watch and record TV, open your television program guide, schedule future TV recordings, and find your recorded TV programs. -
Page 92: Standby Button
TV programs. hp media center pc user’s guide You must press Standby for 1–2 seconds. An LED located under the Standby button blinks when the remote control is transmitting a signal to the remote sensor. -
Page 93: Media Playback Buttons
Media playback buttons These buttons allow you to play back picture slide shows, music files, playlists, music CDs, DVD movies, home videos, and live TV, from within the Media Center program. Button Function Record Records TV programs. The Record button works only when My TV is used to play a TV show. It is inactive when other media is playing. - Page 94 Guide Arrows Live TV Recorded Start hp media center pc user’s guide Function Returns to the previous window. Opens the electronic Television Program Guide. Move between menus, windows, or activities. Moves the cursor to select actions within the Media Center windows.
- Page 95 Selects a desired action, menu, or window. Enter works the same way as the OK Enter button. Prints picture files from the My Pictures window of Media Center. This button does Print not print files from Windows Explorer. CHANNEL/ VOLUME PAGE MORE INFO MUTE PQRS WXYZ CLEAR ENTER PRINT hp media center Remote Control...
- Page 96 guide...
-
Page 97: My Tv
What Can I Do in My TV? The Media Center PC acts as a digital video recorder (DVR) which works with the Media Center remote control so you can watch and record TV programs at your own convenience and pace. -
Page 98: Watching Tv
■ ■ ■ ■ ■ ■ ■ ■ hp media center pc user’s guide Channel number Channel station identifier Title of program Time period of program Actual time Brief summary of the program TV rating, if available Type of program, for example, Sports... -
Page 99: Using Remote Control In My Tv
Using Remote Control in My TV Remote Control button Action To freeze the live TV image, press Pause. While paused, My TV continues to record a pause buffer for up to 30 minutes. To resume watching TV where you left off, press Play. To stop live TV or a recorded program, press Stop once. -
Page 100: Watching Live Tv Using The Digital Video Recorder
The digital video recording features are for select models only. hp media center pc user’s guide When you change the channel, Media Center deletes the previously recorded portion and begins recording again after a short delay. You cannot use time shifting when recording a TV program. -
Page 101: Using The Television Program Guide
Using the Television Program Guide In the Guide, you can scroll through a list of the current television programs and channels available from your television service provider. The Guide displays the channel and network, as well as the program title, scheduled time block, and a brief Viewing the television program guide Press the Start button on the remote control. -
Page 102: Downloading The Television Program Guide
Select Yes. The television program guide starts downloading from the Internet. This can take up to 30 minutes, depending on the amount of data to download and the speed of your Internet connection. hp media center pc user’s guide on the remote... -
Page 103: Changing Your Postal Code To Receive The Correct Television Program Guide
Changing Your Postal Code to Receive the Correct Television Program Guide Press the Start button on the remote control. Select Settings, TV, Guide, and then select Reset Guide lineup. Select Next, and follow onscreen instructions. Setting up an Internet Dial-Up Connection To set up your Internet connection to bypass the Internet Service Provider interface, use this procedure. -
Page 104: Adding Missing Channels To Guide
Edit Guide listings to remove the names and numbers of the channels you don’t want to appear in the Guide. hp media center pc user’s guide on the remote Use the numeric keypad on your remote control to enter the name of the missing channel, and then select Next. -
Page 105: Searching For Programs In My Tv
Searching for Programs in My TV To find a TV program, you can enter a title, keyword, or select a category in your Guide by using your remote control. To search for a TV program Press the Start button on the remote control (select models only), select My TV, and then select Search. -
Page 106: Searching For Tv Programs Using Categories
Media Center won’t record duplicate episodes. Media Center also looks for alternative times to record an episode if a recording conflict happens. hp media center pc user’s guide on the remote... -
Page 107: Recording Tv Programs
Recording TV Programs Media Center allows you to record TV programs so that you can watch them when it is convenient. You can record the program you are watching, or you can record a future program or series from the Guide, the Search, or the Recorded TV window in My TV. -
Page 108: Standby Mode And Scheduled Recordings
You should always close Media Center before you manually place the PC in Standby mode to avoid file corruption and other recording problems. hp media center pc user’s guide Some channels can be shared by two or more ■ networks, depending on the time of day. The Guide may display only one network’s... -
Page 109: Recording Tv From The Guide
Recording TV from the Guide To record a current or future program or series from the Guide: Press the Start button on the remote control, select My TV, and then select Guide. To find the program you want to record, use the arrow buttons on the remote control, and then select the program. - Page 110 Media Center displays a message and allows you to select which program you want to record. To return to the previous window, press Back on the remote control. hp media center pc user’s guide on the remote Title search Keyword search Category search...
-
Page 111: Recording Manually
Recording manually Recording a program manually allows you to select a specific date, channel, and recording time period. For some programs, you may want to begin recording before the scheduled beginning and after the scheduled ending of the program. To manually record a program or series from Recorded TV: Press the Start button on the remote... -
Page 112: My Tv Settings
■ ■ To return to the previous window, press Back on the remote control. hp media center pc user’s guide on the remote Select Record or Don’t record in the window and then press OK on the remote. Select Record series or Cancel series. -
Page 113: Recorded Tv History
Recorded TV History Recorded TV History displays a list of programs which weren’t recorded and why they weren’t recorded. In the Recorded TV History window, you can: Find out which programs were recorded and ■ which were canceled. Display errors for scheduled TV programs.The ■... -
Page 114: Recorded Tv
OK button on the remote control. hp media center pc user’s guide category. You can also delete a recorded program or series of programs and check for any recording errors. -
Page 115: Playing Recorded Tv Programs
Playing Recorded TV Programs Click Start on the taskbar, and then click My Computer. Double-click the Shared Documents folder. Double-click the Recorded TV folder. Double-click your Microsoft Recorded TV program file. A thumbnail picture of your recorded TV program is displayed by default. To view your recorded TV program, use the playback controls. -
Page 116: About Recording Errors
Press the Start button control, select My TV, Recorded TV, and then select Scheduled. hp media center pc user’s guide conflict with another scheduled program, a recording error occurs. If you were watching live TV when the program was scheduled to record and declined the prompt to change channels, a recording error occurs. -
Page 117: Resolving Recording Conflicts
Important information about recorded TV programs When you replace the hard disk drive, you lose any files or software that you created, saved, or installed on the PC. You also lose a special code that Microsoft includes in the files of the recorded TV programs. -
Page 118: Deleting A Scheduled Program Or Series
To remove that program from the hard disk, select Delete in the window and press OK on the remote control. hp media center pc user’s guide on the remote To remove a single program, select Don’t record in the window and press OK on the remote control. -
Page 119: Blocking Unwanted Tv Programs And Movies
Blocking Unwanted TV Programs and Movies (Select Models Only) If you set Media Center to block unrated channels, an error could occur. It is recommended that you make sure this option is not selected. To do this: Press the Start button on the remote control. -
Page 120: Setting Caption Display
Teletext subtitles are stored with the recording so you can view the subtitles when you play the recording later. hp media center pc user’s guide on the remote While watching TV in full-screen mode, press Click (+) or (–) next to Caption display to... -
Page 121: Safeguarding Your Recorded Tv Programs
Most television broadcasters do not encrypt programs, so a recording can be played on any Media Center PC. A recording of a broadcaster- encrypted TV program, though, can be played only on the PC that recorded it. To protect your ability to play recorded TV programs, follow the instructions in “Safeguarding Your Recorded TV Programs”... - Page 122 Scroll down the list to see and then click the entry: C:\Documents and Settings\All Users\DRM\* Click Remove. Click Apply. Click OK. The Options window closes. In the Backup Utility window, click the Backup tab. hp media center pc user’s guide...
- Page 123 In the left box, click the plus sign (+) for Local Disk (C:). The file tree expands. Click the plus sign (+) for Documents and Settings, click the plus sign (+) for All Users, and then click the DRM box so a check mark appears. Scroll down the list and click the System State box so a check mark appears.
- Page 124 Click the drop-down menu arrow and click the optical drive with the backup CD. Click the backup file name. hp media center pc user’s guide Click Open and then click OK. In the Items to restore box, click the plus sign (+) for the backup file name.
-
Page 125: Managing Hard Disk Space
Managing Hard Disk Space The space available for recording TV programs depends on your hard disk allocation, drive size, and default recording quality selections. Your PC requires a certain amount of space to run your Windows XP operating system, run software programs, and store data files. -
Page 126: Using The Disk Cleanup Utility
Double-click Shared Documents, and then double-click Recorded TV. hp media center pc user’s guide Select HP Pavilion (C:) and then click OK. Select the type of files you want to delete. Click OK. Select HP Pavilion (C:) and then click the Settings button. -
Page 127: About Recorded Tv Storage Space Settings
About Recorded TV Storage Space Settings Your recording settings affect how much hard disk space is available for future recordings. 80 GB Hard Disk 120 GB Hard Disk The storage amounts on your PC may vary from the amounts displayed here. My TV... -
Page 128: Freeing Up Space On Your Hard Disk Drive
Takes up about 5 GB of hard disk space, ■ reducing the total amount of space available for your use. Replaces the need for system and application ■ recovery CDs. hp media center pc user’s guide Quality of recording Hard disk space used Best *3 GB/hour Better *2.4 GB/hour... - Page 129 To display hard disk drive space Click Start on the taskbar. Right-click My Computer. Click Manage. To uninstall programs: Click Start. Click Control Panel. Double-click Add or Remove Programs, if it is present. Click the program, and then click the Change/Remove button.
- Page 130 guide...
-
Page 131: My Music
What Can I Do in My Music? The My Music window in Media Center works with Windows Media Player to find and play your music files and CDs. You can use Windows Media Player to create your music library and then use Media Center to find and play your music using your remote control. -
Page 132: What Can I Do In Windows Media Player
■ Windows Media Player Library. hp media center pc user’s guide Create playlists of your favorite songs. Create a music library by copying tracks from CDs or adding music files from the Internet. Organize digital music files by album, artist, playlist, or genre. -
Page 133: Using Supported File Types For My Music
Using Supported File Types for My Music You can play the following types of digital audio files in Media Center. You can also select Media Center as the default player for any of the listed file types. Refer to Windows Media Player Help for more information about supported file types. -
Page 134: Creating Your Music Library
Explorer and in the Media Library in Windows Media Player. You can also find them in Media Center. Adding music files Deleting Music files hp media center pc user’s guide Click Start on the taskbar, choose All Programs, and then click Windows Media Player. -
Page 135: Searching Computer For Music Files
Searching Computer for Music Files You may have already copied and organized your music files on your hard drive. If so, you need to add them to the Windows Media Player Library to access them with the Media Center. To add music files that are stored in your My Music or Shared Music folder on your hard drive: Click Start on the taskbar, and... -
Page 136: Adding Cd Tracks To The Music Library
Windows Media Player Library for Media Center to find them. hp media center pc user’s guide Press the Start button on the remote control, and then select My Music. Insert a CD into the CD drive. -
Page 137: Playing Digital Music Files
Playing Digital Music Files When you first open the Media Center and open the My Music window, you may not find any music files listed unless there is a music CD in your CD drive or unless you have already added audio files to your Windows Media Player Library. -
Page 138: Finding Music Files In My Music
In the My Music window, select Albums, Artists, Playlists, Songs, or Genres to display a list of all items in that category. In these windows you will have other options, depending on the category you select. -
Page 139: Playing A Song
Playing a Song You can play a song from anywhere in My Music. You can select it from the View Song list, or from the Album, Artist, and Genre lists. You can also play a single song from a playlist: In the My Music window, select Songs. -
Page 140: Finding And Playing An Album
You have the option to purchase CDs. hp media center pc user’s guide In the Media Center Start menu, select My Music, and then select Albums. To organize all of the albums available, select View by list or View by cover. -
Page 141: Creating A Playlist
Creating a Playlist A playlist is a customized list of digital music files. Using playlists, you can group various digital music files together and determine the order in which you want the files to play. You can create a playlist that includes several tracks from various CDs or even a To create a playlist Click Start... -
Page 142: Selecting A Visualization
Selecting a Visualization To select which visualization to display when you play a song: hp media center pc user’s guide Press the Start button on the remote control, select My Music. Select Settings. Select Select Visualizations. Select the visualizations you want by placing a check mark next to each one. -
Page 143: My Pictures
What Can I Do in My Pictures? The My Pictures window in Media Center is a great way to view, edit, and print your pictures. In My Pictures, you can: View and scroll through pictures that are in ■ the My Pictures or Shared Pictures folders by using your remote control or your keyboard and mouse. -
Page 144: Using Supported File Types For My Pictures
My Pictures. Unsupported files are skipped in a slide show. Folder icons appear even if the images inside ■ them cannot be displayed. hp media center pc user’s guide File type Joint Photographic Experts Group Tagged Image File Format Graphics Interchange Format... -
Page 145: Using Remote Control In My Pictures
Using Remote Control in My Pictures Display picture information Use the More Info button to display information about the selected picture, such as file name, location, date modified, and the picture resolution. Navigate your pictures Use the Back button to go back to the previous window. -
Page 146: Organizing Your Pictures
Windows Explorer Pictures folder. to place your pictures in the My When the HP Image Zone window appears, Pictures folder. click Go to My Pictures folder at the top of the window. Select the File menu, select New, and then click Folder. -
Page 147: Viewing Your Pictures In Media Center
Locate your picture files and move them to My Pictures folder. Click Start, My Computer, and then select the drive or removable device where your pictures are located. Click and drag your photos to your My Pictures folder. You can add, delete, rename, and organize your picture files into specific folders within My Pictures, such as Vacation or Birthday. -
Page 148: Viewing Pictures As A Slide Show
Slide shows that are recorded onto video CDs (VCDs) may not be able to be played in Media Center. You can play them in the InterVideo WinDVD program. hp media center pc user’s guide Select Sort by date or select Sort by name. on the remote Select Play slide show, and then press OK. -
Page 149: Rotating Pictures
Turning On or Off Photo Captions A caption displays the file name or title and the date the file was created or edited, whichever is first. Press the Start button on the remote control. Select My Pictures. Select Settings. Rotating pictures If your picture appears horizontally or vertically and you want to change the orientation, you can change it in Media Center. -
Page 150: Editing Pictures
Select Print, and then Print again. Press the Print button on the remote control. You may need to set up your printer before you can print from Media Center. Follow any onscreen instructions. hp media center pc user’s guide on the remote on the remote... -
Page 151: Setting Up Your Printer
Copying Pictures to CDs Click Start on the taskbar, and then click My Pictures. Select Go to My Pictures folder when the HP Image Zone Window appears. Locate the files you want to copy. Click Start, My Computer, and then select the drive or removable device where your pictures are located. -
Page 152: Zoom In And Pan Across A Picture
To zoom in 150%, press the OK button on the remote control. To zoom in 225%, press OK again. hp media center pc user’s guide on the remote To pan across the picture while the picture is magnified, press the arrow keys. -
Page 153: Using Hp Image Zone
Using HP Image Zone HP Image Zone is an easy to use software program for managing your still photos, scanned images, and video clips. It provides all the tools you need for viewing, organizing, editing, printing, sharing, and protecting your digital images. - Page 154 A tool for sharing the images with family and friends. After you select images on the My Images tab, you can post the images to the HP Instant Share Web site and send a link to the images on the Web site by e-mail.
-
Page 155: Changing Picture Settings For Slide Shows
Changing Picture Settings for Slide Shows Each user can set his or her own picture settings. Press the Start button on the remote control. Select Settings. You may need to select the scroll arrows on the Start menu to view Settings. - Page 156 guide...
-
Page 157: My Videos
What Can I Do in My Videos? The My Videos window in Media Center makes it easy to play home video files you created or video files you downloaded from the Internet. In My Videos you can: Play and scroll through videos that are in the ■... -
Page 158: Using Remote Control When Playing A Video
Use the media play back buttons and the arrow buttons to control the play back of your videos. Remote Control button hp media center pc user’s guide Action Plays video. Moves video forward/press up to two times to advance faster. -
Page 159: Organizing Your Videos
Organizing Your Videos When you attach a digital video camera to your PC, Windows asks you how you want to capture your video. You can choose from various software programs to capture and then edit your video file. Most programs automatically save your file to the My Videos folder in Windows Explorer. -
Page 160: Playing Digital Videos
OK to replay the video, or select Done and press Done to close the file and return to the My Videos window. hp media center pc user’s guide on the remote My Videos folder Shared Video folder... -
Page 161: Playing A Video Stored On Removable Media
Playing a Video Stored on Removable Media Removable media can be from various sources: Digital Video Camera ■ (FireWire IEEE 1394 port) CD-ROM or DVD-ROM drive ■ 7-In-1 Memory Card Readers such as ■ Smart Media or Compact Flash Make sure your removable media is connected or inserted properly. -
Page 162: Sorting Videos
■ Size of the video file in minutes. ■ hp media center pc user’s guide Select Sort by date or Sort by name. If you press the More Info button while the video is playing, the title and time span or size of the video... -
Page 163: Working With Home Videos
Working with Home Videos Refer to the documentation that came with your digital video camera. To connect a digital video camera to the PC Turn on the PC, and wait for Windows XP to start. Connect the video camera transfer cable into the camera and then into an open port on the front or back of the PC. -
Page 164: Using Supported File Types For My Videos
You can view the following types of video files in Media Center. Other file types are supported if your PC has the correct audio and video cards installed. hp media center pc user’s guide When the video displays inside the Record Click Record, and then click Play under Digital video camera controls. -
Page 165: Play Dvd
Playing DVDs in Media Center Watching DVDs in Media Center allows you to control the playback with your remote control. If you select to play your DVD in another program, the use of some of the remote control buttons is not supported. -
Page 166: Using Remote Control When Playing A Dvd
Returns to the previous DVD chapter and begins playing. Pauses movie/resumes paused movie. Stops playing movie and returns to the Stopped menu. Moves around in the menu windows. Enters selected menu item. Mute Turns off sound. Adjusts volume. hp media center pc user’s guide... -
Page 167: Stopping A Dvd Movie
Stopping a DVD movie Press the Stop button on the remote control to stop the movie. Use the arrow buttons on the remote control to select an item on the Stopped menu, and then press OK. To begin playing the DVD where you left ■... -
Page 168: Changing Dvd Movie Language
To select DVD audio settings for viewing the DVD: In the Media Center Start menu, select Settings. In the Settings window, select DVD. hp media center pc user’s guide In the DVD Settings window, select Audio. The audio properties window opens. Select your speaker and sound options, and... -
Page 169: Fm Radio
What Can I Do in Radio? (Select Models Only) If your PC is equipped with a radio turner card, then Media Center can play both FM radio and Internet radio. The Radio window in Media Center makes it easy to play FM radio stations by using your remote control. -
Page 170: Playing Fm Radio Stations
Select Start FM to begin playing that station. Select Back to return to the previous window. hp media center pc user’s guide on the remote that says FM radio stops when the TV recording starts. If you do not select Cancel recording, then Media Center automatically stops radio and begins recording TV. -
Page 171: Organizing Your Preset Radio Stations
Organizing Your Preset Radio Stations Press the Start button on the remote control. Select Radio. Select Settings. Select the up arrows and down arrows next to each preset station to move it to a different position. Select the delete icon (X) to delete a preset station. -
Page 172: Using Remote Control When Playing A Radio Station
Enters selected menu item. Mute Turns off sound. Pauses radio program up to 30 minutes. Skips radio program ahead 7 seconds and then resumes playing. Moves radio program back 7 seconds and then resumes playing. Adjusts volume. hp media center pc user’s guide... -
Page 173: Media Center Settings
Changing Media Center Settings In the Media Center Settings window, you can change settings for watching television, for viewing your pictures and slide shows, and for controlling sound and the display of all the Media Center windows. Listed below is a summary of which settings are listed under each category. -
Page 174: Changing General Settings
Privacy Data Credits hp media center pc user’s guide on the remote Select General, and then select one of the options listed in the following table. Then, use the arrow buttons to select an option or follow onscreen instructions. -
Page 175: Changing Tv Settings
Changing TV Settings The TV Recorder settings allow you to control your recording priorities and options in Media Center. Press the Start button on the remote control. Select Settings. Select TV. Select Recorder, and then select: History to check a history of your ■... -
Page 176: Changing Other Settings
For more information about radio settings, refer to “Organizing Your Preset Radio Stations” on page 165. hp media center pc user’s guide For more information about DVD settings, refer to “Playing DVDs in Media Center” on page 159. For more information about picture settings, refer to “Changing Picture Settings for Slide Shows”... -
Page 177: Recording Cds And Dvds
The Media Center PC includes several recording software programs for you to create CDs and DVDs. You can: Use RecordNow! to create music and ■ data CDs. About Copying Recorded TV Programs to DVD You can use ArcSoft ShowBiz to copy your... -
Page 178: Copying Recorded Tv Programs To Dvd Or Cd
Select the Media tab and then select Recorded TV Shows from the drop- down list. hp media center pc user’s guide Select your recorded TV program and drag it to the Storyboard section of the window. A message appears telling you that your recorded TV program is in DVR-MS format and ShowBiz converts it to MPEG-2 format. - Page 179 When the Save As window appears, type a file name for your recorded TV program, and then click Save. To add another recorded TV program, repeat steps 4 and 5. ShowBiz displays how much space is being used for your files at the bottom of the window.
- Page 180 Center PC that they Repeat step 5 until all of your recorded TV were recorded to. programs are selected. Click the Burn icon. RecordNow! records your files to disc. Click Done when the recording is complete. hp media center pc user’s guide...
-
Page 181: Watching Recorded Tv Programs On Dvd
DVD do not play in a DVD player. recording to DVDs and CDS, refer to the Creating DVDs and CDs document that came with your Media Center PC. To open RecordNow!, click Start on the taskbar, choose All Programs, RecordNow!, and then click RecordNow!. - Page 182 DVD player. TV programs that have been encrypted (protected) by the broadcaster cannot be copied and played back on any player other than the Media Center PC that they were recorded to. Recording with the CD Writing Wizard Use the Microsoft CD Writing Wizard to record data or music files to CDs only.
-
Page 183: Capturing Analog Home Video
Capturing Analog Home Video (Select Models Only) The TV tuner card of your PC allows you to play television programs in Media Center. The TV tuner card also allows you to connect a VCR, a camcorder, or another analog video device to the PC, and then capture your home video as a file. - Page 184 3: ■ ■ ■ hp media center pc user’s guide Conexant 2388x Video Capture Hauppauge WinTV PVR PCI II Conexant 2388x Video Capture Hauppauge WinTV PVR PCI II Video SVideo_2 Video Composite_2 TV Tuner —...
- Page 185 To disconnect the analog home video source Turn off your analog home video device. Close any open programs. Click Start, click Turn Off Computer, and then click Turn Off. Disconnect your analog home video source (VCR or camcorder) cable from the connectors on the front of the PC.
- Page 186 guide...
-
Page 187: Upgrading And Servicing
HP recommends that you use an antistatic ■ wrist strap and a conductive foam pad when working on the computer. -
Page 188: Removing The Side Panels
Pull the panel toward you until it stops. Lift the panel off the chassis and set it aside. hp media center pc user’s guide If you are replacing an optical drive, remove the other side panel in the same manner. Note that the screws on this panel detach and are loose from the panel. -
Page 189: Replacing The Side Panels
Replacing the Side Panels To replace the side panel, align the notches on the panel with the holes on the chassis, slide the side panel forward until it locks in place, and then tighten the thumbscrews on the side panel. Locating Components in the PC Chassis Power supply Fan duct... -
Page 190: Removing The Fan Duct
Rotate the fan duct (B) into position. Make sure it is securely locked. hp media center pc user’s guide Rotate the fan duct (B) down and out to remove it from the chassis. -
Page 191: Removing The Front Panel
Removing the Front Panel This procedure is only necessary when removing or replacing an optical drive, a 7-In-1 memory card reader, or a diskette drive. Remove the side panel with the thumbscrews. See “Removing the Side Panels” on page 182. Replacing the Front Panel To replace the front panel, align the bottom of the front panel with the ridge on the bottom of... -
Page 192: Accessing The Optical Drives
Remove both side panels. See “Removing the Side Panels” on page 182. Remove the front panel. See “Removing the Front Panel” on page 185. hp media center pc user’s guide Remove the fan duct. See “Removing the Fan Duct” on page 184. -
Page 193: Removing The Optical Drive
Removing the Optical Drive Your computer comes with one or two optical drives (CD, DVD, or combo) which you can replace or upgrade. These drives are located in the two fixed bays at the top of the chassis. To have better access to the back of the drive when you are removing the top optical drive, remove the two screws on both optical drives, and then push both drives part way out through the front of the... -
Page 194: Installing A New Optical Drive
Connect the cables to the back of the drive. define a configuration setting. hp media center pc user’s guide Push the drive all the way in, align the screw holes, and insert the screws. Replace the fan duct. See “Replacing the Front Panel”... -
Page 195: Replacing And Adding Drives
Replacing and Adding Drives You can replace the drives that are located in the removable drive cage: hard disk drive; 7-In-1 memory card reader (select models); and diskette Removing the drive cage Remove the fan duct. See “Removing the Fan Duct”... -
Page 196: Replacing The Drive Cage
Nub on drive cage Nub guides in chassis (2) hp media center pc user’s guide Push the 7-In-1 memory card reader toward the front of the chassis until the two screw holes align with the drive cage. (You may have to push down the front of the reader as you slide it out into the front panel.) Replace... - Page 197 Removing and replacing the diskette drive or the 7-In-1 memory card reader (Some PCs come with a 6-in-1 card reader) To ensure that the drive fits properly into the chassis, be sure to purchase the replacement drive from HP. Remove the drive cage. See “Removing the drive cage” on page 189.
-
Page 198: Installing A Second Hard Drive
Install the two screws. two pins in order to define a configuration setting. hp media center pc user’s guide Replace the drive cage. See “Replacing the drive cage” on page 190. Attach the power cable to the back of the drive. -
Page 199: Adding Memory
DIMMs, depending on which PC model you have. To determine which type of memory module your PC uses, go to the HP Web site by typing http://www.hp.com into your Web browser address box and pressing Enter on your keyboard. -
Page 200: Removing A Memory Module
Holding the new memory module by its top edge or side edges only, remove it from the antistatic packaging. hp media center pc user’s guide Push down the two retaining clips on the ends of the socket until the memory module pops out of the socket. -
Page 201: Removing Add-In Cards
Removing Add-In Cards Disconnect any external and internal cables attached to the card. Remove the screw on the bracket of the card you are replacing. Hold the metal bracket and the far top corner of the card. Carefully remove the card by pulling the card straight out of the expansion slot. -
Page 202: Installing An Hp Camera Docking Station
Installing an HP Camera Docking Station (Select Models Only) Your HP Media Center PC comes with a camera dock bay designed to hold an HP camera docking station (model 8886) and several HP digital cameras which are purchased separately. The camera docking... - Page 203 TV (optional). Plug the power cord (C) into a power ■ outlet. Refer to the instructions that came with the HP camera docking station. Connect the sleeve that came with your HP digital camera to the camera docking station.
- Page 204 Place the docking station cover back over the docking station. Place the HP digital camera into the camera docking station. Follow the instructions that came with your camera docking station. hp media center pc user’s guide...
-
Page 205: Application And System Recovery
The PC does not include a recovery disc in the accessory box, but you can make your own recovery CDs or DVDs. See “Using HP PC Recovery CD-DVD Creator” on page 202. You should also make the Recovery Tools CD. This... - Page 206 A device driver does not work PC stops responding or does not work You replaced the hard disk drive or removed the partition hp media center pc user’s guide Microsoft Application System Recovery from the hard Restore Program disk partition...
-
Page 207: Creating Recovery Cds/Dvds
Creating Recovery CDs/DVDs You can recover (bring back) the operating system and programs that were included on your hard disk drive just as they were when you bought the computer. You recover the operating system and programs directly from your hard disk drive, where a copy was placed for your convenience. - Page 208 Using HP PC Recovery CD-DVD Creator Make recovery CDs or DVDs for your PC by using HP Recovery CD-DVD Creator program before you experience any problem. The recovery disc set is a complete image of the original PC hard disk drive contents and is matched to your PC model number.
-
Page 209: System Restore
Remove the System Recovery partition from ■ your PC hard disk drive to increase space for data. To create or to start the HP PC Recovery Tools CD Click Start on the taskbar. Choose All Programs. Choose PC Help & Tools. -
Page 210: Application Recovery
Application Recovery If an individual factory-installed application or driver accidentally gets erased or damaged, you can reinstall the software using the HP Application Recovery program. Do not skip the last step! You must restart the PC when you are To start Application Recovery:... -
Page 211: System Recovery
System Recovery When other methods of repairing your system software (like System Restore or Application Recovery) fail, you may want to use the HP System Recovery program as a last resort to reinstall the software. When necessary, you can reinstall the operating... -
Page 212: System Recovery Using Recovery Discs
Press the On button to turn the PC on. During the startup, do the following to enter the System Recovery program: When the blue screen with the HP Invent logo appears, press the F10 key on the keyboard. (You have only a few seconds to press the F10 key before the normal startup process continues.) - Page 213 To run the System Recovery program using recovery discs If the PC works, back up all data files that you want to save onto removable media, such as CD-RW or diskette. Remove the backup CD or diskette you’ve made. Press the Eject button on the top CD-ROM drive, and wait for the tray to open.
- Page 214 TV programs previously recorded to disk, or copied to DVD or to other media. For more information about protecting your recorded TV programs, refer to “Safeguarding Your Recorded TV Programs” on page 115. hp media center pc user’s guide...
-
Page 215: Troubleshooting
Be sure that you installed the device drivers that came with the new device. You may need an updated driver for Windows XP. For non-HP peripherals, contact the vendor directly. For HP peripherals, visit the HP Web site. Refer to the Warranty & Support Guide for details. Troubleshooting Your system is... - Page 216 PC is not recommended and should be used only as a last resort. hp media center pc user’s guide Solution When the computer is in standby mode (the On button power ■ indicator light is flashing), moving the mouse does not wake it.
- Page 217 Problem Solution The computer Press the Mute button on the keyboard or on the remote control to ■ doesn’t make see if the Mute feature is turned on. any sound. Use the keyboard controls to increase the volume. ■ Click the Volume icon on the taskbar. Increase the volume, and ■...
- Page 218 Solution Check the button configuration. To configure the button: Click Start on the taskbar. Click Control Panel. Click Printers and Other Hardware, if it is present.
- Page 219 Problem Solution The monitor Make sure the monitor is turned on — it has its own power button. ■ doesn’t work, Adjust the brightness and contrast controls on the monitor. ■ even though the computer Check the connection of the power cord into the monitor. ■...
- Page 220 My software stopped working. My remote control doesn’t work. hp media center pc user’s guide Solution Check that the TV is connected to the PC. See “Connecting the TV” ■ on page 20. Check that the TV out image is enabled. See “Using Media Center ■...
- Page 221 Problem Solution My remote sensor If a faint red light doesn’t appear when you point the remote control at is not receiving a the remote sensor, try the following: signal from the remote control. Click Start, right-click My Computer, and then select Properties.
- Page 222 The 7-In-1 Memory Card Reader won’t read my memory card. hp media center pc user’s guide Solution The 7-In-1 card reader is a device that uses the Safely Remove ■ Hardware task. This appears as a tray icon next to the time. Do not click Stop in the Safely Remove Hardware window.
- Page 223 Problem Solution Resolving Video Your file may be corrupt or in an unsupported format. Open the ■ Errors. video file in a video editor such as ArcSoft ShowBiz, and then resave the file in a supported format. There may be a problem with the codec. For more information, ■...
- Page 224 My music files don’t appear in the Media Library. hp media center pc user’s guide Solution You can put data files on a DVD to store them or transfer them to another PC. However, data files on a DVD do not play in a DVD player. Rerecord your files to a file format that can be read by some DVD players.
-
Page 225: Index
Numerals 7-In-1 memory card media types 64 troubleshooting 63 using 63 7-In-1 memory card reader replacing or adding 191 troubleshooting 63 using 61 accessing optical drives 186 add-in cards, removing and replacing 195 adding CD tracks to music library 130 channels to TV program guide 169 memory 193 missing channels to TV program guide 98... - Page 226 (combo) 59, 187 DVD-ROM 58, 187, 188 hard disk drive 189 locating 183 optical drives 186 HP Media Center PC User’s Guide can’t remove from drive 215 handling 57 inserting 57 won’t play 218 DVD movies, changing...
- Page 227 78 using with another program open 78 viewing your pictures 141 what you can do 67 Media Center PC desktop 38 Media Center, what you can do in My Music 125 in My Pictures 137 in My TV 91...
- Page 228 132 playing a song 133 playing songs chosen randomly by Media Center 133 HP Media Center PC User’s Guide My Pictures 137 changing picture settings 149 copying pictures to CD 145 displaying information about a picture 139...
- Page 229 On button 37 On button light flashing 57 opening computer chassis 182 Media Center 55 operating system, reinstalling 206 optical drives accessing 186 removing and installing 187 organizing pictures 140 preset radio stations 165 videos 153 parental controls setting 113 connectors on back 13 connectors on front 12 PC Recovery CD-DVD Creator 202...
- Page 230 99 selecting Internet Service Provider 37 setting up Internet connection 74 Television Program Guide 75 television signal 75 HP Media Center PC User’s Guide settings background color 168 calibration settings 168 for phone call notification 168 for sound 168...
- Page 231 Start menu 38 Media Center 71 System Recovery 201, 205 Recovery Tools CD 203 starting, if the PC is not responding 206 starting, if the PC is responding 205 using recovery discs 201 when to use 199 System Restore 199 settings 120 system tray 38 Teletext, displaying 114...
- Page 232 157 video, connecting analog VCR or camcorder 177 visualization, selecting 136 Visualize option 134 volume, adjusting 34 HP Media Center PC User’s Guide warnings add-in cards overloading PC 195 installing memory module 194 removing memory module 194...
Need help?
Do you have a question about the Media Center PC and is the answer not in the manual?
Questions and answers