
Related Manuals for Levana LV-TW500


Summary of Contents for Levana LV-TW500
-
Page 1: Title Page
Digital Wireless Baby Camera w/ Online Monitoring USERS MANUAL www.myLevana.com Model #: LV-TW500 LV-TW500 Manual.indd 1 14/10/2010 11:37:15 AM... -
Page 2: Product Warranty Information
Warranty Terms 1. LEVANA products are guaranteed for a period of one year from the date of purchase against defects in workmanship and materials. This warranty is limited to the repair, replacement or refund of the purchase price at LEVANA’s option. -
Page 3: Table Of Contents
Online Monitoring Congratulations on your purchase of the LV-TW500! You’ve just taken a step to help ensure your child’s safety as well as ensure that you will not miss out on any special moments of your child’s life. This innovative digital wireless baby camera allows you to view your baby from anywhere in the world as long as your computer or smart phone is connected to the Internet. -
Page 4: What's Included
Regardless of where you are in the world, you can watch live video of your baby initiative that aims to control the use of hazardous materials in electrical and electronic equipment. Levana is on any Internet-accessible computer. -
Page 5: Fcc Statement
Such modifications could void the user's authority to operate the equipment. AVOIDING SIGNAL DISRUPTION Your LV-TW500 uses digital transmission to ensure a clear and consistent picture. The signal also passes easily through interior walls. However, buildings with metal frames or placing the camera near large metal objects may cause signal degradation. -
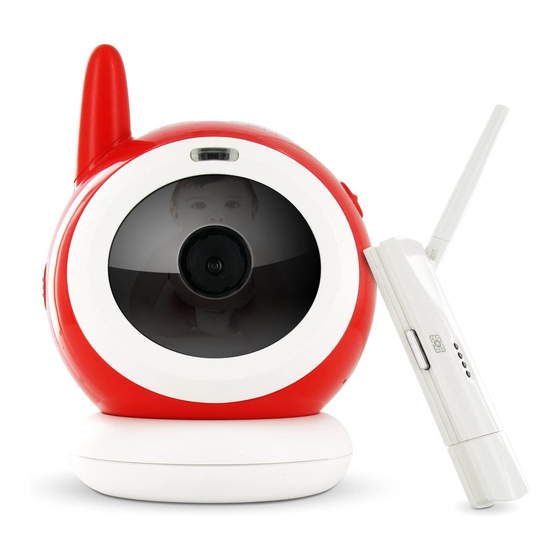
Page 6: Knowing Your Baby Camera
Switching this turns your baby camera on and off NOTE: Batteries in the camera will last a maximum of 4.5 continuous hours. We recommend using batteries only when necessary. For best results, use Lithium AAA Batteries or the power adapter. LV-TW500 Manual.indd 6 14/10/2010 11:37:39 AM... -
Page 7: Knowing Your Usb Receiver
LV-TW500 4. Pairing Button: This is the button you press to pair the camera to the USB receiver 8 STEPS TO USE THE LV-TW500 Please follow the step by step instructions, Step 1: Camera Setup Step 2: Connect the USB Receiver ... -
Page 8: Step 1 - Camera Setup
Turn Switch On Plug Camera In Setting up the Baby Camera: Setting up your LV-TW500 baby camera is simple. ↑ 1. If you are plugging the camera in, choose the desired location you would like to place your baby camera. Make sure it is within 6ft of a power source or an extension cable will be needed. -
Page 9: Using The Magnetic Base
(red light). • The LED on the camera will remain red until the batteries lose power. Change the batteries when the LEDs are red and blinking. Upon startup, the LED will be red LV-TW500 Manual.indd 9 14/10/2010 11:37:53 AM... -
Page 10: Using The Crib Mount
4. Once you have the device connected you are ready to move onto Step 2 and install the drivers and software. NOTE: It takes a few seconds for the USB receiver to power up; therefore it takes a few seconds before the lights on the USB receiver turn on. LV-TW500 Manual.indd 10 14/10/2010 11:37:56 AM... -
Page 11: Step 3 - Installing The Drivers From The Cd
Step 3 and install the software. • If you are using Vista an installation control screen may appear, if so, select “Allow” Restart Computer Prompt VISTA -Select Allow LV-TW500 Manual.indd 11 14/10/2010 11:37:57 AM... -
Page 12: Step 4 - Installing The Software From The Cd
The software is what allows you to view your digital wireless baby camera on the computer! It also allows you to record video, capture snapshots, view online, and alert you if there is motion detected. The software is what allows you to alter any of the settings for your LV-TW500. To Install the Live Viewing Software: 1. -
Page 13: Step 5 - Pairing The Camera And Usb Receiver
3. Start the Secuexpress 2 watcher program on your computer. Note: The LV-TW500 USB receiver is set to automatically find the baby camera when it is plugged into a computer. If the receiver does not automatically find the camera you have to pair the two devices. -
Page 14: Step 6 - The Basics
Watch recorded video footage Take a snapshot of the screen and save it to your computer Enable/Disable motion detection recording View your baby on other computers in the house by using your IP address LV-TW500 Manual.indd 14 14/10/2010 11:38:06 AM... -
Page 15: Watcher Software Buttons And Connections
11. Viewing Screen: This screen displays what your baby camera is viewing live, double clicking it will give you a full screen view, double click again to exit the full screen view LV-TW500 Manual.indd 15 14/10/2010 11:38:21 AM... -
Page 16: Viewing Your Baby Through The Computer
Record Icon Recording Sections of Footage and Saving it onto your Computer: The LV-TW500 allows you to record footage onto your computer. The software automatically saves it in a common area, we recommend leaving the file save location the same. -
Page 17: Enabling Motion Detection Recording
NOTE: If both the “running man” and “record” icons are not hightlighted in the viewer the system will have motion software, the system is NOT recording and saving motion detection footage. detection recording enabled. LV-TW500 Manual.indd 17 14/10/2010 11:38:22 AM... -
Page 18: Footage Save Folder
Event recording. For directions on how to set the record mode and record audio see RECORDING MODE. File List NOTE: For more information on the preferences box, please see the SOFTWARE - IN DEPTH section. LV-TW500 Manual.indd 18 14/10/2010 11:38:23 AM... -
Page 19: Playback Player Buttons And Connections
9. Date/Speed: This shows you the date and time that the video was recorded as well as the playback speed 10. Viewing Screen: Your recorded footage will play back through this viewing screen LV-TW500 Manual.indd 19 14/10/2010 11:38:34 AM... -
Page 20: Snapshot
2. When you select “live,” the button that used to say “live” will then say “snap.” 3. To take a snapshot click on the “snap” button. Camera Icon on Watcher Camera Icon on Playback LV-TW500 Manual.indd 20 14/10/2010 11:38:35 AM... -
Page 21: Viewing Baby On Other Computers In The House
3. In the black box that pops up type the word “ipconfig” and press enter. 4. This should pop up your IP address, Subnet mask and Default gateway. 5. Write down the number next to “IP address.” Type IPconfig Write IP address Down Run Menu LV-TW500 Manual.indd 21 14/10/2010 11:38:35 AM... - Page 22 The first screen is giving you an option on the size of the viewing screen • We recommend clicking on the 640 x 480 view Select a Viewing screen Size • All online viewing (external, remote and mobile) will give you this option Select a Viewing screen Size LV-TW500 Manual.indd 22 14/10/2010 11:38:36 AM...
-
Page 23: Step 7 - Port Forwarding And Online Viewing
` If you are not using the default Port (Port 80) you will also need the port that the software is programmed to run off of. To see what your port is set to see Remote Access in the SOFTWARE-IN DEPTH section LV-TW500 Manual.indd 23... -
Page 24: Option 1
1. Insert CD3 and select the link named “view networking ” or open up your web browser and go to: www.myLEVANA.com/networking 2. Once the site has loaded you will see a list with photos of different types of LEVANA products, select the LV-TW500. -
Page 25: Option 2
7. Once you have completed port forwarding, see the TESTING PORT FORWARDING. NOTE: www.portforward.com is not affiliated with LEVANA. Select a Router most similar to yours from list Go to www.portforward.com... -
Page 26: Testing Port Forwarding
9. If you receive an error message please view the troubleshooting guide. If you’re still having trouble you can always contact LEVANA’s 24/7 support team. Write down your external IP address from www.whatsmyip.org Success Note: If you see this your port forwarding was successful... -
Page 27: Online Software
NOTE: If you would rather use a web site name instead of an IP address you can use the DynDNS instructions to set up an account so that the cameras can be accessed by a name like www.nadiasbaby.dyndns.org (for example). LV-TW500 Manual.indd 27 14/10/2010 11:38:45 AM... -
Page 28: Mobile Viewing
Mobile Viewing with iPod Touch Mobile Viewing with Nokia NOTE: The images are similar to what the mobile viewing will look like. The image on your phone’s web browser may appear different. LV-TW500 Manual.indd 28 14/10/2010 11:38:46 AM... -
Page 29: Dyndns Setup
• The next page has information about creating your host name Dyn DNS home page DynDNS Account Confirmation Note: The DynDNS sites are not owned nor operated by LEVANA and therefore support for these services will be done through their web site. LV-TW500 Manual.indd 29... - Page 30 ONCE THE ACCOUNT HAS BEEN CONFIRMED YOU CAN LOG INTO THE Select “Get Started” ACCOUNT AND SETUP A DDNS FOR YOUR LV-TW500 To set up a DynDNS name for your baby camera: 1. Enter the DYNDNS.org user name and password you created and click login.
-
Page 31: Port Forwarding Troubleshooting
ISP to assist with bridging the modem and router together Page Cannot be Displayed NOTE: If you are experiencing any difficulties with port forwarding, you can always contact our 24/7 hour support team. LV-TW500 Manual.indd 31 14/10/2010 11:39:07 AM... -
Page 32: Step 8 - Software-In Depth
STEP 8 - SOFTWARE - IN DEPTH LV-TW500 Manual.indd 32 14/10/2010 11:39:10 AM... -
Page 33: Options Menu
• Set the recording mode (directions above in “THE BASICS” section) • Enable or disable password protection for online viewing • Set a password • Set an IP address change notification • Enable or disable recording state LV-TW500 Manual.indd 33 14/10/2010 11:39:11 AM... - Page 34 2. Select the codec you would like to use to compress the audio. 3. To save changes and exit the preferences box select OK. To exit without saving select Cancel. LV-TW500 Manual.indd 34 14/10/2010 11:39:12 AM...
- Page 35 3. Make sure you tell this password to the people who would be viewing the footage online, such as Grandma and Grandpa. 4. To save changes and exit the preferences box select OK. To exit without saving select Cancel. LV-TW500 Manual.indd 35 14/10/2010 11:39:14 AM...
- Page 36 6. You will have to update your port forwarding to work with your new IP address. Note: Make sure you check your External IP address as well, your external IP address can change and you need the most up to date external IP address to access the online footage. LV-TW500 Manual.indd 36 14/10/2010 11:39:15 AM...
-
Page 37: Dyndns Ip Setup
7. When you receive an email, you will have to re-set your port forwarding to work with your new IP address. Select “Download Now” Icon Insert DynDNS account information Select Run LV-TW500 Manual.indd 37 14/10/2010 11:39:16 AM... -
Page 38: Save Recording And Detection Settings
80 is a general default port. 6. Specify video size by selecting the drop down menu. It is best to leave it at 320 x 240 as that size produces the best quality picture. Remote Access Menu LV-TW500 Manual.indd 38 14/10/2010 11:39:16 AM... -
Page 39: Motion Detection
Click this when you have adjusted the motion and volume sensitivity to your liking and you would like to save and exit 9. Cancel: Click this if you would like to exit the motion options without saving your settings LV-TW500 Manual.indd 39 14/10/2010 11:39:24 AM... - Page 40 To exit the motion mask screen without saving select cancel 3. Clear All: Selecting this will clear the screen of any motion mask setting 4. Mask All: Selecting this will put a motion mask on the entire screen LV-TW500 Manual.indd 40 14/10/2010 11:39:35 AM...
-
Page 41: Event Notifications
3. To test out that the sound you have selected is the one you would like, select play. The selected sound should begin to play for you through your computer speakers. 4. To have the alarm/sound repeat select ‘’loop playback’’ . Search for sound file to play Options → Event Notification LV-TW500 Manual.indd 41 14/10/2010 11:39:36 AM... - Page 42 OK. To exit without saving select Cancel. Set email settings 5. You will now get an email notification and an image sent to your inbox when your baby camera detects motion. Example image attached to email LV-TW500 Manual.indd 42 14/10/2010 11:39:44 AM...
- Page 43 In order to have this function work you will need to have write access to an FTP server (not provided by LEVANA). The photos will be uploaded on your FTP server as .JPGs. Set FTP server notification: 1.
-
Page 44: Audio Capture Filter
Audio Capture Filter: As the LV-TW500 has a microphone built into it, the options to adjust sound are limited. You can only adjust the main master input volume; this allows you to set the volume of sound that plays through the software. -
Page 45: Video Capture Filter
To open the video capture filter select “Options” →” Video capture filter.” not applicable to the LV-TW500. The other options will not adjust and adjusting them will prompt a screen to appear telling you that the operation cannot be completed. To get to the video pin options The following video settings can be adjusted: select “options”... -
Page 46: Command Menu
Note: The above photo has a check mark next to the words “Menu Bar” and “Status Detection,” this means that motion detection has been activated. Bar,” this means that the menu and status bar are visible when the player is open. LV-TW500 Manual.indd 46 14/10/2010 11:39:47 AM... -
Page 47: Logs
Remote Connections As the LV-TW500 is designed to be set up and viewed in a home, it is not compatible of showing you the remote connection information. If you would like to view the remote connection information you can view it through the log file. The log file will show you when someone connected as well as their IP address. -
Page 48: Playback (Player) File Menu
4. To view the footage after recording it follow the open record database instructions. 5. If you are viewing it on a different computer make sure that the computer you are using has the playback program installed. Example of Record database LV-TW500 Manual.indd 48 14/10/2010 11:39:48 AM... -
Page 49: Skype"Remote Monitoring Program
Note: You can control the camera view through the Skype software, you can turn Note: LEVANA and our support team are not affiliated with “Skype” in anyway night vision on/off by typing “LED on” and “LED off” in the chat box LV-TW500 Manual.indd 49... -
Page 50: Troubleshooting Guide
“light” button • If you set up a DynDNS account it will adjust for your external IP address for you so you can avoid this issue in the future LV-TW500 Manual.indd 50 14/10/2010 11:39:51 AM... -
Page 51: Specifications
Network Viewing Yes (Software must be running) Camera Bracket Operating Temperature 14°F ~ 104°F Network Password Protection Operating Humidity 0%-85% Compression Adjustable Camera Power Input DC 9V 600mA Log Files Playback of recorded footage LV-TW500 Manual.indd 51 14/10/2010 11:39:52 AM... - Page 52 LV-TW500 Manual.indd 52 14/10/2010 11:40:19 AM...
Need help?
Do you have a question about the LV-TW500 and is the answer not in the manual?
Questions and answers