
Subscribe to Our Youtube Channel
Related Manuals for Levana LV-TW200


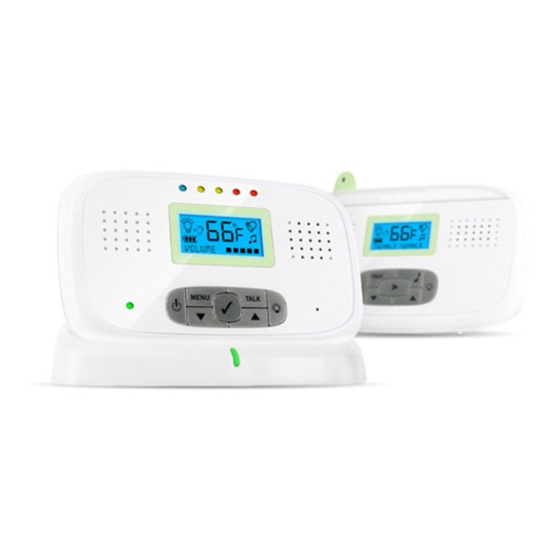
Summary of Contents for Levana LV-TW200
- Page 1 USeRS MANUAL Melody Digital Audio Monitor w/ Talk-to-Baby Intercom Model #: LV-TW200 www.myLevana.com...
-
Page 2: Product Warranty Information
5. This warranty does not cover the shipping cost, insurance or any other incidental charges. 6. You MUST call LEVANA before sending any product back for repair. You will be sent a Return Authorization form with return instructions. When returning the product for warranty service, please pack it carefully in the original box with all supplied accessories, and enclose your original receipt or copy, and a brief explanation of the problem (include RA #). -
Page 3: Table Of Contents
TABLE OF CONTENTS PRODUCT WARRANTY INFORMATION ..............2 TABLE OF CONTENTS ..................3 WHAT’S INCLUDED .................... 4 FEATURES ....................... 4 BUTTONS AND CONNECTIONS - PARENT UNIT ............6 BUTTONS AND CONNECTIONS - BABY UNIT ............8 GETTING STARTED .................... 10 ATTACH POWER TO THE BABY UNIT USING THE AC ADAPTER ...... -
Page 4: What's Included
User Manual FEATURES Superior Digital Wireless Technology Feel free to take the monitor with you around the house and even outside! Levana’s Digital Technology ensures that you will always hear clearly and signals remain strong up to 2000 feet away. - Page 5 FEATURES Soothing Night light The baby unit has a gentle night light that glows a calming tangerine. You can turn it on manually, set it to automatic which will turn on whenever your child becomes restless and makes noise, or control it by remote control from another room. Rechargeable Monitor for Busy Parents Simply place the parent unit onto the charging base, and enjoy over eight hours of continuous audio.
-
Page 6: Buttons And Connections - Parent Unit
BUTTONS AND CONNECTIONS - PARENT UNIT... - Page 7 BUTTONS AND CONNECTIONS - DESCRIPTIONS Front of Unit 1. Volume Indication LEDs - Indicates the level of volume being heard in baby’s room 2. LCD Screen - Displays the temperature and current settings 3. LED Flashlight - A LED flashlight to help you find things in the dark 4.
-
Page 8: Buttons And Connections - Baby Unit
BUTTONS AND CONNECTIONS - BABY UNIT... - Page 9 BUTTONS AND CONNECTIONS - DESCRIPTIONS Front of Unit 1. Antenna - Transmits and receives signals with the parent unit 2. Night Light - Sooth baby to sleep with a calming night light 3. LCD Screen - Displays the temperature and current settings 4.
-
Page 10: Getting Started
GETTING STARTED Attach Power to the Baby Unit Using the AC adapter 1. Plug one end of the included power adapter into any available wall outlet. 2. Plug the small end of the power adapter into the DC jack on the back of the baby monitor. Installing Batteries 1. -
Page 11: Operation - Parent Unit
OPERATION - PARENT UNIT Many of the monitor features are set and personalized through the main menu of the parent unit. The select button is used to select an option or menu, the menu button is used to exit and return to the previous menu. Turning the Night Light On and Off 1. -
Page 12: Sound Alert Settings
OPERATION - PARENT UNIT Sound Alert Settings When the volume on the parent unit is set to Off, the Sound Alert menu lets you choose to have an audible alert when noise in the baby’s room becomes loud enough to reach the red LED indicators. 1. -
Page 13: Setting The Temperature Type
OPERATION - PARENT UNIT Setting the Temperature Type 1. From the temperature menu, press the down button until ‘Degree C’ or ‘Degree F‘ is displayed. 2. Depending on the monitors current status, pressing select will change the monitor to show the temperature in the format displayed. Clock Settings 1. -
Page 14: Talk To Baby Function
OPERATION - PARENT UNIT Talk to Baby Function 1. On the front of the parent unit, press and hold the Talk button. 2. Speak directly into the front of the parent unit, where a microphone is located. 3. When you are finished talking, simply release the Talk button. LED Flashlight 1. -
Page 15: Lullaby Selection Button
OPERATION - BABY UNIT Lullaby Selection Button You can also choose and play the lullabies from the baby unit. Your choices are Twinkle Twinkle Little Star, Minuet in G, Londonderry, or Play All. 1. Press the Lullaby button on the front of the baby unit to select one of the three available lullabies, or the play all setting. -
Page 16: Troubleshooting
TROUBLESHOOTING Problem Possible Cause No reception or transmission • The unit has not been switched on on the parent unit • The AC/DC adapter has not been connected • The rechargeable battery pack is not installed properly • Battery power is too low. Recharge the battery, put it back on the charging base •... -
Page 17: Specifications
SPECIFICATIONS Parent Unit Specifications Power Input ............. 6V ~ 300mA Wireless Frequency .......... 2.4 GHz Digital Wireless Range............... 1000ft (High Power) - 500ft (Low Power) Battery Operable ..........Yes - Rechargeable Battery Included Battery Life ............8 Hours Recharge Time ..........4 Hours Screen .............. -
Page 18: Fcc Approved
FCC APPROVED This equipment has been tested and found to comply with the limits for a Class B digital device, pursuant to Part 15 of the FCC Rules. These limits are designed to provide reasonable protection against harmful interference in a residential installation. - Page 19 SAFETY INSTRUCTIONS Ventilation: This baby monitor should not be used on a bed, sofa, rug or similar surface that may block the ventilation openings, or be placed in an enclosed area, such as a bookcase or drawer that may impede air flow. Keep Away from Sources of Heat: This unit should not be exposed to direct heat sources such as a candle, fireplace, radiator, heat register, stove or other appliance that emits heat.
Need help?
Do you have a question about the LV-TW200 and is the answer not in the manual?
Questions and answers