
Related Manuals for Levana LV-TW502


Summary of Contents for Levana LV-TW502
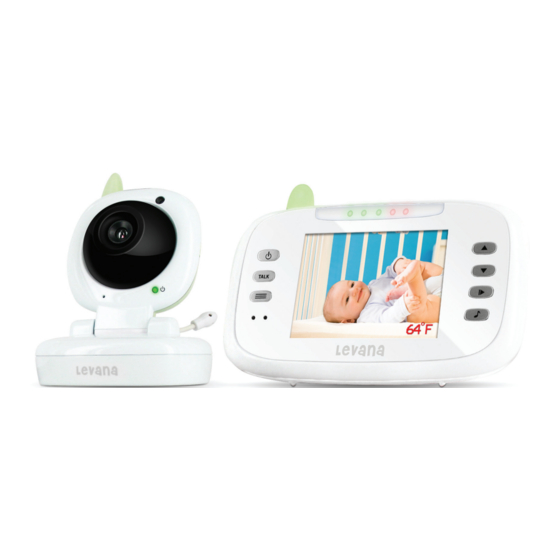
- Page 1 USeR MANUAL Safe N’ See Advanced ™ Digital Video Monitor With Talk To Baby™ Intercom Model #: LV-TW502 www.myLevana.com...
-
Page 2: Need Help
DO NOT RETURN THIS PRODUCT TO THE STORE Please contact a Levana customer support representative regarding any additional information on product features, specifications or if you need any help with set-up, we are available 24/7! Please contact us via one of the methods below: Email: support@mylevana.com... -
Page 3: Table Of Contents
3.5" LCD screen, from anywhere in your home! Feel free to relax and take comfort in knowing that your child is in good hands with Levana. TABLE OF CONTENTS NEED HELP? .............................. -
Page 4: Features
500ft away . Feel free to move around the house and no matter where you go, you will always see your baby. With Levana, you’ll never miss a moment. Large LCD for Superior Viewing Quality Imagine what you will catch your baby doing on this bright and clear, large 3.5”... - Page 5 • Levana does not endorse any of its products for illegal activities. Levana is not responsible or liable in any way for any damage, vandalism, theft or any other action that may occur while a Levana product is in use by the purchaser.
-
Page 6: Buttons And Connections - Monitor
BUTTONS AND CONNECTIONS - MONITOR... - Page 7 BUTTONS AND CONNECTIONS - MONITOR 1. Antenna Transmits and receives signals 2. Rechargeable Battery Compartment Insert the rechargeable battery here 3. Belt Clip and Support Stand Flip up to use as a belt clip, or down to use as a support stand 4.
-
Page 8: Buttons And Connections - Camera
BUTTONS AND CONNECTIONS - CAMERA... -
Page 9: Night Light
BUTTONS AND CONNECTIONS - CAMERA 1. Antenna 6. CDS Light Sensor Transmits and receives signals Detects the absence of light and turns on night vision 2. Night Vision IR LEDs 7. Power LED Allows you to see up to 10 feet in complete darkness Indicates that the camera is powered on... -
Page 10: Camera Setup And Mounting Guide
Power cords should NEVER be placed within 3 feet of a crib, or within baby’s reach. Using Levana’s Camera Setup and Mounting Guide, you can monitor your baby while they sleep safely in their crib. -
Page 11: Setting Up Your System
SETTING UP YOUR SYSTEM Battery Operation The camera unit can be powered using 4 AAA batteries instead of the included AC adapter. Remove the battery compartment cover on the bottom of the camera base, using a small phillips (cross) head screwdriver. Place 4 AAA batteries (not included) in the compartment, paying attention to the labelled polarity markings. -
Page 12: Installing The Rechargeable Battery
SETTING UP YOUR SYSTEM Installing the Rechargeable Battery Turn the belt clip on the back of the monitor unit upwards. Remove the battery compartment cover using a flat edge screwdriver to twist the battery compartment latch to the open position. Insert the included rechargeable battery, ensuring that the copper connections on the battery line up with the copper connections... -
Page 13: Night Vision
Switching the Monitor ON/OFF Press and hold the power button until you hear two beeps. The LEVANA logo will appear on the screen for a moment followed by the picture being transmitted. To turn off the unit, press and hold the power button again for 1 second. -
Page 14: Setting The Brightness
MONITOR OPERATION Setting the Brightness Press the menu button once. The brightness icon will display on the screen along with the brightness gauge that will indicate the current set level. Use the up and down buttons to adjust the brightness level up and down. Adjusting the Temperature Display The ideal temperature for a baby’s room is between 16°... -
Page 15: Adjusting The Vox Sensitivity
MONITOR OPERATION Adjusting the VOX* Sensitivity VOX = Voice Operated Transmission = Sound Detection The VOX function allows the camera to transmit video and audio immediately after a sound is heard. Once transmission begins, the video will play for 10 seconds if no more noise is heard. Pressing a button on the monitor will also turn the screen and transmission ON at any time. -
Page 16: Pairing
PAIRING THE DEVICES The camera and monitor come paired (connected) together. If you do receive this package and the devices do not automatically connect and transmit, you may do so manually. Light Sensor Slide the power switch on the right hand side of the camera to the OFF position. -
Page 17: Troubleshooting
TROUBLESHOOTING PROBLEM SOLUTION Equipment does not function • Camera and/or monitor are not switched on • The battery is dead or defective • The power adapters are not connected No reception/Screen freezes or turns black • Camera and monitor are not paired •... -
Page 18: Specifications
SPECIFICATIONS Camera Specifications Input Power..................100 - 240 VAC, 50 - 60 Hz ~ 200mA Output Power ..................6 VDC ~ 800mA IR LEDs and Range ................4 LEDs, 10 foot range Range....................500 Feet Maximum Frequency Range ................2.4 GHz Operable Temperature ...............32 ˚ F to 104 ˚ F (0 ˚ C to 40 ˚ C) Transmission Power ................15 ~17 dBm Monitor Specifications Input Power ..................100 - 240 VAC, 50 - 60 Hz ~ 200 mA... -
Page 19: Fcc Statement
FCC STATEMENT This device complies with part 15 of the FCC Rules. Operation is subject to the following two conditions: This device may not cause harmful interference. This device must accept any interference received, including interference that may cause undesired operation. -
Page 20: Safety Instructions
SAFETY INSTRUCTIONS Read and Keep Instructions: All the safety and operating instructions should be read before the video baby monitor is operated. Water and Moisture: This product is designed for indoor use only. The unit should not be exposed to rain, moisture, dripping or splashing. -
Page 21: Product Warranty Information
USA 14305 Warranty Terms 1. LEVANA products are guaranteed for a period of one year from the date of purchase against defects in workmanship and materials. This warranty is limited to the repair, replacement or refund of the purchase price at LEVANA’s option.
Need help?
Do you have a question about the LV-TW502 and is the answer not in the manual?
Questions and answers