Table of Contents
Advertisement
Astra
31006B
mylevana.com
™
CAUTION: Keep small parts away from children.
ATTENTION: Gardez les petites pièces hors de la portée des enfants.
PRECAUCIÓN: Mantenga las piezas pequeñas fuera del alcance de los niños.
MANUAL / MANUEL / MANUAL
Digital Baby Video Mon
Digital Baby Video Monitor
Moniteur vidéo bébé numéri
Moniteur vidéo bébé numérique
Video Monitor Digital para B
Video Monitor Digital para Bebé
Advertisement
Table of Contents

Related Manuals for Levana Astra 31006B


Summary of Contents for Levana Astra 31006B
- Page 1 MANUAL / MANUEL / MANUAL Digital Baby Video Monitor Digital Baby Video Mon Astra ™ Moniteur vidéo bébé numérique Moniteur vidéo bébé numéri Video Monitor Digital para Bebé Video Monitor Digital para B 31006B CAUTION: Keep small parts away from children. ATTENTION: Gardez les petites pièces hors de la portée des enfants.
-
Page 2: Safety Instructions
SAFETY WARNINGS This product cannot replace responsible adult supervision. CAUTION: Keep small parts away from children. Strangulation Hazard: Children can become entangled in Use only with provided power supply. cords. Power cords should be kept more than 3 feet away The socket-outlet shall be installed near the equipment and from the crib and baby’s reach at all times. -
Page 3: Fcc Statement
F F CC Caution: IC Warning RSS(Category I Equipment): Any Changes or modifications not expressly approved This device complies with Industry Canada licence-exempt by the party responsible for compliance could void the RSS standard(s). Operation is subject to the following two user's authority to operate the equipment. -
Page 4: Warranty
The warranty expressly provided for herein is the sole warranty provided in connection with the product itself and no other warranty, expressed or implied is provided. LEVANA assumes no responsibilities for any other claims not specifically mentioned in this warranty. -
Page 5: Table Of Contents
TABLE OF CONTENTS SAFETY INSTRUCTIONS ..........................................2 FCC STATEMENT ............................................3 WARRANTY ..............................................4 WHAT’S INCLUDED ............................................. 6 BUTTONS AND CONNECTIONS - MONITOR ..................................7 BUTTONS AND CONNECTIONS - CAMERA ................................... 8 SETUP ................................................9 Battery installation ........................................9 Connecting Power to the Monitor / Charging Battery ............................10 Connecting Power to the Camera .................................. -
Page 6: What's Included
® does not endorse any LEVANA ® products for illegal activities. Levana is not responsible or liable in any way for any damage, vandalism, theft or any other action that may occur while a LEVANA ® product is in use by the purchaser. -
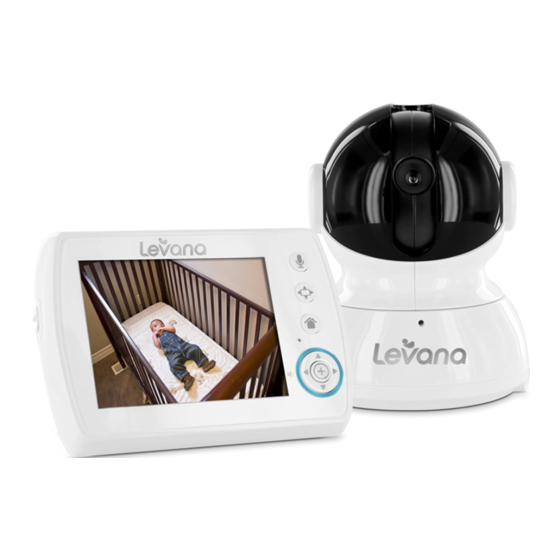
Page 7: Buttons And Connections - Monitor
MONITOR LOCK / UNLOCK BUTTON Disables ALL function buttons in the LOCK position LCD SCREEN POWER ON/OFF POWER INPUT TALK TO BABY™ Press and hold to talk, release to listen MENU MICROPHONE COLOR-CHANGING LED RING Ring changes color with sound intensity DIRECTIONAL ARROWS / VOLUME CONTROL ANTENNA Extend to improve signal... -
Page 8: Buttons And Connections - Camera
CAMERA ANTENNA MICROPHONE POWER INPUT POWER LED POWER ON/OFF NIGHT VISION LIGHT SENSOR SPEAKER mylevana.com... -
Page 9: Setup
SETUP LET’S GET STARTED! Battery Installation Gently remove the BATTERY COMPARTMENT COVER on the back of the monitor by sliding down. 2. Insert the battery; the battery connectors on the battery should line up with the connectors inside the battery compartment. 3. -
Page 10: Connecting Power To The Monitor / Charging Battery
SETUP Connecting Power to the Monitor / Charging Battery Connect the small end of power adapter marked MONITOR into the DC input on the side of the monitor as shown in the diagram. Connect the other end of the adapter into an available LED Ring wall outlet. -
Page 11: Screen Icons
SCREEN ICONS SIGNAL STRENGTH SOUND SENSITIVITY SETTING PTZ / VPIZ / PTZ STRONG MEDIUM HIGH SIGNAL SIGNAL — — — — — — BATTERY STRENGTH ZOOM VOLUME EMPTY CHARGING FULL LOUD PEEP MODE TALK TO BABY™ BRIGHTNESS DARK BRIGHT CAMERA CAMERA PAIRING SUPPORT... -
Page 12: Operation
OPERATION Turn the MONITOR ON/OFF Press and hold the POWER button on the side of the monitor to turn the monitor ON. Press and hold the POWER button again to turn OFF the monitor. Pairing the Camera(s) and Monitor ICONS ARE ORANGE WHEN SELECTED The camera and monitor come paired (connected) to each other automatically. -
Page 13: Placement Of The Monitor
OPERATION Placement of the Monitor This monitor can be placed on a tabletop. You can place the monitor on a tabletop by using the retractable table stand on the back of the monitor. When not in use, simply tuck the table stand away into the back of the monitor until you hear a "click". -
Page 14: Mounting The Camera On A Wall Safely
OPERATION Mounting the Camera on a Wall Safely: Before drilling the holes, it is important to check the reception and camera positioning in the intended location on the wall. Ensure you are hanging the camera no less than 3 feet away from baby’s crib. Note: Baby monitors and cameras with power cords should never be hung on or near the crib as it is a strangulation hazard. -
Page 15: Night Vision
OPERATION Night Vision INVISIBLE The camera is equipped with NEW Invisible IR (infrared) LEDs which keep the nursery LEDs dark. The LEDs are located on the front of the camera and allow you to see up to 12 feet in complete darkness so you can check on your baby at any time of night. The night vision LEDs will activate automatically when the Light Sensor on the side of the camera detects that the light levels are too low. -
Page 16: Volume
OPERATION Volume Use the navigational arrows to increase /decrease /mute the VOLUME. Press the button to INCREASE the volume in LIVE VIEW; the VOLUME icon will display the volume level in the top left corner of the screen. Press the button to DECREASE the volume;... -
Page 17: Using Peep Mode
OPERATION Using PEEP Mode When in PEEP Mode, the monitor enters standby/sleep mode after 1 minute of inactivity. When sound is detected, the screen changes to live view. To access live view manually when the screen is off, press the POWER button ONCE. -
Page 18: Setting The Brightness
OPERATION Setting the Brightness Brightness Mode sets the brightness of the the screen. Brightness Mode also extends the battery life. To set the Brightness Mode, press the MENU button. Using the navigational arrows on the front of the monitor, highlight the BRIGHTNESS icon. Use the to toggle to the your desired brightness and press the SELECT button... -
Page 19: Contacting Customer Support
OPERATION Contacting Customer Support Customer Support is just a click away whenever you need it! Our customer support team can be reached by live web chat or on our website at www.mylevana.com/support. Our experts will be happy to assist you in English, French and Spanish. To access Customer Support, press the MENU button. -
Page 20: Troubleshooting
TROUBLESHOOTING ISSUE POSSIBLE SOLUTION Equipment does not function Confirm that the camera and monitor are ON The battery may be depleted; charge battery The power adapters may not be properly connected No reception Camera and monitor may not be properly paired; follow PAIRING instructions Camera may be too far away from the monitor Extend the antenna on the monitor Reception Interference (static) - Page 21 SPECIFICATIONS MONITOR MONITOR Monitor Type TFT LCD Talk to Baby Screen Size 3.5” Lullabies Resolution 320x240 Battery Type Li-Ion Frame Rate 25 FPS Battery Capacity 1800 mAH LCD Brightness Adjustable: 0,1,2,3,4 Battery Connection Charging Contact Frequency 2.4GHz Battery Life (video + audio on) 10 hours Private Signal Battery Life (LCD off)
- Page 22 SPECIFICATIONS CAMERA CAMERA Image sensor CMOS Housing Material ABS Plastic Resolution 640 x 480 Wall Mountable Viewing Angle 50 Degree Power Adapter Input 100~240VAC, 50/60Hz 150mA Focal Length 2.8mm Power Adapter 6V 800mA DC Optimal Focal Distance 2-10ft Operating Temperature 0 to 50 Degree Celsius Dimensions 31/2 “x 4”...
Need help?
Do you have a question about the Astra 31006B and is the answer not in the manual?
Questions and answers
can you use without monitor