Table of Contents
Advertisement
Quick Links
Advertisement
Table of Contents

Related Manuals for Hyundai H- CDM8038


Summary of Contents for Hyundai H- CDM8038
- Page 1 H- CDM8038 CD/MP3/WMA – RECEIVER CD/MP3/WMA - Instruction manual...
-
Page 2: Table Of Contents
Dear customer! Thank you for purchasing our product. For safety, it is strongly recommended to read this manual carefully before connecting, operating and/or adjusting the product and keep the manual for reference in the future. Table of contents Table of contents................................. 2 Important safeguards................................ -
Page 3: Important Safeguards
Important safeguards Read carefully through this manual to familiarize yourself with this high-quality sound system. Disconnect the vehicle's negative battery terminal while mounting and connecting the unit. When replacing the fuse, be sure to use one with an identical amperage rating. Using a fuse with a higher amperage rating may cause serious damage to the unit. -
Page 4: Accessories
Accessories Mounting parts Receiver 1 pc Bluetooth headset 1 pc Bluetooth headset pouch 1 pc Bluetooth headset ear clip 1 pc Front panel 1 pc Front panel case 1 pc Customer information 1 pc Warranty card 1 pc Instruction manual 1 pc... -
Page 5: Installation/Connections
Installation/Connections Use only the supplied mounting hardware for a safe and secure installation. Be sure to remove the front panel before installing the unit. Mounting angle adjustment Adjust the mounting angle to less than 20°. Installation in the dashboard Note: Keep the release key in a safe place as you may need it in the future to remove the unit from the car. - Page 6 1. Unit 2. Release case 3. Dash board 4. Hex nut 5. Lock washer 6. Plain washer 7. Car body 8. Rear support strap 9. Tapping screw 10. Hex bolt...
- Page 7 Electrical connections...
- Page 8 ISO connector Location Function Connector A Connector B Rear Right(+)---Violet Rear Right(-)---Violet/Black stripe Front Right(+)---Grey Battery 12V (+)/yellow Front Right(-)---Grey/Black Stripe Power Antenna/blue Front Left(+)---White Front Left((-)---White/Black Stripe ACC+/red Rear Left(+)---Green Ground/black Rear Left(-)---Green/Black Stripe...
-
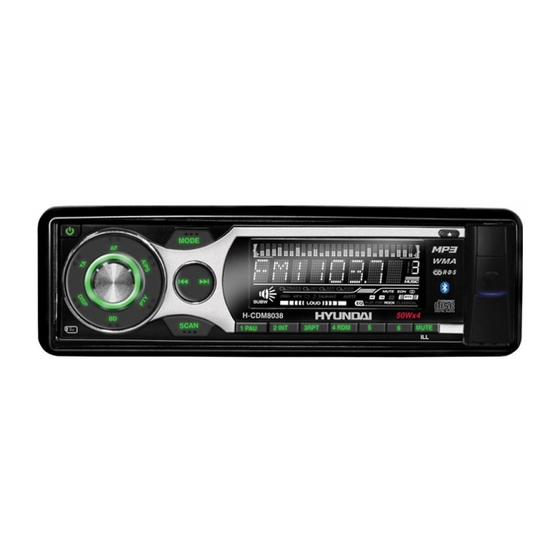
Page 9: Panel Controls
Panel controls Front panel POWER button SEL button VOL knob Preset stations (1,2,3,4,5,6) AF button TA button PTY button DISP button MODE button 10. BD button 11. PREVIOUS/NEXT button 12. A/PS button 13. SCAN button 14. MUTE/DUAL ILLUMINATION button 15. LCD display 16. - Page 10 25. Multi-media card (MMC)/SD card slot 26. Wireless bluetooth headset 27. RESET button 28. Status indicator light Note: Pressing the RESET button will erase the clock setting and stored stations. Panel status indicator lights up when you slide the panel down; flashes when you remove the panel.
-
Page 11: General Operations
General operations Reset the unit Operating the unit for the first time or after replacing the car battery, you must reset the unit. Press OPEN button on the panel to open the panel and press the RESET button with thin hard object to restore the unit to the original factory settings. - Page 12 Dual illumination When press the MUTE button for more than 2 seconds, it is activated as selecting Blue or Red buttons illumination. Volume control/SELECT Rotating this knob, you can adjust VOL/BASS/TREB/BAL/FAD. To select the functions, press SEL button shortly until the desired functions are shown on the display.
- Page 13 RETUNE S/L - SHORT/LONG “RETUNE” refers to the time period the unit allows for radio scan when reception is interrupted. “S” represents a time period of 30 seconds and “L” represents a time period of 90 seconds. AUDIO DSP CONTROLS Choose equalizer mode: POP M =>...
- Page 14 ESP (Electronic Shock Protection) MODE Note: 10 sec./40 sec. for CD, 120 sec. for MP3 automatically works. MULTI CD SELECTION Choose CD MULTI ON or OFF. CD MULTI ON: Read multi section CD. CD MULTI OFF: Read first section only. BEEP MODE BEEP ON: BEEP sound can be heard from speaker when the buttons are pressed.
- Page 15 SEEK 1: When SEEK 1 mode is activated, AUTO SEEK SCAN is stopped when station is detected even user still push SEEK button. SEEK 2: Auto SEEK SCAN is not stopped even station is detected if user pushes SEEK button. When releases SEEK button, then stop when station is detected.
-
Page 16: Digital Tuner Operations
Digital tuner operations Note: RDS (Radio Data System) service availability varies with areas. Please understand if RDS service is not available in you area, the following service is not available, either. MODE Press MODE button to turn on tuner mode. BAND (BD) Press BD button. - Page 17 TA (TRAFFIC ALARM) FUNCTION Briefly press the TA button to turn on or turn off the TA function. When TA is enabled (on), the tuner starts searching the traffic announcement. AF (ALTERNATIVE FREQUENCIES) FUNCTION Briefly press the AF button to turn on or turn off the AF function. The RDS program will be automatically searched and received.
-
Page 18: Cd/Sd/Mmc Operations
CD/SD/MMC operations Discs for playback This unit can play disc types: CD/CD-R/-RW. Compatible with formats: CDDA/MP3/WMA. Loading and ejecting a disc 1. Turn the power on. 2. Press the OPEN button on the panel. 3. Insert the disc with the printed side facing upward into the slot. 4. - Page 19 Multi card reader not support. Note: SD cards brands: Cannon, Fuji film, Palm, Motorola, Microsoft, IBM, HP, Compaq, Sharp, Samsung, etc. Capacity: up to 2 GB. MMC cards brands: Ericsson, Nokia, Motorola, HP, Palm, Sanyo, Microsystems, etc. Capacity: up to 2 GB. Note: Because of the great variety of products with SD and MMC card slots and their sometimes quite manufacturer- specific functions the producer can neither guarantee that all devices will be recognized nor that all operating options that are possible in theory will actually work.
- Page 20 REPEAT When RPT button is pressed, “RPT ON” indication is displayed and playback of the selected track will be continually repeated until the track repeat mode is cancelled by pressing RPT button again. RANDOM When RDM button is pressed, “RDM ON” indication is displayed and each track of the disc is played in random instead of normal order.
- Page 21 Turn VOL knob to right or left, you can select the file you want. Press SEL button, then the song you selected will start. Searching Character: Press A/PS 3 times, then character search mode is activated. Press SEL button, then “A” character is displayed. Turn VOL knob to right or left, you can select the letter you want.
-
Page 22: Mp3/Wma Overview
MP3/WMA overview MP3 is short for MPEG Audio Layer 3 and refers to an audio compression technology standard. This product allows playback of MP3 files on CD-ROM, CD-R or CD-RW discs. The unit can read MP3 files written in the format compliant with ISO 9660. However it does not support the MP3 data written by the method of packet write. - Page 23 Notes on creating your own CD-R or CD-RW containing MP3 files: To enjoy high quality sound, we recommend converting to MP3 files with a sampling frequency of 44.1 kHz and a fixed bit rate o f 128 kbps. DO NOT store more than 256 MP3 files per disc. For ISO 9660 - compliant format, the maximum allowable depth of nested folders is 8, including the root directory (folder).
-
Page 24: Bluetooth (Hands-Free) Operations
Bluetooth (hands-free) operations 1. Release bluetooth headset 2. ANSWER/MAKE A CALL button 3. VOLUME + 4. VOLUME- 5. Led light 6. Microphone 7. Ear clip Before you can use the Bluetooth headset, you must first perform PAIRING. Pairing is a procedure used to connect 2 Bluetooth devices together. - Page 25 Note: To turn on headset, press and hold ANSWER/MAKE A CALL until Blue LED lights on. When no device connection was found, Blue LED will blink once every 10 seconds. To turn off headset, press and hold ANSWER/MAKE A CALL button until LED lights are off. Press ANSWER/MAKE A CALL button two times will dial the last number.
- Page 26 This list is only updated to the time this list is being printed. This list gives an example of Bluetooth mobile phone available on the market, if your Bluetooth mobile phone is not on the list, please try it out in practice or try your phone at the local dealer or consult with the local dealer in case it is not mentioned in the list.
-
Page 27: Anti-Theft System
Anti-theft system Remove the panel 1. Press POWER button to switch off the power of the unit. 2. Press OPEN button to flip down the panel. 3. Push the panel to the left and then pull it towards you. 4. Put it to the special box and take it with you. Remove the unit 1. -
Page 28: Cleaning
Cleaning Cleaning the cabinet Wipe with a soft cloth. If the cabinet is very dampen (not dropping wet) the cloth with a weak solution of soapy water, and then wipe clean. Cleaning discs Fingerprints should be carefully wiped from the surface of disc with a soft cloth. Unlike conventional records, compact discs have no grooves to collect dust and macroscopic dirt, so gently wiping them with a soft cloth should remove must panicles. -
Page 29: Troubleshooting Guide
Troubleshooting guide Symptom Cause Solution The car ignition is not on. If the power supply is properly connected to the No power car accessory switch the ignition key to “ACC”. Replace the fuse. The fuse is blown. Disc cannot be loaded. Presence of disc inside the player. -
Page 30: Specification
Specification General 12 V DC Power supply Current consumption max. 10A Maximum power output 50 W x 4 channels Dimensions (L x W x H) 178 x 165 x 50 mm Working temperature range -10º - +60º 40 sec. ESP for Audio-CD, 120 sec ESP for MP3, 300 sec ESP for WMA FM Stereo Radio 65 –... - Page 31 ..................................31 ..............................32 ................................. 33 ..............................34 ................................. 38 ................................ 40 ................................45 CD/SD/MMC ........................47 WMA................................. 51 Bluetooth (hands-free) ............................53 ..............................56 ..............................56 .................................. 57 ........................ 58 ............................59...
- Page 33 Bluetooth...
- Page 34 20°.
- Page 37 (+)--- (-)--- (+)--- 12 (+)/ (-)--- (+)--- ((-)--- (+12 )/ (+)--- (-)---...
- Page 38 POWER (1,2,3,4,5,6) DISP MODE PREVIOUS/NEXT A/PS SCAN MUTE/DUAL ILLUMINATION 15. LCD OPEN EJECT PAUSE...
- Page 39 23. 24. + 10/ -10 TRACK SEARCH DOWN/UP MMC/SD Bluetooth RESET RESET...
- Page 40 RESET ( OPEN. RESET. DISP DISP DISP DISP MODE : AUX/TUNER/S-CDP(CD/MP3)/MMC/SD(...
- Page 41 MUTE, MUTE VOL, : VOL ( )/BASS ( )/TREB ( )/BAL ( )/FAD ( SEL, SEL 2 TA SEEK/TA ALARM TA SEEK TA ALARM...
- Page 42 MASK DPI/MASK ALL MASK DPI, MASK ALL RDS. RETUNE S/L - SHORT/LONG «RETUNE» . «S» , «L» AUDIO DSP ( : POP M => ROCK M => CLASS M=> FLAT M =>DSP OFF. LOUDNESS ( LOUD ON ( OFF (...
- Page 43 SUBWOOFER ( (ON) (OFF) ESP (Electronic Shock Protection – : 10 ./40 . CD, 120 . MP3. MULTI CD ( (ON) (OFF) BEEP (...
- Page 44 BEEP ON ( SEEK ( SEEK 1: SEEK. SEEK 2: SEEK SEEK, STEREO/MONO ( LOCAL/DX ( LOCAL DISTANT (DX) (...
- Page 45 RDS ( MODE, - TUNER. : FM1--FM2--FM3--FM(OIRT)--MW1(AM1)--MW2(AM2). NEXT, PREVIOUS, SCAN. (A/PS) A/PS, TA (...
- Page 46 AF ( PTY, : PTY — PTY — 1. POPM, ROCK M NEWS, AFFAIRS, INFO 2. EASY M, LIGHT M SPORT, EDUCATE, DRAMA 3. CLASSICS, OTHER M CULTURE, SCIENCE, VARIED 4. JAZZ, COUNTRY WEATHER, FINANCE, CHILDREN 5. NATION M, OLDIES SOCIAL, RELIGION, PHONE IN 6.
- Page 47 CD/SD/MMC : CD/CD-R/-RW. : CDDA/MP3/WMA. OPEN EJECT, SD/MMC SD/MMC SD/MMC. SD/MMC MP3/WMA ID3 SD/ MMC.. FAT 12/ FAT 16/ FAT 32 - FAT 12/ 16 ( , 500 - FAT 32 ( , 500 : 32 : 32 (id3tag ver 2.0)
- Page 48 : Cannon, Fuji film, Palm, Motorola, Microsoft, IBM, HP, Compaq, Sharp, Samsung, MMC: : Ericsson, Nokia, Motorola, HP, Palm, Sanyo, Microsystems, : 16 M ~ 2.0. MP3/WMA ID3, . ID3 NEXT/PREVIOUS, MP3/WMA PAUSE, INTRO, “INT ON”).
- Page 49 RPT, “RPT ON” RDM, “RDM ON” MP3/WMA A/PS, SEL, VOL, SEL, VOL, SEL, A/PS SEL, VOL, VOL, SEL,...
- Page 50 A/PS 3 SEL, “A”. VOL, VOL, SEL,...
- Page 51 MPEG 3 CD-ROM, CD-R CD-RW. ISO 9660. “.mp3”. “.mp3”, “ MP3” “ ”, ” “ ” 256. VBR, . VBR: WMA (Windows Media Audio) – Microsoft Corporation. , 64...
- Page 52 CD-R CD-RW, 44,1 ISO 9660, CD-R MP3 CD-R CD-RW CD-R CD-RW CD-R CD-RW 1. ID3TAG.
- Page 53 Bluetooth (hands-free) bluetooth ANSWER/MAKE A CALL VOLUME + VOLUME- Bluetooth, Bluetooth. ANSWER/MAKE A CALL Bluetooth Bluetooth “BT” «0000» ANSWER/MAKE A CALL, VOLUME+/-, ANSWER/MAKE A CALL.
- Page 54 ANSWER/MAKE A CALL, ANSWER/MAKE A CALL; ANSWER/MAKE A CALL Bluetooth, Bluetooth: Nokia 3230 Nokia 6680 Samsung D508 Sony Ericsson 810C Motorola E1 Nokia 3250 Nokia 7610 Samsung D608 Sony Ericsson K750i Motorola E680 Nokia 5200 Nokia 8800 Samsung D800 Sony Ericsson K800i Motorola L2 Nokia 5300 Nokia E50...
- Page 55 Nokia 6311 Nokia N72 Samsung Z400 Nokia 6600 Nokia N90 Samsung Z510 Nokia 6670 Nokia N91...
- Page 56 POWER, OPEN,...
- Page 58 “ ”. RESET.
- Page 59 178 165 50 -10º - +60º 40 CD, 120 c MP3, 300 WMA 65 – 74 / 87.5 - 108.0 2.8 µ - 1620 RMS (+/-3 – 20 (A-vtd) Classic, Rock, Pop, Flat . 2000...
Need help?
Do you have a question about the H- CDM8038 and is the answer not in the manual?
Questions and answers