Zoom ADSL X6 User Manual
Router
Hide thumbs
Also See for ADSL X6:
- User manual (87 pages) ,
- Quick start manual (9 pages) ,
- Specifications (2 pages)
Table of Contents
Advertisement
Advertisement
Table of Contents

Related Manuals for Zoom ADSL X6


Summary of Contents for Zoom ADSL X6
- Page 1 ADSL X6...
- Page 2 NOTICE This document contains proprietary information protected by copyright, and this Manual and all the accompanying hardware, software, and documentation are copyrighted. No part of this document may be photocopied or reproduced by mechanical, electronic, or other means in any form. The manufacturer does not warrant that the hardware will work properly in all environments and applications, and makes no warranty or representation, either expressed or implied, with respect...
-
Page 3: Table Of Contents
Contents Overview................6 1. Installation Instructions ..........7 Package Contents............7 Before You Begin............8 Installing the X6...............9 Step 1: Installing the Software ........9 Step 2: Installing the Hardware........10 Step 3: Establishing Communication ......12 Step 4: Setting Up a Wired or Wireless Network ..17 Universal Plug and Play ..........19 If You Need Help ............19 2. - Page 4 Backing Up and Restoring Your Configurations....91 Updating Your Firmware ..........92 Appendix A. ADSL Internet Settings ......93 Appendix B. Front and Back Panels......97 Appendix C. TCP/IP Network Settings......99 Macintosh TCP/IP Settings ........100 Linux TCP/IP Settings..........102 Windows TCP/IP Settings........103 Appendix D. Troubleshooting ........106 ADSL X6 User Guide...
-
Page 5: Table Of Contents
Appendix E. Configuring Your Web Browser ....112 Appendix F. Wireless Channels by Country ....116 Appendix G. Regulatory Information......117 Safety Notices............118 Declaration of Conformity ........119 Table of Contents... -
Page 6: Overview
IP address. You can find new and updated information about the at the Zoom Web site: www.zoom.com/techsupport/adsl/adsl_x6.shtml ADSL X6 User’s Guide... -
Page 7: Installation Instructions
• Phone cord • Power cube • The CD contains the installation software, documentation, warranty, and Customer Support information. If anything is missing or damaged, please contact Zoom Customer Support or whoever sold you the modem. Chapter 1: Installation Instructions... -
Page 8: Before You Begin
Additional Ethernet cables. If you plan to connect more than one computer directly to the modem, you will need additional Ethernet cables to make the connection. The modem supports up to four direct connections with its four LAN ports. ADSL X6 User Guide... -
Page 9: Installing The X6
Installing the X6 Installing the involves four steps: Installing the Software, Installing the Hardware, Establishing Communication, and Setting Up a Wired Network. Step 1: Installing the Software Note: This section is for Windows computer users who did not already run the Install Assistant on the CD. If you already ran the Install Assistant or are using a Macintosh or Linux computer, skip this section and begin with the next one, Installing the Hardware. -
Page 10: Step 2: Installing The Hardware
BEFORE beginning this section. Software installation is not required for Macintosh and Linux computers. Shut down and power off your computer. For Windows users, this is the computer on which you just installed the software. ADSL X6 User Guide... - Page 11 For Macintosh or Linux users, this can be any one of the computers that you plan to use with the . In a typical situation, this would be the computer that is closest to your ADSL wall jack. Rotate the antenna on the back of the modem to a vertical position.
-
Page 12: Step 3: Establishing Communication
TCP/IP Settings on page 102 for instructions. You must set up the so that it can communicate with your Internet service provider. To do this, you must use the Zoom Configuration Manager. Close all programs including antivirus software and pop-up blockers. - Page 13 Tip! If you are using a Windows computer, a Zoom icon should have been placed on your desktop automatically. Instead of typing the address above in your Web browser, you can double-click the Zoom icon. On the Enter Network Password dialog box, type the following user name and password in lowercase then click OK.
- Page 14 This feature lets multiple users access the Internet sharing a single IP address. Enabled is typically the right setting. Select Disable in the unlikely event that you want to assign different public IP addresses to each network user. ADSL X6 User Guide...
- Page 15 This is NOT the same Username and Password that you used earlier to open the Zoom Configuration Manager.) If you selected 1483 Bridged or 1483 Routed, you have the option of using either dynamic or static IP addressing.
- Page 16 You can then make the notebook part of your wireless network. Congratulations! You have established communication and your computer is now connected to the Internet. Now continue with Step 4: Setting Up a Wired or Wireless Network. ADSL X6 User Guide...
-
Page 17: Step 4: Setting Up A Wired Or Wireless Network
Step 4: Setting Up a Wired or Wireless Network Once a computer that is directly connected to the modem is able to browse the Web, you know for certain that your Web connection is working. Now you can set up the rest of your network. -
Page 18: To Connect A Network Device
Navigator) on each computer and try to connect to a familiar Web address. Congratulations! You have set up your wired devices. If you have wireless devices that you want to add to your network, go to Setting Up Your Wireless Network on page 20. ADSL X6 User Guide... -
Page 19: Universal Plug And Play
There is no setup for you to do. If You Need Help Zoom has many Technical Support services available to its customers. You can access these services in a variety of ways: • Visit our Web site at www.zoom.com and select Technical Support. -
Page 20: Setting Up Your Wireless Network
2. Some desktop and notebook computers may have built-in wireless networking capabilities, but do not use Windows XP. If this is so, set up your computer’s wireless connection using Connecting a Wireless-enabled Computer to the X6 on page 21. ADSL X6 User Guide... -
Page 21: Connecting A Wireless-Enabled Computer To The X6
When the SSID (Service Set Identifier) of your wireless network appears in the list—the SSID is zoom— select it as the network you want to use to connect to the Internet. - Page 22 10. If you need to change this channel, you must do so using the Wireless Setup page of the Zoom Configuration Manager. If you want to secure your wireless network so it won’t be accessible by others, you should specify security settings.
-
Page 23: Connecting A Windows Xp Computer With Built-In Wireless Capabilities
Use Windows to configure my wireless network settings check box is selected by default). Select zoom from the Available networks list, then click the Configure button to add it to the Preferred networks list. The notebook will try to connect to the Internet using the wireless networks listed here, in the order in which they appear. - Page 24 If you connect successfully, your notebook’s wireless capability is configured and you are ready to browse the Web! Important! If you want to add security to your network, please see Setting Wireless Security on page 26. ADSL X6 User Guide...
-
Page 25: Checking Your Settings
Checking Your Settings If you ever need to check your wireless settings, you can do so from the Wireless Setup page. This page is available in the Zoom Configuration Manager by clicking the Wireless icon. The table below explains the settings: This setting…... -
Page 26: Setting Wireless Security
Security or Encryption or Setup or Advanced Features. If all the clients support WPA2 or WPA, proceed with Setting Up Security Using WPA2 or WPA. If they do not, skip to Setting Up Security Using WEP. ADSL X6 User Guide... -
Page 27: Setting Up Security Using Wpa2 Or Wpa
WPA2 or WPA. If they do not, skip to Setting Up Security Using WEP. Click the Wireless icon in the Zoom Configuration Manager. This will open the Wireless Setup page. Go to Encryption (which should say None) and select WPA2 or WPA from the drop-down menu. - Page 28 Find the configuration menu for security, choose WPA2 or WPA, and enter the Passphrase, exactly as you entered it on the Wireless Setup page. Your security setup configuration is now complete! ADSL X6 User Guide...
-
Page 29: Setting Up Security Using Wep
We recommend that most people configure their WEP for 64-bit security. Click the Wireless icon in the Zoom Configuration Manager. This will open the Wireless Setup page. Go to Encryption (which should say None) and select WEP-64 bit (or WEP-128 bit for more security, but diminished network performance) from the drop-down menu. - Page 30 If ALLof the wireless devices (clients) on the network are Zoom devices, go to step 3. If some or all or the devices are not Zoom devices, go to step 4. If ALL of the wireless devices (clients) on the network are Zoom devices, you need to enter the Passphrase that you just entered for each device.
-
Page 31: The X6 And Online Gaming
The X6 and Online Gaming This chapter covers the set up of the for online gaming with a desktop, notebook, Xbox® Live, or Playstation® 2. Do I Need to Do Anything? There are three cases where you need to set up your modem in order to play online games: •... -
Page 32: Setting Up The X6 For Online Gaming
If you are using Xbox or PlayStation 2, connect the device to your modem with an Ethernet cable. On your TV screen, locate Network Settings and select Connect. Click the Advanced Setup icon in the Zoom Configuration Manager. ADSL X6 User Guide... - Page 33 On the Advanced Setup page, click the LAN Configuration button. Next click the Add DHCP Fixed Host button. The Create New DHCP Server Fixed Host page appears: Before you can enter an IP address, you need to enter the MAC (Media Access Control) address of your computer or gaming system.
- Page 34 (after C:\> or C:\WINDOWS>), type ipconfig, leave a space, then type /all It should look like this: ipconfig /all Press Enter. The MAC address is displayed as the 12- digit Physical Address or Internet Adapter address. Go to Step 5. ADSL X6 User Guide...
- Page 35 If you are using Xbox® Live to play an online game: You can find the MAC address on the Xbox Dashboard in the lower right corner of the Network Settings menu. You will see something like MAC=0050F24ADC29. Your address will be different.
- Page 36 On the Connection Test menu, select Test Settings. At the Test for connecting to your ISP was successful message, select Continue. Then follow the instructions to save your settings and return to the main menu. Now go to Step 5. ADSL X6 User Guide...
- Page 37 Now that you have determined the MAC address, you can assign your computer or gaming system an IP address. On the Create New DHCP Server Fixed Host page, make these entries: Setting Values IP Address Enter 10.0.0.50. If you are setting up more than one computer or gaming system, you should use different IP addresses.
-
Page 38: Step 2: Setting Up A Virtual Server Or Dmz
If you are using Xbox Live, go to Setting Up a DMZ on a Xbox® Live page 41. • If you are using Playstation 2, go to Setting Up a DMZ on a Playstation® 2 on page 43. ADSL X6 User Guide... -
Page 39: Your Computer
Setting Up a Virtual Server or DMZ on Your Computer Note: If you have third-party firewall software, such as the Windows XP firewall, installed on your computer, you may need to deactivate it before setting up the virtual server or DMZ. Otherwise your computer may block the ports you want to open. - Page 40 PC as a DMZ. The highest supported port number is 65535. Click Save Changes and then Write Settings to Flash. Your set up is complete! ADSL X6 User Guide...
- Page 41 Setting Up a DMZ on a Xbox® Live Click the Advanced Setup icon. Then, click the Virtual Server/DMZ button: On the Virtual Server/DMZ page, click the Add Virtual Server/DMZ link to display the Add Virtual Server/DMZ page: Make the following entries: Setting Values IP Address...
- Page 42 Note: You will need your subscription code to activate your account—this number is located on the CD’s sleeve. (If you require more detailed instructions, please refer to your Xbox Live documentation.) Your setup is complete! ADSL X6 User Guide...
- Page 43 Setting Up a DMZ on a Playstation® 2 Click the Advanced Setup icon. Then, click the Virtual Server/DMZ button: On the Virtual Server/DMZ page, click the Add Virtual Server/DMZ link to display the Add Virtual Server/DMZ page: Chapter 4: The X6 and Online Gaming...
- Page 44 Server page. Transport Select DMZ to enable your Playstation as a Type DMZ. (Protocol) Ports The field remains unavailable because you selected DMZ. Click Save Changes and then Write Settings to Flash. Your setup is complete! ADSL X6 User Guide...
-
Page 45: Using Advanced Setup
You want to set up fixed IP addresses for your computer(s) Note: Users who want to set up Quality of Service (described in this section) can do so more easily using the Zoom Install Assistant. Chapter 5: Using Advanced Setup... -
Page 46: Viewing The Advanced Setup Options
Viewing the Advanced Setup Options You open the Advanced Setup page by clicking the Advanced Setup icon at the top of the Zoom Configuration Manager. The page opens and displays buttons organized into three groups: Configuration, Status, and Administration: Configuration Options When you click a Configuration button, a page opens to the option you selected. - Page 47 This button… Opens a page that lets you… Firewall Define an additional layer of security for the computers in your network. For example, if you create a DMZ interface using the Virtual Server/DMZ page (see below), you can enable the firewall filtering and add a security policy that blocks certain protocols from reaching the DMZ machine.
-
Page 48: Status Options
The reports refresh themselves to give you the most current information. Typically, these reports are used for maintenance purposes and troubleshooting. The following table describes each report in the Status group: ADSL X6 User Guide... -
Page 49: Administration Options
The buttons in the Administration group are typically used for administrative tasks, such as updating the modem’s firmware, changing your Zoom Configuration Manager password, putting back your modem’s configuration file. The following table lists each button in the Administration group and gives a brief description of the things that you can do with that feature. -
Page 50: Using The Wan Configuration Settings
NAT also appear on the Basic Setup page. Most likely you have already entered values for these settings and only need the WAN Configuration page for setting up an advanced feature such as enabling a disconnect timeout on your PPP connection. ADSL X6 User Guide... - Page 51 WAN Configuration page The table on the next page describes the settings on the WAN Configuration page and the values that you can enter. After you enter your values, click Save Changes and then Write Settings to Flash. Chapter 5: Using Advanced Setup...
- Page 52 Username Your DSL provider supplies this username when you sign up for ADSL service. (It is not the same as the username and password for the Zoom Configuration Manager.) Password Your DSL provider supplies this password when you sign up for ADSL service.
- Page 53 Setting Description Disconnect timeout The amount of time before the PPP connection drops if there is no activity. A value of 0 means stay connected even if your network stays idle. Authentication The type of authentication protocol used during the negotiation of the PPP connection.
- Page 54 DSL provider to use anything except UBR (Unspecified Bit Rate) in the Burst Tolerance Traffic Class setting. Your service provider Max Cell Rate will also supply you with the Cell, Burst, and Tolerance Rates. Max Burst Rate Sustainable Cell Rate ADSL X6 User Guide...
- Page 55 Setting Description RIP is an Internet protocol that you can set up to share routing table information with: • LAN devices that support RIP • Remote networks connected via the ADSL line • Your ISP’s location Most small home or office networks do not need to use RIP since they have only one router and one path to an ISP.
-
Page 56: Using The Ethernet Configuration Settings
If you change any of the settings, click Save Changes, and then Write Settings to Flash. Setting Description Port The Ethernet Ports 1-4 on the back of your modem. Configuration Shows how your Ethernet ports are set up. ADSL X6 User Guide... -
Page 57: Setting Up A Static Routing Table
Setting Description Linked A check mark indicates that the Ethernet port is connected. Speed/Duplex If you are having problems establishing your Ethernet connection, try setting the Speed/Duplex value to match that of the Ethernet NIC in your computer. Setting Up a Static Routing Table Do I need static routing? Most users do not need to set up static routes. - Page 58 IP addresses based on the above subnet IP address of the destination. Metric The number of hops. This should usually be left at 1. Advertise Enable this if you want to advertise this route. ADSL X6 User Guide...
-
Page 59: Adding Extra Security With Advanced Firewall Filtering
Adding Extra Security with Advanced Firewall Filtering Do I need extra security? Setting up advanced firewall security provides an additional layer of security. For example, if you create a DMZ interface for gaming using the Virtual Server/DMZ page, you can enable the firewall filtering and add a security policy that blocks IP addresses, ports, aliases, and certain protocols from reaching the DMZ machine. - Page 60 WAN to the DMZ machine or the Virtual Server. Choose the DMZ- Internal policy to allow or block what is sent from a DMZ machine to your LAN. ADSL X6 User Guide...
- Page 61 Click the Policy Rules link of the Policy Type that you want. The Firewall Add Filter Rules page opens. Click the Add Policy Rule link. After you click the link, the Firewall Add Policy Rule page opens: Chapter 5: Using Advanced Setup...
- Page 62 Traffic Outbound Lets you block or allow outbound traffic based on the rules you set up in the policy. Click Save Changes then Write Settings to Flash. ADSL X6 User Guide...
- Page 63 Go back to the Firewall Configuration page and select Enable. Then click Write Settings to Flash. Chapter 5: Using Advanced Setup...
-
Page 64: Setting Security Logging
Configure Security Logging. The Security Logging page opens: Enable the Logging Types that you want and set the Level. You can also print (Output to) the information to your console or to a file (Event Log). ADSL X6 User Guide... -
Page 65: Configuring Intrusion Detection
Configuring Intrusion Detection What is intrusion detection? Intrusion detection protects your network from hackers who use the Internet to damage your network. Your modem’s default Intrusion Detection setting should work fine for most hacker attacks, but there is additional functionality that you can set up. Your modem offers protection from various Denial of Service (DOS) attacks;... - Page 66 Sets the maximum number of ICMP Count packets per second before an ICMP Flood is detected. ICMP Flood is a DOS attack where the attacker tries to flood the network with ICMP packets in order to prevent legitimate network traffic. ADSL X6 User Guide...
-
Page 67: Adding A Dns Server Name
Adding a DNS Server Name Do I need to add a DNS server name? Typically you should not need to enter a DNS server name as it is assigned automatically when your connection is established. However, your ISP may instruct you to enter an IP address for a DNS server name. -
Page 68: Creating A Virtual Server Or A Dmz
DMZ, see page 38. For information about setting up a Virtual Server or DMZ for gaming, see Setting Up the X6 for Online Gaming on page 32. Here is a picture of the Virtual Server/DMZ page: ADSL X6 User Guide... - Page 69 Clicking the Add Virtual Server/DMZ link opens the Add Virtual Server/DMZ page: The following table shows you the values you can enter. After you enter the value, click Save Changes, then Write Settings to Flash. Setting Description Internal IP Address The IP address of the computer where you will set up the virtual server or DMZ.
-
Page 70: Using The Adsl Settings
ADSL Configuration page. Here is a picture of the ADSL page where you change your settings: The following table shows you the values to enter. After you enter the values, click Save Changes, then Write Settings to Flash. ADSL X6 User Guide... - Page 71 Setting Description Standard If you are having problems establishing the physical layer connection, you can try selecting the different settings to see if it helps you connect. (If the link light on the modem is blinking than the physical layer connection is down, if the link light is solid than the problem is elsewhere.) EC/FDM Mode...
-
Page 72: Changing Your Lan Settings
You can extend the range of IP addresses that are assigned to your network devices should you add new devices to your network. You can also change the default LAN IP address for your modem. Here is a picture of the LAN Configuration page: ADSL X6 User Guide... - Page 73 The following table shows you the values to enter. After you enter the values, click Save Changes, then Write Settings to Flash. Setting Description IP Address The IP address of your modem. Subnet Mask The modem's subnet mask address. Status You should leave this setting on Enable.
-
Page 74: Creating A Fixed Ip Address
You will want to create a fixed IP Address if you are setting up a computer, Xbox, or Playstation for gaming. To create a fixed IP address, see steps 2-6 in Step 1: Choosing an IP Address for Gaming on page 32. ADSL X6 User Guide... -
Page 75: Assigning A Half Bridge Device
Assigning a Half Bridge Device When would I assign a half bridge device? Assigning a PPP Half Bridge assigns a public IP address to a computer that you choose so you can bypass the modem’s NAT feature and open up all ports on your computer. You may want to do this if you are using an application that requires multiple ports on a computer in your network. -
Page 76: Enabling Or Disabling Upnp
Universal Plug and Play (UPnP) with Internet Gateway Device (IGD) protocol is installed in X6 units when they are shipped by Zoom. Change this setting only if you have a good reason to do so. To change the status of Universal Plug and Play, on the Advanced... -
Page 77: Assigning Ports To A Pvc
Assigning Ports to a PVC Normally you should not change Per Port PVC (Permanent Virtual Circuit) settings unless your ISP tells you to do so. If you have more than one PVC set up, you can use this feature to assign Ethernet ports to the additional PVC(s). - Page 78 If you assigned Ethernet (LAN) ports 3 and 4 to PVC 1, note that those ports are no longer available to PVC 0: Click Write Settings to Flash to save your PVC port settings to permanent memory. ADSL X6 User Guide...
-
Page 79: Changing Http And Telnet Ports
Changing HTTP and Telnet Ports This feature lets you change the default X6 ports for Internet and Telnet traffic. If, for example, you are running another Internet server on the network and that server is using Port 80, you need to assign a different port to the X6 to avoid a conflict. -
Page 80: Filtering Out Mac Addresses
Enter the 12-digit address without separators. Save Changes Click this button to display the MAC address information in the MAC Filters List (see next page). Reset Before you click Save Changes, you can click this button to clear all entries. ADSL X6 User Guide... - Page 81 Click this link to display the associated MAC address information in the top half of the screen, where you can edit it or delete it from the MAC Filters List. MAC Filters List Edit/Delete Click this link to edit or delete the associated MAC address information.
-
Page 82: Managing Access To Services
Select a check box to enable the associated service for remote network users. By default, all the services are Disabled for remote users. Click Save Changes and then Write Settings to Flash to save the service availability configuration to permanent memory. ADSL X6 User Guide... -
Page 83: Configuring Quality Of Service
Configuring Quality of Service Quality of Service (QoS) helps guarantee upstream bandwidth for applications that require fast and dependable throughput. For example, QoS can slow down a photo upload so a phone call can proceed without garbling, and/or a gamer can enjoy faster response time. - Page 84 QoS page (see page 85). Which ports should Select one to three ports. By default, these be Medium Priority? ports will together share 20% of the upstream bandwidth. You can configure a different percentage on the Advanced ADSL X6 User Guide...
- Page 85 QoS page (see below). Advanced QoS page Click this link to specify a different upstream bandwidth percentage for High, Medium and Standard priorities. Setting Description What guaranteed The default is 70%. You can enter a bandwidth should different whole number percent. The High Priority Ports High Priority and Medium Priority share?
-
Page 86: Monitoring Adsl, Wireless, And Ethernet Status
(Rx and Tx Packets). You can also tell if your modem has wireless encryption enabled. (To encrypt your information, click the Wireless icon in the Zoom Configuration Manager). ADSL Status Report Here is a picture of the ADSL Status Report:... - Page 87 The ADSL Line State tells you where your modem is in the connection process. The three states are Training, Handshake, and ShowTime. A line state of ShowTime shows that your modem has established a physical connection to the DSLAM (DSL Access Multiplexer –...
- Page 88 Ethernet Status Report Here is a picture of the Ethernet Status Report: The Ethernet Status Report gives you information about the receive (Rx) and transmission (Tx) rates of packets. ADSL X6 User Guide...
-
Page 89: Changing Your Password
When should I change my password? For added protection of your settings, you should change the Zoom login password after you have logged into the Zoom Configuration Manager. Here is a picture of the page where you enter your Old Password and New Password: Be sure to write your new settings to Flash, and to remember your new password. -
Page 90: Restoring Factory Settings
This will restore the admin/zoomadsl login to the Zoom Configuration Manager on your computer. You can login using the Zoom login and then change your password. Here is a picture of the Restore Factory Settings page: Follow the instructions on the page to reset your ADSL modem to its original firmware. -
Page 91: Backing Up And Restoring Your Configurations
Backing Up and Restoring Your Configurations When would I need to back up and restore my configuration settings? It is a good idea to back up your configuration settings after you set up the X6, and also before you upload new firmware. Then if the update overwrites your configurations, you can put them back using the Restore option. -
Page 92: Updating Your Firmware
How do I update my firmware? Periodically you may want to update the firmware on your X6 modem. To do this, you download the Image file from the Zoom Web Site to your computer. You then use the Firmware Update option to upload the file to your modem. -
Page 93: Appendix A. Adsl Internet Settings
We post updated tables on our Web site. If your service provider or country is not listed in the tables below, please consult www.zoom.com Note to USA customers If your ADSL service provider is not shown below, use the settings for Service Provider Not Shown at the bottom of the table. - Page 94 Sonic 1483 Bridged IP LLC Sprint (Embarq) (1) PPPoA LLC Sprint (Embarq) (2) PPPoE LLC Uniserve 1483 Bridged IP LLC Verizon (1) PPPoE LLC Verizon (2) 1483 Bridged IP LLC Service Provider Not Shown PPPoE LLC ADSL X6 User Guide...
- Page 95 Table B: Countries Other Than the USA Service Provider VPI VCI Encapsulation Australia-Telstra PPPoA LLC Argentina-Telecom PPPoE LLC Argentina-Telefonica PPPoE LLC Belgium-ADSL Office 1483 Routed IP LLC Belgium-Turboline PPPoA LLC Bolivia 1483 Routed IP LLC Brazil-Brasil Telcom PPPoE LLC Brazil-Telefonica PPPoE LLC Brazil-Telmar PPPoE LLC...
- Page 96 1483 Routed IP LLC Sweden-Telenordia PPPoE Sweden-Telia 1483 Bridged IP LLC Switzerland PPPoE LLC Turkey(1) PPPoE LLC Turkey(2) PPPoA VC-MUX UK (1) PPPoA VC-MUX UK (2) PPPoE LLC Venezuela-CANTV 1483 Routed IP LLC Vietnam PPPoE LLC ADSL X6 User Guide...
-
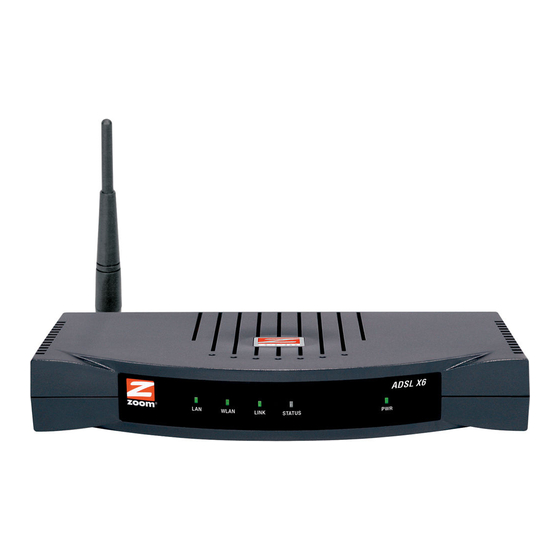
Page 97: Appendix B. Front And Back Panels
Appendix B Front and Back Panels The front panel of the looks like this: The following table describes each light on the front panel. Light Description Lights if any LAN port of the is plugged into the Ethernet port of a powered-up device. Blinks when data is sent. - Page 98 100 megabit LAN 4 per second Ethernet port. The green light blinks when there is activity on that particular LAN line. ADSL Jack to connect the modem to the ADSL telephone wall jack. ADSL X6 User Guide...
-
Page 99: Appendix C. Tcp/Ip Network Settings
Appendix C TCP/IP Network Settings If you are using a Macintosh or Linux computer, you must ensure that your computer’s TCP/IP network settings are configured properly. Otherwise you will not be able to connect to the Internet. Note: If you are using a Windows computer, you do not have to configure the TCP/IP settings. -
Page 100: Macintosh Tcp/Ip Settings
Configure: list box. Do not enter anything into the DHCP Client ID field. Click Apply Now (or Save if prompted) and close the Network pane. Continue with Step 3: Establishing Communication on page 12. ADSL X6 User Guide... - Page 101 Mac OS 7.6.1 - 9.2.2 From the Apple menu, choose Control Panels and then TCP/IP to display the TCP/IP Window. Under Connect via:, select Ethernet built-in. Under Configure:, select Using DHCP Server. Do not enter anything in the DHCP Client ID field. Close the TCP/IP Window.
-
Page 102: Linux Tcp/Ip Settings
Set them as follows (see the instructions in rc.config): NETCONFIG="_0" NETDEV_0="eth0" IFCONFIG_0="dhcpclient" Reboot with this command: /sbin/shutdown -r now. Debian Add this line to the file /etc/network/interfaces: iface eth0 inet dhcp Reboot with this command: /sbin/shutdown -r now. ADSL X6 User Guide... -
Page 103: Windows Tcp/Ip Settings
Windows TCP/IP Settings How you configure your Windows computer’s network settings differs, depending on your operating system. Go to the section that corresponds to your Window’s operating system. Note: If you are using a Windows computer, you do not have to configure the TCP/IP settings. -
Page 104: Windows 2000
If you are using a static IP address: Ensure that Use the following IP address and Use the following DNS server addresses are selected and that the correct IP address, Subnet mask, Default gateway, and Preferred DNS server values appear. ADSL X6 User Guide... - Page 105 Windows 98/Me Open the Internet Protocol (TCP/IP) Properties dialog box. From the desktop, click the Start button, point to Settings, then Control Panel. Double-click the Network icon to display the Network dialog box. Select your NIC card’s TCP/IP entry (it should include TCP/IP in it, but not AOL, Dial-up, or Adapter) and click the Properties button and then click OK.
-
Page 106: Appendix D. Troubleshooting
Check that you have phone filters on all the phones and fax machines using the same ADSL line as the . These devices can produce noise and interfere with your ADSL connection when they are off-hook. ADSL X6 User Guide... - Page 107 ADSL Username and Password correctly. (Note that this is NOT the username and password you used to log into the Zoom Configuration Manager on page 12.) If you had the modem automatically configure its settings, open the Basic Setup page, and ensure that MANUAL is selected, and then select 7 from the Virtual Circuit drop-down list.
- Page 108 If you are using Macintosh, see Macintosh TCP/IP Settings on page 100. If you are using Linux, see Linux TCP/IP Settings on page 102. If you are using Windows, see Windows TCP/IP Settings on page 103. ADSL X6 User Guide...
- Page 109 Problem I cannot log into the Zoom Configuration Manager. I have typed http://10.0.0.2, but I am not prompted for a User Name and Password. Solution There are several issues that could cause this problem. Check these items: • If you are using a Macintosh or Linux computer, your TCP/IP settings may not be properly configured.
- Page 110 LAN ports. Run the installation CD (as explained in Installing the Software on page 9), reboot the computer, and then try to connect to a familiar Web address to ensure that the Internet connection is made. ADSL X6 User Guide...
- Page 111 Problem The computer on which I installed the X6 software is connected to the Web, but the computers connected through my network device (such as a wireless access point, router, hub, or switch) cannot access the Internet. Solution The problem is most likely with your network device (such as a wireless access point, router, hub, or switch).
-
Page 112: Appendix E. Configuring Your Web Browser
If you are using an earlier version of one of these browsers, the configuration may be slightly different from below. In those cases—or if you are using another browser altogether—configure the browser to use a network connection (this might be called a Local Area Network or broadband connection). ADSL X6 User Guide... - Page 113 Configuring Internet Explorer The following instructions are for Internet Explorer Version 5.0 or later. (If you do not have this version, you can get a free upgrade from Microsoft Corp. If you are not sure what version you have, open Internet Explorer and from the Help menu, choose About Internet Explorer.
- Page 114 (if it appears) and click Finish. If you accessed Internet Explorer’s settings from the Control Panel (as explained in the Tip following step 1), the Control Panel window will still be open. Close it before continuing. ADSL X6 User Guide...
- Page 115 Configuring Netscape Navigator The following instructions are for Netscape Navigator Version 7.2. (If you do not have Version 7.2, you can get a free upgrade from Netscape Communication Corp. If you are not sure what version you have, open Netscape Navigator and from the Help menu, choose About Netscape.
-
Page 116: Appendix F. Wireless Channels By Country
For most countries channels 1-13 are normal for private wireless networks. The following table shows countries known to use channels other than 1-13 for private wireless networks. Country Channels France 10-13 Israel Japan 1-13 14 (802.11b only) Taiwan 1-11 1-11 ADSL X6 User’s Guide... -
Page 117: Appendix G. Regulatory Information
Appendix G Regulatory Information U.S. FCC Part 68 Statement This equipment complies with Part 68 of the FCC rules and the requirements adopted by the ACTA. The unit bears a label on the back which contains among other information a product identifier in the format US:AAAEQ##TXXXX. -
Page 118: Safety Notices
Do not use this product near water, for example, in a wet basement or near a swimming pool. Avoid using this product during an electrical storm. There may be a remote risk of electric shock from lightning.. ADSL X6 User Guide... -
Page 119: Declaration Of Conformity
Le constructeur déclare sous son entière responsabilité que ce matériel est conforme à la Directive 1999/5/EC via les documents ci-dessous. Ce produit a reçu le marquage CE. Hiermit erklärt Zoom die Übereinstimmung des Gerätes modem mit den grundlegenden Anforderungen und den anderen relevanten Festlegungen der Richtlinie 1999/5/EC. Dieses Produkt ist das gekennzeichnete CE.
Need help?
Do you have a question about the ADSL X6 and is the answer not in the manual?
Questions and answers