MyTek 192-DSD User Manual
Hide thumbs
Also See for 192-DSD:
- User manual (44 pages) ,
- User manual (33 pages) ,
- User manual (47 pages)

Related Manuals for MyTek 192-DSD


Summary of Contents for MyTek 192-DSD
- Page 1 Stereo192-DSD DAC Reference Quality Digital - Analog Converter User's Manual v.2.0 Firmware 1.7.2 – Feb 8 , 2013 © Mytek Digital 2013...
- Page 2 This manual may be updated at any time. To download the latest version, technical support, and for setup tips please visit: http://www.mytekdigital.com Contact Mytek tech support at: hifisupport@mytekdigital.com or at: tel. +1 (347) 384-2687 Mytek Digital 148 India St. Brooklyn, NY 11222...
-
Page 3: Table Of Contents
INDOWS Firmware Update ............................35 Windows and OS X............................35 Internal User Adjustments........................36 Remote Control Setup..........................37 192-DSD DAC A ....................37 TEREO PPLE EMOTE ETUP 192-DSD DAC RC 5 R ....................37 TEREO EMOTE ETUP Signal Flow..............................39 FireWire Recording............................40 ......................40 INDOWS ECORDING ETUP OS X F ........................42... -
Page 4: Introduction
The Mytek Stereo192-DSD Digital to Analog Converter is an ultra- transparent mastering grade digital audio playback system. Designed around state of the art Sabre 32 bit conversion technology, the Stereo192-DSD DAC delivers features and sound quality beyond expectations of the most discerning listener. The DAC is capable of converting high resolution PCM audio up to 192 kHz, and DSD audio (up to 128xDSD on USB2 and FW) , through high-speed USB 2.0, FireWire, AES/EBU, SPDIF, or TOSLINK. -
Page 5: Tereo 192-Dsd Dac Silver Reamp Ersion
(part # St192-DAC-S-P) This version is intended for computer audiophiles who prefer a minimalist look with not too many lights. A pair of unbalanced analog inputs can be selected in addition to all available digital inputs. As with other inputs, it can be routed via the analog stepped attenuator to both main outputs and headphones. -
Page 6: Tereo 192-Dsd Dac Black Reamp Ersion
(part # St192-DAC-B-P) This hardware version is intended for both computer playback and mastering professional audio recording and monitoring. A pair of unbalanced analog inputs can be selected in addition to all available digital inputs. As with the other inputs, it can be routed via the analog stepped attenuator to both main outputs and headphones. -
Page 7: Tereo 192-Dsd Dac Black Astering Ersion
(part # St192-DAC-B-M) This version is intended for mastering engineers involved in downloadable DSD and SACD mastering/remastering and for general professional use. A pair of BNC SDIF DSD inputs allows digital transfers from existing professional DSD recording equipment and professional SACD players to the computer’s hard disk. This version is the same as the “Black Preamp”... -
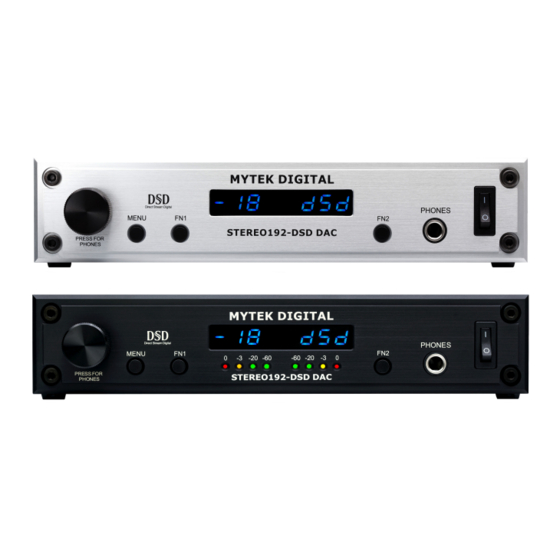
Page 8: Front Panel
A Multifunction Rotary Encoder. This encoder is both a knob and a Button. Pressing the knob engages the button function of the encoder. It's primary function is to control the volume level of both the main outputs and headphones. It also functions as MENU navigation for configuring playback options. -
Page 9: Rear Panel
A IEC Power socket and fuse. Standard 115/230V receptacle. (100V for Japanese Models). B S/PDIF Coax Input. Consumer digital input that accepts up to 192kHz sampling rate. This input can also be used to transmit digital data computer connection. C FireWire 400 Port. 6-pin computer interface. Can be used with FireWire 400 >... -
Page 10: Main Menu
www.mytekdigital.com Page: 10/48... -
Page 11: Led Menu
www.mytekdigital.com Page: 11/48... -
Page 12: Menu Operation
Menu is accessed by pressing the Menu button. Once in the Menu, turning the rotary encoder cycles through the options while pressing the encoder advances the selection. Pressing Menu button again backs the selection one level until you exit the menu. All settings are preserved when the unit is powered off. -
Page 13: Filters
There are several filtering options for both PCM and DSD. The filters affect how upper “out-of-audio” band frequencies are rolled off. Sharp - Brickwall cutoff at ½ sampling rate. Slow - Gentle cutoff with some aliasing. Cutoff frequency - 50, 60 or 70 Kilohertz for two pole gentle lowpass filter to reduce high frequency noise. -
Page 14: Function Buttons
Two buttons, FN1 and FN2, are user programmable switches. Each button's function is set inside the Function menu. The following options are available (*PCM Only – not DSD): Input - Allows the user to select 3 user “Presets,” Input A, Input B, Input C;... -
Page 15: Driver Installation And Uninstallation
1. Connect the Analog Outputs to your powered speakers/amplifier. Balanced connections (XLR) are typically for professional audio equipment while unbalanced connections (RCA) are typically for consumer audio equipment. 2. Connect the unit to your computer using USB1.1. 3. Turn on both the computer and the converter, then your speakers/amplifier. -
Page 16: Os X - Usb 2.0
USB2.0 and Firewire require installation of Mytek drivers on both Win and Mac OS. (the latest driver are available at mytekdigital.com). 1. Open the Mytek_Digital_SDK_XXXX.dmg (ensure you have the latest driver by visiting mytekdigital.com). 2. Open the Mytek_Digital_SDK_XXXX mounted drive. 3. Open Mytek Digital.mpkg. www.mytekdigital.com Page: 16/48... - Page 17 4. Click the Continue button in the lower right hand corner. 5. Click the Install button in the lower right hand corner. www.mytekdigital.com Page: 17/48...
- Page 18 6. Once the installation is complete press the Close button in the lower right hand corner. 7. Copy Mytek_Digital_CPL inside Mytek_Digital_ SDK_XXXX mounted drive to the Applications folder. Note! When reinstalling the Mytek_Digital_CPL application you will need to replace the previous application installation.
- Page 19 8. Open the Mytek_Digital_CPL and ensure the Volume Bypass checkbox is checked. Warning! Volume bypass must be checked to guarantee Bit Transparency ensuring proper DSD playback. Note! If you are experiencing digital Uninstalling Mac OS X Mytek USB Driver artifacts during playback increase the Set Sample 1) Remove the following files from the folders located on the Offset size inside the...
- Page 20 Use of USB2.0 and Firewire requires prior installation of Mytek drivers on both Win and Mac OS. (the latest drivers are available at mytekdigital.com). 1. Download the latest FireWire driver from http://www.mytekdigital.com 2. Unzip the archive. Most operating systems have this functionality built-in.
- Page 21 Double click the .pkg file to start the driver installation. 5. Begin the Installation by pressing Continue. 6. Select Install. www.mytekdigital.com Page: 21/48...
- Page 22 7. Upon Successful installation Restart the computer to complete Mytek FireWire Driver Installation. www.mytekdigital.com Page: 22/48...
-
Page 23: Os X - Fire Wire Windows - Usb 2.0
Use of USB2.0 and Firewire requires prior installation of Mytek drivers on both Win and Mac OS. (the latest drivers are available at mytekdigital.com). 1. Locate the mytek_vXXXX_usbpal_driver.zip: 2. Extract the contents of the mytek.vXXXX_ usbpal_driver.zip installer by right clicking on the installers icon and selecting Extract All... - Page 24 3. Open the Extracted mytek.vXXXX_usbpal_driver folder. 4. Open the Setup.exe file found inside the mytek_vXXXX_usbpal_driver folder. 5. Once the Setup.exe opens press Next. www.mytekdigital.com Page: 24/48...
- Page 25 6. Choose the location of installation. By default it will install in C:\Program Files\MytekDigital\ mytek_Driver. We recommend leaving this as is (If you wish to customize the install choose the location by selecting browse). Select Install. 7. Setup.exe will now install the Mytek Driver. This process may take a few minutes.
- Page 26 8. Upon completion of Setup.exe press the Next button. 9. To complete installation of the mytek.vXXXX_usbpal _driver simply press the Finish button. www.mytekdigital.com Page: 26/48...
- Page 27 10. Confirm installation by launching the Stereo 192-DSD DAC Control Panel from the Start menu. 11. Installation was successful if the Stereo192-DSD Control Panel shows a device and permits access to playback options. More than 1 DAC can be connected via USB to use the same driver.
-
Page 28: Windows - Fire Wire
Use of USB2.0 and Firewire requires prior installation of Mytek drivers on both Win and Mac OS. (the latest drivers are available at mytekdigital.com). 1. Locate the Mytek_Universal_FireWire_Driver_vXXX.zip 2. Extract the contents of the Mytek_Universal_Firewire_ Driver_ vXXX.zip installer icon and selecting Extract All... www.mytekdigital.com Page: 28/48... - Page 29 3. Select Extract to put the installation folder next to the .zip. 4. Open the extracted Mytek_Universal_FireWire_Driver_ vXXX folder. www.mytekdigital.com Page: 29/48...
- Page 30 5. Inside the Mytek_Universal_FireWire_Driver_vXXX folder open the MytekDiceDrvInstaller_vXXX.exe. 6. If a windows security warning pops up select Run. www.mytekdigital.com Page: 30/48...
- Page 31 7. Once Mytek_FireWire installer begins select Next to begin installation. 8. The Mytek Firewire Control Panel is by default installed in the Program Files directory. It is recommended to Use the Default Location. Choose Next once you have decided. www.mytekdigital.com Page: 31/48...
- Page 32 9. Choose to create or not create a new desktop Icon for the Mytek Firewire Control Panel by checking or Unchecking the Create a desktop icon box. 10. Begin installing the Mytek Firewire Control Panel by selecting Install. www.mytekdigital.com Page: 32/48...
- Page 33 11. If any “Window's Security Warnings” appears choose Install to continue installation. 12. Once installation has begun it may take several minutes to complete please be patient until the task completes. 13. Finalize the installation by selecting Restart. This will restart your computer complete...
- Page 34 14. You can confirm installation by opening the Mytek_Firewire icon located in your Start menu. 15. Make sure the Stereo192-DSD DAC is connected and input is put to Fire. If so the Mytek Control Panel will say System Clock Locked. www.mytekdigital.com Page: 34/48...
-
Page 35: Firmware Update
Currently the DAC firmware updte requires Firewire connection (cannot be performed via USB). As of Firmware v.1.7.0 a failsafe feature has been added to ensure proper operation following a firmware load failure. If firmware update is interrupted (by power cut for example), the unit will revert to its last firmware. -
Page 36: Internal User Adjustments
Inside the unit you will find the 115/230 voltage switch. Normally this will be set to the proper voltage of the country of purchase. If you need to switch the voltage, it can be found between the power plug socket and the toroidal transformer. The voltage value is printed next to the switch. -
Page 37: Remote Control Setup
The Mytek Stereo192-DSD DAC is infrared remote ready and will work with any Aluminum Apple Remote or any Universal Remote Control using the Philips RC5 standard. Stereo192-DSD DAC Apple Remote Setup 1. Press the Menu button 2. Rotate the knob until Remote is selected. Press the knob to enter Remote menu 3. - Page 38 RC 5 Remote Overview The Mytek Stereo192-DSD DAC can operate as: 1. TV - address – 00 2. Preamp - address – 16 3. CD - address – 20 In each of these options the remote's volume up and volume down buttons correspond to turning the Stereo192-DSD DAC's Main knob.
-
Page 39: Signal Flow
Remote control does not work. Suggested solution Possible cause Device not programmed. Rotate the device's knob to select your remote's proper channel, either 00, 16 or 20. Incorrect remote control. Try other remote control. This device works with any Aluminum Apple Remote or any Universal Remote Control using the RC5 standard. -
Page 40: Firewire Recording
www.mytekdigital.com Page: 40/48... - Page 41 The Stereo192-DSD DAC has the unique ability to operate as a 2 channel Firewire Audio Interface for Both MAC and PC. Connecting a stand-alone stereo analog digital converter such as the MYTEK Stereo192 ADC via AES/EBU, S/PDIF, TOSLINK or ADAT allows the passing of digital audio through the DAC into any DAW or archival software.
- Page 42 5. Under the Bus Tab inside the Mytek_FireWire control panel switch Sync Source: to the Digital format you are using i.e. AES/EBU, S/PDIF, TOSLINK, ADAT. 6. Under the Bus Tab insde the Mytek_FireWire control panel switch Sample Rate: to match the Digital Source feeding the MYTEK Stereo192-DSD DAC.
- Page 43 1. Change the MYTEK Stereo192-DSD DAC input setting to Firewire. Press the Menu button INPUT Rotate the knob until is selected Press the knob Fire Rotate the knob until is selected Press the Menu button Twice 2. Connect to the appropriate Digital Source to the Digital inputs on the Stereo192-DSD DAC via AES/EBU, S/PDIF, TOSLINK, or ADAT.
-
Page 44: Troubleshooting
5. Under the Bus Tab inside the Mytek_FireWire control panel switch Sync Source: to the Digital format you are using i.e. AES/EBU, S/PDIF, TOSLINK, ADAT. 6. Under the Bus Tab inside the Mytek_FireWire control panel switch Sample Rate: to match the Digital Source feeding the MYTEK Stereo192-DSD DAC. -
Page 45: Specifications
- Conversion: 32bit, PCM up to 192k, 64xDSD, 128xDSD. - Dynamic Range: 128dB (ESS Sabre chipset in 8 mono to 2 stereo config.) THD DAC: -110dB. - Digital Audio Inputs: SPDIF, AES/EBU, Toslink all up to 192k single wire. (64xDSD and 128XDSD SDIF DSD interface on Mastering Version). -
Page 46: Important Safety Information
Read these instructions. Keep these instructions. Heed all warnings. Follow all instructions. Do not use this apparatus near water. Clean only with dry cloth. Do not block any ventilation openings. Install in accordance with the manufacturer's instructions. Do not install near any heat sources such as radiators, heat registers, stoves, or other apparatus (including amplifiers) that produce heat. -
Page 47: Warning
Excessive sound pressure from speakers and headphones can cause hearing loss. In order to use this product safely, avoid prolonged listening at excessive sound pressure levels. For the customers in the U.S.A. This equipment has been tested and found to comply with the limits for a Class A digital device, pursuant to Part 15 of the FCC Rules. -
Page 48: Warranty
This Stereo192-DSD-DAC is warranted by Mytek to the original purchaser against defects in workmanship and materials used in manufacture for a period of two years from the date of purchase. Faults due to customer misuse, unauthorized modifications or accidents are not covered by this warranty. No other warranty is expressed or implied.
Need help?
Do you have a question about the 192-DSD and is the answer not in the manual?
Questions and answers