
Related Manuals for SMART Sympodium ID250 TM


Summary of Contents for SMART Sympodium ID250 TM
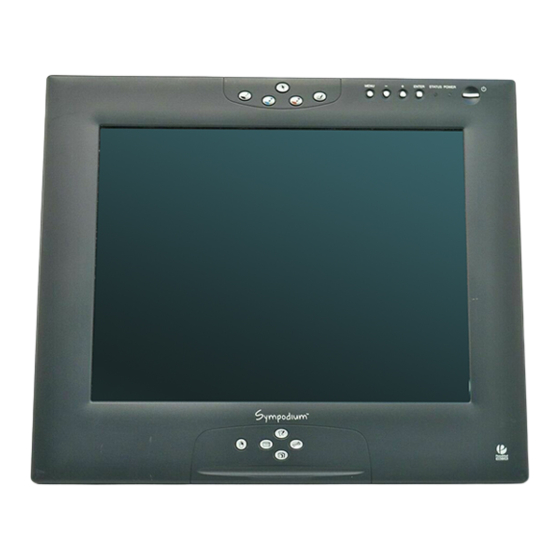
- Page 1 Installation and User’s Guide Sympodium ID250 MENU ENTER STATUS POWER Interactive Pen Display...
-
Page 2: Technical Support
U.S. Patent Nos. 6,326,954. Other U.S., Canadian and foreign patents pending. Copyright Notice © 2002–2003 SMART Technologies Inc. All rights reserved. No part of this publication may be reproduced, transmitted, transcribed, stored in a retrieval system or translated into any language in any form by any means without the prior written consent of SMART. -
Page 3: Important Information
ID250 to malfunction. Where use is prohibited, power off the ID250 to prevent this possibility. SMART Technologies Inc. does not accept any liability for direct or consequential damages. For details, refer to the warranty that’s included with your ID250. -
Page 4: Other Precautions
Other Precautions For proper installation, read this guide carefully and observe the following precautions. The Components • Do not place sharp or heavy objects on the ID250. These objects may scratch the screen’s surface or block the ventilation holes. Also, don’t use any instrument other than the stylus on the screen because other instruments may damage the screen’s coating. -
Page 5: Verifying The Package Contents
Verifying the Package Contents When you unpack your ID250, verify the contents with this list: • the interactive pen display, stand, stylus and tether • an accessory kit, which contains – the SMART Board™ software CD-ROM – this guide and a SMART Board User’s Guide for Windows computers and a SMART Board User’s Guide for Macintosh computers –... - Page 6 Important Information...
-
Page 7: Table Of Contents
Contents Important Information .................... i Other Precautions ........................ii Verifying the Package Contents ..................iii Locating More Information ....................iii List of Figures ..................... vii Overview ........................ 1 The Interactive Screen ......................2 The Stylus, Pen Tool and Function Buttons ............... 2 Connectivity Ports ....................... - Page 8 Customer Support ....................23 Contacting Technical Support ................... 23 General Inquiries ......................23 Warranty ...........................23 Appendix A: Specifications for the ID250 ............25 Index ........................27 Contents...
-
Page 9: List Of Figures
List of Figures Front View of the ID250 ......................1 Rear View of the ID250 ......................3 Location of the Serial Number ....................4 Connections for the ID250 ......................6 Security Slot Location ......................11 Integrating the ID250 with a Projector and a SMART Board Interactive Whiteboard ....12 Integrating the ID250 with a Monitor (Using a Video Distribution Amplifier) ...... - Page 10 viii List of Figures...
-
Page 11: Overview
Overview The Sympodium ID250 interactive pen display works with a computer to create an interactive presentation environment. It uses SMART Board software (version 8.1 or higher) to provide presenters and teachers with dynamic and interactive tools for creating presentations and lessons. Its powerful interactive writing surface allows you to control and annotate over any computer application while facing the audience. -
Page 12: The Interactive Screen
The Interactive Screen The screen is a liquid crystal display (LCD) with a native resolution of 1024 x 768. It supports up to 16,777,216 colors. This screen acts as both an input device and an output device. Integrated into the screen is an electromagnetic digitizer, which makes the screen interactive. However, this digitizer won’t function in the vicinity of a large magnetic field. -
Page 13: Connectivity Ports
Connectivity Ports The ID250 has four ports: a USB port for connection to the supplied USB cable; an HD DB15 video input port for the video cable from your computer; an HD DB15 video output port for a video cable to a projector or a monitor;... -
Page 14: System Requirements
System Requirements For the ID250 to operate properly, you must connect it to a computer that meets the following requirements. Windows operating system: • Pentium® 150 MHz processor (Pentium II processor or later recommended) • 48 MB of RAM (128 MB recommended) •... -
Page 15: Installing The Id250
ID250 on their lap, or as a hand-held device. NOTE: SMART Technologies makes no representation, promise or guarantee that the ID250 will cure or prevent, in whole or in part, mouse-induced repetitive stress symptoms, injuries or conditions. -
Page 16: Connecting The Id250
When the ID250 is on, it generates a fair amount of heat. To maintain a consistent operating temperature, don’t block or cover any of the ventilation holes, which are at the back of the unit. Other external factors can affect the ID250, such as the heat generated by television lighting or the airflow in the room. -
Page 17: Integrating A Monitor Or A Projector
Integrating a Monitor or a Projector You can connect a projector or another monitor directly to the ID250. With this setup, whatever you display on the ID250 also appears on the other screen, so your audience will see your annotations on the interactive screen. -
Page 18: Orienting The Screen
Orienting the Screen To accurately respond to a stylus touch, the computer needs to know the exact location of the image on the interactive screen. This is the purpose of the orientation procedure, which is a very simple process of touching the stylus precisely on a grid of red crosses. -
Page 19: Adjusting The Screen
Adjusting the Screen If the interactive screen receives a signal with a horizontal frequency between 30 kHz and 56.5 kHz and a vertical frequency between 50 Hz and 70 Hz, it automatically adjusts the horizontal and vertical position, phase and pitch settings. However, you can fine-tune the screen display settings by using the On Screen Display Menu and the adjustment buttons on the ID250. - Page 20 To adjust the screen Press the Menu button to open the On Screen Display Menu screen. M E N U ENTER STATUSP O W E R MENU ENTER STATUS POWER Press here Use the – and + buttons to select an option. Scroll through the icons described on page9. NOTE: You can’t use the stylus, mouse or keyboard to scroll, only the ID250 buttons.
-
Page 21: Tethering The Stylus
Tethering the Stylus You can attach the tether between the stylus and the ID250, so the stylus is always within reach. To attach the tether to the stylus and the ID250 There is a loop in the cord at each end of the tether. Thread one loop through the opening at the end of the stylus, and then slip the rest of the cord through the loop. -
Page 22: Other Integrations
Other Integrations Depending on your equipment and your expertise, you may want to integrate the ID250 with other devices. You can easily adapt the ID250 to expand the multimedia capabilities of the equipment in the room. For example, you can integrate your ID250 with a projector and a SMART Board interactive whiteboard. USB Cable Serial/ Power or... -
Page 23: Using The Id250
Using the ID250 The Sympodium ID250 interactive pen display is as easy to use as a pen and paper. By touching the stylus to the screen, you can interact with computer applications intuitively, as long as the SMART Board tools are running on the computer. With the pen tool and the function buttons, many tools and features are literally at your fingertips. -
Page 24: Clicking
Clicking Press the Left-Click or the Right-Click button for your stylus to behave like a mouse. You can then press the tip of the stylus on the interactive screen to activate an object. To double-click, press twice with the stylus. To drag an object, press it with the tip of the stylus and slide it to its new location. After you use the electronic ink or the eraser, press the Left-Click button to return to mouse mode. -
Page 25: The Capture Toolbar (Windows Version Only)
To create and save annotations in an Aware application Open your Aware application. With your finger, press one of the Colored Ink buttons. Write or draw on the screen with the stylus, just as you would write on paper. As you do so, a stream of electronic ink follows your stylus tip. Save the annotation as part of the file by saving the file as you normally would. -
Page 26: Using The Eraser
Using the Eraser You can use the eraser tool on the ID250 to remove your annotations from the screen. However, the eraser doesn’t remove any geometric shapes that you created using the Floating Tools in SMART Board software, only the annotations you drew with the stylus. To erase an annotation Press the Eraser button on the ID250. -
Page 27: Maintaining The Id250
Maintaining the ID250 With proper care, your ID250 can last for years. Try to keeping the unit clean and replace the stylus tip when it wears down so it doesn’t scratch the interactive screen. Cleaning You should clean a heavily used screen once a week because dirt and dust can stick to the screen and the stylus tip. -
Page 28: Removing The Stylus Tip
To replace the stylus tip Using the o-ring tool, grab the stylus tip and slide it straight out of the stylus. O-Ring Tool Stylus Tip Figure 11: Removing the Stylus Tip Insert a new tip straight into the barrel of the stylus. Push the tip firmly until it stops. Figure 12: Replacing the Stylus Tip Maintaining the ID250... -
Page 29: Troubleshooting
Troubleshooting Use this section to solve any problems that occur with your ID250. However, if you can’t solve your problem using these suggestions, call Technical Support at the numbers listed on page25. The ID250 has two light-emitting diodes (LEDs) that indicate the system’s status. Use these LEDs to determine that: •... -
Page 30: Image Problems
Image Problems If you don’t see an image on the interactive pen display, check that the ID250 is turned on and that you have properly connected the power, video and USB cables. Also check that: • the computer resolution isn’t higher than 1024 x 768 •... -
Page 31: Troubleshooting Summary Table
Troubleshooting Summary Table Use the following table to solve a problem with the ID250. Keep in mind that any computer that you use with the ID250 must be running the SMART Board tools for the screen to be touch sensitive. You’ll know that the SMART Board tools are running if you can see the SMART Board icon in the system tray or the Dock. - Page 32 Symptom Probable Cause Remedy Afterimage appears on the Video burn-in is occurring Use a screen saver or the power screen management features of your computer’s operating system. The white in an image doesn’t Video image problem Check the video connection. appear to be white on the Return the screen to the factory screen...
-
Page 33: Customer Support
Fax: +1.403.228.2500 E-mail: info@smarttech.com Address: SMART Technologies Inc. Suite 600, 1177 – 11th Avenue SW Calgary, AB CANADA T2R 1K9 Warranty A two-year limited equipment warranty covers your Sympodium ID250 interactive pen display. To return defective merchandise, call Technical Support to receive the appropriate Return of Merchandise Authorization, as well as shipping instructions so you can send the module or component to an authorized service center. - Page 34 A User Registration Card is included with your ID250. To facilitate user support and to receive news and updates, fill in and mail the card to SMART Technologies Inc. You can also register online at www.smarttech.com/registration. If you indicate that you would like to receive information on product upgrades, we’ll e-mail you details on the newest software and tools...
-
Page 35: Appendix A: Specifications For The Id250
Appendix A: Specifications for the ID250 Physical Specifications Size Without Tilt Stand 15 3/4" W x 13 3/8" D x 2" H (40.0 cm x 34.0 cm x 5.1 cm) With Tilt Stand (Lowest Position) 15 3/4" W x 12 5/8" D x 4 7/8" H (40.0 cm x 32.1 cm x 12.4 cm) With Tilt Stand (Highest Position) 15 3/4"... - Page 36 Storage and Operating Specifications Storage 14°F to 140°F (-10°C to 60° C) with 20% to 90% humidity, non-condensing Operation 41°F to 95°F (5°C to 35°C) with 20% to 80% humidity, non-condensing SMART Order Number SSID250 Sympodium Interactive Pen Display 15" 13 3/8"...
-
Page 37: Index
Index Angle of Installation 5 Inquiries 23 Annotating 14, 15 Installing 5 Non-Aware 15 Fan 6 Projector 7 SMART Board Software 7 Software 7 Tether 11 Backlight Setting Adjustment 9 Interpreting the Indicator Color 19 Brightness 9 Keyboard Location 6 Cable Keyboard, Using 16 USB Length 6... - Page 38 Preventing Surface Damage 17 Projected SMART Board Interactive Whiteboard iii Projector Installation 7 Vertical Center, Changing 9 Video Cable Length 6 Refresh Rate 5 Registration 24 Warranty 23 Resolution 8 Windows Operating System Resolution 8 Writing 14 Non-Aware Applications 15 Screen Adjusting 9 Image Problems 20...
- Page 39 Suite 600, 1177 – 11th Avenue SW Calgary, AB CANADA T2R 1K9 Main Switchboard: 1.888.42.SMART (Canada/U.S.) or +1.403.245.0333 (all other countries) Support Tel: 1.866.518.6791 (Canada/U.S.) or +1.403.228.5940 (all other countries) Support Fax: +1.403.806.1256 support@smarttech.com www.smarttech.com 99-00498-00 REV A0...
Need help?
Do you have a question about the Sympodium ID250 TM and is the answer not in the manual?
Questions and answers