Table of Contents
Advertisement
Advertisement
Table of Contents

Related Manuals for X-Rite RM200QC


Summary of Contents for X-Rite RM200QC
- Page 1 RM200QC User Manual...
- Page 2 IATA, ICOA, IMDG & PHMSA. The single cell battery contained in the RM200QC device is 25g in weight, 3.7V, 1030mAh, and complies with the UN 38.3 tests in effect the year it was originally shipped.
-
Page 3: Limited Warranty
Customer shall be responsible for packaging and shipping the defective product to the service center designated by X-Rite. X-Rite shall pay for the return of the product to Customer if the shipment is to a location within the region in which the X-Rite service center is located. - Page 4 This product may be covered by one or more patents. Refer to the instrument for actual patent numbers. © 2013 by X-Rite, Incorporated “ALL RIGHTS RESERVED” X-Rite is a registered trademark of X-Rite, Incorporated. All other logos, brand names, and product names mentioned are the properties of their respective holders.
-
Page 5: Table Of Contents
Charging the Battery ............................. 8 Powering On and Off (battery operation only) ..................... 9 Initial Startup ................................ 9 Function Screens ....................11 Using the RM200QC Instrument ................12 General Use ................................12 Changing Aperture View ............................13 Navigating the Screens ............................13 Selecting Samples .................... -
Page 6: Description
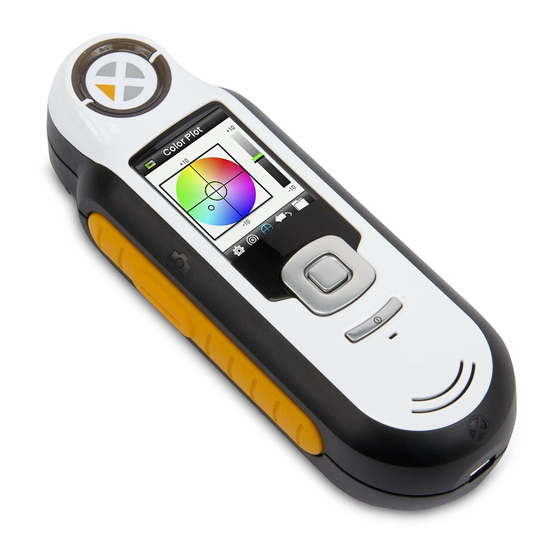
RM200QC User Manual Introduction Thank you for purchasing the X-Rite RM200QC, this handheld spectrocolorimeter provides an inexpensive yet powerful way to record and communicate color difference to speed introduction of new products and reduce instances of scrap. It simplifies how textiles, coatings, plastic molding and other industries can compare color parts in production with set standards, and then create reports. -
Page 7: Package Contents
• USB interface cable • Quick Start Guide Important Information The color display of RM200QC has limited capabilities dependant on viewing conditions. Colors on screen are for guidance only, verify with samples for visual accuracy or use Delta E for color difference comparison. -
Page 8: Getting Started
1. Install the software that accompanied the instrument if you have not already done so. 2. Connect the USB cable to the RM200QC and your computer’s USB port. A battery charging screen momentarily appears. For the first time connection, a language selection screen also appears. -
Page 9: Powering On And Off (Battery Operation Only)
Power button to turn on the instrument when this power down method is used. Initial Startup The very first time RM200QC is powered on, you are asked to select the desired operating language for the instrument. After the language is selected, you can go through a short tutorial on using the instrument and then perform a calibration. - Page 10 RM200QC User Manual View Tutorial 1. View the tutorial by pressing the right side of the Navigation control. Pressing the left side of the Navigation control takes you back one screen. Continue with remaining Tutorial screens Press Right Press Right Nav.
-
Page 11: Function Screens
RM200QC User Manual Function Screens The RM200QC has been designed to allow easy navigation between functions. Functions are selected by pressing the left or right sides of the Navigation control. The active function is indicated by the highlighted icon on the function bar and the title of the window. -
Page 12: Using The Rm200Qc Instrument
RM200QC User Manual Using the RM200QC Instrument General Use When holding the instrument by its sides, it should be easy to press the Measure button on the side with your thumb or index finger. 1. To measure a sample, place the instrument flat against a sample with the center of the sample positioned under the measurement optics. -
Page 13: Changing Aperture View
RM200QC User Manual Changing Aperture View 1. Lightly press and hold the Measure button to activate the preview. The area to be measured is indicated in the preview by the circle. Two measurement areas are available: • Small (4 mm aperture) •... - Page 14 RM200QC User Manual Screens that contain images of “arrows” indicate that the Up and Down sides of the Navigation control are used to adjust or page-through options, standards, etc.
-
Page 15: Selecting Samples
RM200QC User Manual Selecting Samples The RM200QC instrument is unique in that is has been designed to measure a wide variety of samples without the limitations on minimum size or surface textures. RM200QC employs the principle of WYSIWYG (What You See Is What You Get). -
Page 16: Calibration
RM200QC User Manual Calibration IMPORTANT: The calibration reference is dramatically affected by smudge marks and dust, and must be kept clean. It is recommended that the instrument is cleaned regularly. Refer to the Cleaning section later in this manual for procedure on cleaning the calibration reference and optics. -
Page 17: Recertification
“Your device is due recertification in XX days” This message will automatically close after 3 seconds or if a button is pressed. For details on how to get your RM200QC recertified or serviced, please contact your local X-Rite representative. Details available at... -
Page 18: Operation
RM200QC User Manual Operation Settings Menu The Setting menu is used to set instrument options, initiate a calibration and view production information from this menu. You should review and set the options as needed before using your instrument for the first time. - Page 19 The device will display the USB Report Mode Active window. The device will now be recognized on your computer as a removable disk “RM200QC”. If this is the first time you have plugged in your device running in the USB Report mode, the new device installation prompt will be seen and the required drivers will automatically be installed.
-
Page 20: Calibrate
RM200QC User Manual • DATA.CSV – This provides data for the measured standards and samples that is easily manipulated in Excel to a format of your preference, or for more advanced data collection and analysis. 5. Unplug the USB cable from the device to exit from the USB Report Mode. -
Page 21: Display Options
RM200QC User Manual 1. Select the aperture option from the list by pressing the up and down sides of the Navigation control. 2. Press the Enter (Select) button to select the option and return to the Settings window. Display Options The display options are used to turn on and off what information is displayed on the Color QC screen. -
Page 22: Tolerance
RM200QC User Manual 4. When finished, press the right side of the Navigation control (Save) to go to the Settings window. Tolerance The tolerance option is used to set the global tolerance for all standards and samples. 1. Select Color Equation by pressing the up and down sides of the Navigation control, and then press the Enter (Edit) button. -
Page 23: Volume
RM200QC User Manual Volume The volume option is used to set the system volume and the voice tag volume. 1. Select System volume or Voice tag volume by pressing the up and down sides of the Navigation control. 2. Press the Enter (Select) button to open the volume level screen. -
Page 24: Date And Time
RM200QC User Manual Date and Time The date and time option is used to set the current time, date and format for the instrument. 1. Select the date and time attribute by pressing the left and right sides of the Navigation control. -
Page 25: Reset Device
RM200QC User Manual Reset Device The reset device option is used to reset the instrument back to the factory defaults. All stored standards and records that exist will also be deleted. 1. Select the reset device option from the list by pressing the up and down sides of the Navigation control. - Page 26 RM200QC User Manual 3. Enter the password (default is 999) with the virtual keyboard using the Navigation control and Enter button. 4. When finished, highlight OK on the virtual keyboard and press the Enter button. If the password you entered is correct the “Security Deactivated” message will display. The device is now unlocked, and standards and settings can now be modified.
-
Page 27: Standard Menu
RM200QC User Manual Standard Menu The RM200QC can store a maximum of 20 standards with L*a*b* data. When a standard is measured, the instrument automatically assigned it a generic color name that can be changed. More than one standard can be set active (star icon) to allow the instrument to automatically selected the closest standard during a Color QC measurement. - Page 28 RM200QC User Manual appears at the bottom of the display to indicate the measurement status. It is important that the instrument is held steady for the duration of the measurement. A simulated color patch for the standard appears. This screen indicates that standard averaging is activated in the Settings menu.
-
Page 29: Editing A Standard
RM200QC User Manual 10. Exit the name window by selecting Back from the list and pressing the Enter button. 11. When finished, press the left side of the Navigation control (Save) to save the new standard. 12. Press the right side of the Navigation control (Exit) to main Standard screen. - Page 30 RM200QC User Manual 5. Use the up and down side of the Navigation control to select “Yes” and then press the Enter (Select) button to save changes. 6. Press the right side of the Navigation control (Exit) back to the Standard screen.
-
Page 31: Color Qc Menu
3. When finished, press the right side of the Navigation control (Exit) twice to advance to the Color QC screen. 4. Make sure the white reference slider is in the storage location and position the RM200QC on to the sample as previously explained. - Page 32 RM200QC User Manual If desired, adjust the measurement area by pressing on the up or down side of the Navigation control while lightly holding down the Measure button. Note: You can preset your aperture preference in the Settings menu. 6. When you have located the area you wish to measure, press the Measure button firmly. An audible “camera-click”...
-
Page 33: Saving A Tag With A Measurement
Each measurement is automatically saved in the sample record. A voice tag or text tag can be saved with each sample measurement. RM200QC can store a maximum of 350 sample measurements which are stored in date & time order. When the limit of 350 stored records is reached the oldest record is automatically deleted. - Page 34 RM200QC User Manual button. You have a maximum of 30 seconds recording time per record. When finished, release the Enter button. To listen to the voice tag you just recorded, select Play voice tag from the list and press the Enter button.
-
Page 35: Quick Check Menu
RM200QC User Manual Quick Check Menu The Quick Check menu contains functions which allow you to make quick comparison measurements that are not stored to the instrument. The following functions can be selected from the menu. - Color Compare is a quick function to measure a standard and then a sample and display results. -
Page 36: Opacity Mode
RM200QC User Manual If you do not want to use the last measurement taken, press the left side of the Navigation control to clear (Reset) the measurement. 2. Continue with additional standard measurements if averaging is used. Example above indicated that 3 measurements are required for the standard. - Page 37 RM200QC User Manual If you do not want to use the last measurement taken, press the left side of the Navigation control to clear (Reset) the measurement. 2. Continue with additional measurements if averaging is used. 3. After Over White measurement, the device will jump to the Over Black measurement.
-
Page 38: Sample Records Menu
RM200QC User Manual Sample Records Menu The Sample Records function enables you to retrieve a stored sample from the instruments database, delete an individual sample, or delete all stored samples. 1. Select the Sample Records icon in the function bar by pressing on the right side of the Navigation control. -
Page 39: Delete All Sample
RM200QC User Manual Delete All Sample This option allows you to delete all samples that are stored to the selected standard. 1. Press the up and down sides of the Navigation control to highlight the desired standard, and press the Enter button. -
Page 40: Appendices
RM200QC User Manual Appendices Troubleshooting Symptom Action Will not turn on Press and hold the Power button. Charge battery / plug in to USB port. Instrument not 1. Unplug the USB connection. responding 2. Hold down on/off button 10 seconds to turn off then restart. -
Page 41: Cleaning
RM200QC User Manual Cleaning The instrument should be stored with calibration slider in the closed position when not in use. Do not immerse the instrument in liquid, and do not use anything other than a water- dampened cloth for cleaning the exterior. -
Page 42: Cleaning The Calibration Reference
RM200QC User Manual 3. Blow short bursts of clean, dry air into the optics port. This should remove any accumulated debris from the optics. Canned air straw Optics port 4. Reposition the aperture over the optics housing and turn 45° clockwise to lock into place. -
Page 43: Technical Specifications
RM200QC User Manual Technical Specifications Measurement time: 1.8 seconds Operating Temp: 0° to 40°C (50° to 104°F) Storage temp: -20° to 60°C (-4° to 140°F) Humidity Range: 20- 80% RH (non-condensing) Usage: Indoor use only Altitude: 2000m Pollution Degree: Transient Overvoltage:... - Page 44 RM200QC User Manual China RoHs Disclosure Table 产品中有害物质的含量 X-Rite, Incorporated. Model RM200 Series (Capsure) Instrument 仪器 有害物质 Assembly 组件 铅 汞 镉 六价 多溴联苯 多溴联苯醚 (Pb) (Hg) (Cd) 铬 (Cr6) (PBB) (PBDE) 全部 PCB Assembly PCB 组件 Metal Fasteners 金属扣件...
- Page 45 X-Rite Asia Pacific Limited Suite 2801, 28th Floor, AXA Tower Landmark East, 100 How Ming Street Kwun Tong, Kowloon, Hong Kong Phone (852) 2568 6283 Fax (852) 2885 8610 Please visit www.xrite.com for a local office near you. P/N RM200QC-EN Rev. C...
Need help?
Do you have a question about the RM200QC and is the answer not in the manual?
Questions and answers
Does the RM200 qc require to be send out for calibration
Yes, the X-Rite RM200QC requires calibration. Calibration should be initiated from the Settings menu and may need to be repeated if there is a temperature variation.
This answer is automatically generated