Table of Contents
Advertisement
Quick Links
Advertisement
Table of Contents

Subscribe to Our Youtube Channel
Related Manuals for Vodavi Digital telephone


Summary of Contents for Vodavi Digital telephone
-
Page 1: User Guide
Station User Guide Including Attendant Features... - Page 3 Vodavi Telephone Systems Station User Guide February 2003 - Issue 1.1 P/N: IN3152-00...
- Page 4 VODAVI reserves the right to make changes in specifications at any time and without notice. The information furnished by VODAVI in this material is believed to be accurate and reliable, but is not warranted to be true in all cases.
- Page 5 Vodavi Telephone Systems Quick Reference Card FIXED FEATURE BUTTONS • MSG (MESSAGE WAIT) Button* -- Allows you to initiate a message waiting indication at • CAMP ON Button* -- Enables you to alert a busy stations that are busy, unattended, or in Do Not party that an outside line is on hold and waiting Disturb.
- Page 6 Quick Reference Card Vodavi Telephone Systems PLACING AN OUTSIDE LINE ON HOLD TO TRANSFER A CALL USING DIRECTORY DIALING • If your system is programmed for Exclusive Hold Preference, press the HOLD button once 1. Press the TRANS button. for Exclusive Hold or twice for System Hold.
-
Page 7: Quick Reference Card
Vodavi Large Screen Telephone Quick Reference Card Large Screen Display Features Using the Soft Keys The digital 30-button model provides a 7-line by From the main menu, use the soft keys to access 16-character display with 10 Soft Keys, a MENU the options listed. -
Page 8: Voice Mail
Vodavi Large Screen Telephone Quick Reference Card Voice Mail After selecting FEATURES on the main menu, the following options will display: Press… Then select… Call Forward VOICE MAIL the desired VM group (1-5). Press… Then select … Display will show…... -
Page 9: Table Of Contents
Station User Guide Contents About This User Guide ............1 911 Alert..................2 Account Codes ................. 3 Using Account Codes............3 Verified Account Codes..........3 Account Codes - Traveling COS (Verified) ....4 ACD/UCD..................5 ACD Call Factor ..............5 ACD Call Qualifier............. - Page 10 Station User Guide Attendant Speed Dial - System Storing ....24 Attendant Unavailable ........... 25 Attendant Voice Mail Alarm Clear ......25 Background Music (Optional) ..........26 Call Back ..................27 Call Coverage ................28 Call Forward................30 Call Forward - External (Off-Net)......... 31 Call Forward - Follow Me..........
- Page 11 Station User Guide CO Line Queue................47 Conference................. 48 Conference Combinations..........48 Conference Procedures..........48 Dial-By-Name ................51 Directory Dial ................52 Do Not Disturb................54 Executive Override..............56 Flash ..................... 56 Flash Key on Intercom ............ 56 Flexible Button Programming ..........57 Group Listening ...............
- Page 12 Station User Guide Placing an Outside Line on Hold ........ 76 Answering a Recall............76 Answering an Outside Call..........76 Placing an Outside Call........... 76 Paging..................77 Paging - Meet Me ............. 78 Personalized Messages............78 Pre-assigned Messages ..........78 Custom Messages ............
- Page 13 Station User Guide Voice Mail Transfer with ID Digits ......97 Voice Mailbox Button ............. 97 Voice Mail Group Button ..........98 Voice Mail Group Access..........98 Voice Mail One-Touch Recording....... 98 Volume Control ................ 100 Worksheets ................102 Flexible Button Programming Worksheet ....102 Speed Dial Bin Programming Worksheet....
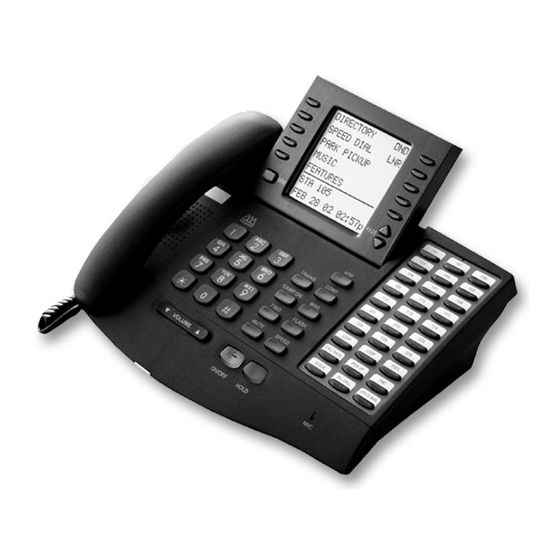
- Page 14 Station User Guide Digital Telephone Features Vodavi Digital Telephones have flexible buttons and dual color LEDs that can be customized for each application. When flexible buttons are used as DSS buttons, station status can be seen in a single glance. When they are used as CO/PBX/Centrex buttons, line status is easily monitored.
- Page 15 Station User Guide Number Feature Description Message Indicator Indicates that you have a message. 24-Character Display Displays information about telephone status, dialing directories, and text message information. Interactive Soft Keys Used to work in conjuction with fixed and flexible features. Flexible Button Keys Used to access outside lines or access call- handling features.
- Page 16 Station User Guide viii 8-Button Executive Telephone...
- Page 17 Station User Guide Number Feature Description Message Indicator Indicates that you have a message. 24-Character Display Displays information about telephone status, dialing directories, and text message information. Interactive Soft Keys Used to program phone feature/functions. Flexible Button Keys Used to access outside lines or access call- handling features.
- Page 18 Station User Guide 8-Button Enhanced Telephone (Non-Display) Number Feature Description Message Indicator Indicates that you have a message. Flexible Button Keys Used to access outside lines or access call-handling features. TRANS Key Used to transfer an outside call between stations. SPEED Key Used to access speed dialing, save number redial and last number redial.
-
Page 19: About This User Guide
The features described in this book apply to the II/III/IV, Mach I, and Digital Telephone Systems when using Vodavi Telephones … unless an exception is specifically noted. GUIDELINES Flexible Buttons -- Most system features can be set up on a flexible button for easy one-button access. -
Page 20: 911 Alert
911 Alert 911 Alert Any station user or attendant who programs a flexible button for 911 ALERT (feature code 608) will be alerted of internal stations placing 911 calls. The system can store the 16 most recent 911 calls. Calling information includes the time/date of the call and the station number from which the call was placed. -
Page 21: Account Codes
Account Codes Account Codes Using Account Codes Prior to placing, or during, an outside line call: 1. Press the preprogrammed ACCOUNT CODE button (627). 2. Dial account code up to 12 digits. (The other party does not hear the digits being dialed). If account code is less than 12 digits, an [ ] must be entered to return to the call. -
Page 22: Account Codes - Traveling Cos (Verified)
Account Codes To enter an Account Code during a call: 1. Depress the hookswitch momentarily. Call is placed on executive hold while you enter your account code. 2. Dial [627]. 3. Dial the account code. If the account code contains fewer than 12 digits, dial [ to automatically return to the call. -
Page 23: Acd/Ucd
ACD/UCD ACD/UCD The Automatic Call Distribution (ACD) feature is available with optional software. When purchased, Uniform Call Distribution (UCD) is not used and is replaced by the ACD functions. ACD Call Factor The Call Factor feature is used exclusively with digital voice mail to provide average call duration to the caller. -
Page 24: Acd Help
ACD/UCD ACD Help While on a call in progress, the following results will occur when an Agent presses their preprogrammed HELP flexible button. AGENT The Agent will hear a confirmation tone and their HELP button will illuminate if a supervisor is logged into their ACD group. -
Page 25: Acd Member Status
ACD/UCD SINGLE LINE TELEPHONE While on a call-in-progress, the agent: Presses the FLASH button and then dials the HELP code [574] on the dial pad. The agent must press FLASH again to return to their call after the code is dialed. ACD Member Status Any station (Supervisor or Agent) logged onto the ACD group can view the status of the ACD group members as follows:... -
Page 26: Acd Overflow Available/Unavailable
ACD/UCD ACD Overflow Available/Unavailable To place a station in Available Mode: Dial [578] on the dial pad to start receiving ACD calls, -or- Press the preprogrammed AVAILABLE/UNAVAILABLE button. To place a station in Unavailable Mode: Dial [578] on the dial pad to block incoming ACD calls, -or- Press the preprogrammed AVAILABLE/UNAVAILABLE button. -
Page 27: Acd Supervisor Display
ACD/UCD To log into an ACD Secondary Group: 1. Dial LOGIN CODE [582] on the dial pad, followed by the desired ACD group number (5XX), -or- Press the preprogrammed LOGIN flexible button. 2. Enter your four-digit AGENT ID code (0000-9999). The LOGIN flexible button LED will light steady and a confirmation tone will sound to verify the login process. -
Page 28: Acd Supervisor Login/Logout
ACD/UCD To change the display to a different group: Dial the ACD Supervisor Display code [577] on the dial pad, followed by the ACD group you want to observe, -or- Press the preprogrammed flexible button. ACD Supervisor Login/Logout To log in to an ACD group: 1. -
Page 29: Acd/Ucd Available/Unavailable
ACD/UCD ACD/UCD Available/Unavailable If you are an ACD/UCD Agent, you can place your station in the Available mode to receive ACD/UCD calls or in the Unavailable mode to block ACD/UCD calls from ringing to your station. To enter Available Mode: Dial [566] on the dial pad to start receiving ACD/UCD calls, -or- Press the preprogrammed AVAILABLE/UNAVAILABLE button. -
Page 30: Ucd Calls In Queue Display
ACD/UCD Second Method -- From an idle key telephone: The preprogrammed flexible button for the ACD group being monitored will flash, indicating there are calls in queue. 1. Press the preprogrammed ACD CALLS IN QUEUE DISPLAY flexible button. This idle display shows how many calls are in queue. AC D 5 XX 0 0 C AL LS I N QU E U E M M M DD Y Y H H : M M am... -
Page 31: Ucd Overflow Station Forward
ACD/UCD 3. Replace the handset or press ON/OFF to terminate display. This feature cannot be used with a call in progress. The station is considered busy for incoming calls during this operation. UCD Overflow Station Forward An enhancement allows UCD calls reaching the Overflow Station to call forward to another station: 1. -
Page 32: Answering Machine Emulation
Answering Machine Emulation Answering Machine Emulation When a call is sent to your voice mailbox, you can press a preprogrammed flexible button to listen to the caller leaving the voice mail message. If you decide to speak with the caller, you can press the preprogrammed button to be connected to the caller. - Page 33 Answering Machine Emulation Speaker Mode The VM message is broadcast over the speaker. The MUTE key is enabled and the LED lights solid red. When the station is monitoring the caller in VM, the display shows. V M S CR E E N I NG M M M DD Y Y H H : M M am MAILBOX Options...
-
Page 34: Attendant Features
Attendant Features Attendant Features If your station is designated as the attendant station, the following features are available to assist you in efficiently operating your telephone. Attendant Clear Alarm The attendant can dial feature code [606] to clear any alarm. This function does not clear the condition, only the display. -
Page 35: Attendant Custom Message
Attendant Features Attendant Custom Message Program the ten custom messages for system-wide use at the first Attendant station as follows: 1. Dial the Custom Message program code [694] on the dial pad. The following message displays: E N T E R MS G N O M M M D D Y Y H H :M M a m 2. -
Page 36: Attendant Day/Night/Special
Attendant Features Attendant Day/Night/Special The system’s Automatic Night Mode Feature can be overridden by the Attendant station. Any Attendant station user can press their DND button or a Soft Key to place the system into Night Mode. The Night Service feature provides a means to place the system in night mode or remove the system from night mode from any keyset, providing the system was put in night mode by the night service feature... -
Page 37: Attendant Directory List Programming
Attendant Features Attendant Directory List Programming The Attendant can program up to 200 names in the directory list. When the directory list is accessed by any display telephone user, the system displays the name associated with a speed dial number so when the desired name is shown, the user may then have the system dial the number. - Page 38 Attendant Features 3. Enter the 3- or 4-digit station intercom number. 4. Press the MUTE button. 5. Enter the name (up to 24 characters may be entered) by using the keys. The display updates as the name is entered. Other Codes A - 21 D - 31 D - 31...
- Page 39 Attendant Features Local Translation Table The following procedure is used to associate names to the Local Number/Name Translation Table number only. To add names to Local Translation number: 1. Enter desired three-digit Directory List number (000-199), or dial [ ] to scroll up (next entry) or [#] to scroll down (previous entry) through the list.
-
Page 40: Attendant Disable Outgoing Co Line
Attendant Features Speed Dial Bin The following procedure is used to associate names to a system speed dial bin only. To add names to a System Speed Bin: 1. Enter desired 3-digit Directory List number (000-199), or dial [ ] to scroll up (next entry) or [#] to scroll down (previous entry) through the list. -
Page 41: Attendant Override
Attendant Features Attendant Override When Attendant Override is enabled, Attendant stations may override or call stations that are busy or in Do Not Disturb. To call a station busy on a CO call: Press the preprogrammed ATTN OVERRIDE button [601]. Three short tone bursts are presented to the called party. -
Page 42: Attendant Speed Dial - System Storing
Attendant Features Attendant Speed Dial - System Storing System Speed numbers must be entered by the first programmed Attendant. If an Attendant is not specified, enter at Station 100. 1. Press SPEED once, then press the desired outside line key, -or- Press SPEED twice to select an outside line automatically. -
Page 43: Attendant Unavailable
Attendant Features Attendant Unavailable The Attendant Unavailable feature lets Attendant stations have a button that places their station in an Unavailable Mode. When the station is in the Unavailable Mode, the next Attendant station receives dial “0” calls and recalls. To activate Unavailable Mode: As the (first programmed) Attendant …... -
Page 44: Background Music (Optional)
Background Music (Optional) Background Music (Optional) To activate Background Music: 1. Dial [632] or press the preprogrammed BGM flexible button, then enter desired channel number on the keypad. -or- Use the Soft Key’s BGM option. 0 : OF F 1 /2 / 3 : C H -1 /2 / 3 M M M DD Y Y H H :M M a m DVX Plus II/III/IV... -
Page 45: Call Back
Call Back Call Back A station can initiate a call back request to another busy station. Once that station becomes idle, the station that left the call back request is signaled. To leave a Call Back request when a number is busy: 1. -
Page 46: Call Coverage
Call Coverage Call Coverage The Call Coverage feature provides the functionality for stations to answer calls for other stations by utilizing call coverage buttons. Visual and Audible status of ringing stations to an assigned coverage station are provided. To assign a Call Coverage Button: 1. - Page 47 Call Coverage After the call is answered, one of the following messages will display: Non-network system or in same Node: C A LL F O R S TA X X X X F R O M S TA Y Y Y Y HH :MM :SS Network system with call passed across a switch: X X X X XX X X X CA LL I NG...
-
Page 48: Call Forward
Call Forward Call Forward The Call Forward feature allows a station to have internal or external calls forwarded to a designated station, an ACD or UCD group pilot number, Voice Mail group number, or Hunt group. This feature must be enabled in Admin Programming. To activate Call Forwarding: 1. -
Page 49: Call Forward - External (Off-Net)
Call Forward SINGLE LINE TELEPHONE The SLT operation uses the same procedures as used in Digital Telephone operation described above, except there is no FWD button or Soft Keys. You must use feature codes 640 and 662. Call Forward - External (Off-Net) Stations are allowed to forward intercom and transferred CO line calls to an off-net location. -
Page 50: Call Forward - Follow Me
Call Forward Call Forward - Follow Me The Follow Me feature lets a user who is away from their station, activate/deactivate call forwarding from another station in the system. This lets the user forward their calls to their current location or into Voice Mail, ACD/UCD, Hunt Group, any other station in the system, or to an off-net location. - Page 51 Call Forward To establish Follow Me Call Forwarding (off-site location): 1. Dial into the system on a DISA or TIE trunk. Enter the DISA access code, if applicable. 2. Dial the Follow Me Forward code [642] on the dial pad. 3.
-
Page 52: Call Park
Call Park Call Park Call Park - Personal Each digital telephone in the system can place a call into a personal park location and then later retrieve that call from the originating station. Internal calls and external calls can be placed into the stations’... -
Page 53: Call Park - Station
Call Park Conditions » If the Call Park user receives or makes a second call while the first call is parked, the user can alternately connect to the two calls by pressing the preprogrammed PERSONAL PARK button or by dialing [438]. Call Park - Station Call park (by station number) allows external calls to be parked at a station other than your own. -
Page 54: Call Park - System
Call Park Call Park - System An external call can be placed into one of eight parking locations and can be retrieved by any station that has a direct line appearance or an available Loop button. Parked calls have their own recall timer that recalls the originating station, and if still unanswered, the Attendant(s). -
Page 55: Call Pickup
Call Pickup 3. Dial [#] + the desired parking location (430-437). SINGLE LINE TELEPHONE To park a call: 1. Press the FLASH button. The caller is put on Exclusive Hold. 2. Dial parking location (430-437). A confirmation tone will sound. 3. -
Page 56: Group Call Pickup
Call Pickup SINGLE LINE TELEPHONE To use Directed Call Pickup: 1. Lift the handset. 2. Dial [#1]. 3. Dial station number of ringing telephone. You MUST have access to the specific outside line or a LOOP button to do a directed call pickup. Group Call Pickup To create a Pickup Button: 1. -
Page 57: Call Transfer
Call Transfer Call Transfer Outside lines can be transferred from one phone to another within the system. The transfer can be either screened (announced) or unscreened to either an idle or busy station, an ACD/UCD Group, or a Hunt Group. Executive/Secretary Transfer If you are designated the: Executive station, and your phone is busy or in DND, all calls... -
Page 58: Screened Transfer
Call Transfer Screened Transfer To conduct the transfer, while connected to an outside line: 1. Press the station button where call is to be transferred (if programmed on your telephone) or press TRANS and dial station number. The called extension signals according to the selected intercom H, T, or P mode. -
Page 59: Unanswered Co Call Transfer
Caller ID Display Unanswered CO Call Transfer While idle or on an internal/external call and an incoming or transferred CO call is ringing at your station: 1. If on another call, place the current call on hold and replace the handset or press ON/OFF. 2. -
Page 60: Caller Id Display (Unanswered Calls)
Caller ID Display Caller ID Display (Unanswered Calls) An Unanswered Call Management Table with 100 system-wide entry capacity is maintained in the system. The calling number/ name information pertaining to any unanswered call is placed in this table at the time the system determines the call was abandoned. -
Page 61: Caller Id Name/Number
Caller ID Name/Number Caller ID Name/Number This feature allows you to program a flexible button [653] to view both the number and name on the LCD when receiving a Caller ID CO call. When the feature is enabled, the flexible button LED is lit solid and the name and number is displayed. -
Page 62: Calling Station Handsfree Mode Override
Calling Station Handsfree Mode Override Calling Station Handsfree Mode Override This feature enables a calling station to override a called station’s T intercom setting. When placing a call to a station and handsfree is desired: 1. Dial [7#] on the dial pad. 2. -
Page 63: Camp On
Camp On Camp On A station may alert a busy party that an outside line is on hold and waiting for them by using the CAMP ON button. To camp on a call, press the TRANS button to transfer the call to the desired busy station, then press the CAMP ON button. -
Page 64: Co Line - Access
CO Line - Access If you do not have a CAMP ON button: Go on-hook with your present call, the Camp On call will ring through, -or- Place the present call on hold, then go on-hook, the Camp On call will ring through. SINGLE LINE TELEPHONE To alert a busy station of your call: 1. -
Page 65: Co Line Queue
CO Line Queue CO Line Queue If you wish to be placed on a waiting list for a particular outside line that is busy, to become available: 1. Press desired busy OUTSIDE LINE button, -or- Press the POOL button. (A busy tone will sound.) 2. -
Page 66: Conference
Conference Conference Conference Combinations Only stations that have conference enabled can institute a conference. Add-On Conference -- Up to eight internal parties can engage in a conference, or seven internal parties with one external party. A maximum of five 8-party conferences (five external parties maximum) can be established. - Page 67 Conference To exit a Conference (controller only): For a Single-line conference … 1. Press the ON/OFF button to ON. 2. Press the MUTE button, then replace the handset to monitor the conference. For a Multi-line conference … 1. Press the HOLD button to place outside parties on hold. The Hold Timer starts.
- Page 68 Conference To terminate a party during a Conference call: 1. Press the line button of the party you wish to drop. 2. Replace the handset, or press the ON/OFF button. 3. Lift the handset, or press the ON/OFF button. 4. Press the flashing CONF button. SINGLE LINE TELEPHONE To set up a Conference with one external and one other internal station:...
-
Page 69: Dial-By-Name
Dial-By-Name Dial-By-Name The system allows station users to dial extension numbers, or speed bins, by entering the name of a person that has been programmed for that station. The system database allows entry of a name (alphanumeric) up to 24 characters in length for each station. The programmed name can be used for dial-by-name station users and in directory dialing. -
Page 70: Directory Dial
Directory Dial Directory Dial Display telephone users may view a list of up to 200 names from the System Directory on the station’s LCD display. You can dial the station or speed dial bin by pressing a single button. Names placed in the Directory List may be associated to intercom numbers, System Speed dial bins, or entries in the Local Number/Name Translation Table. - Page 71 Directory Dial 3. The alphabet is represented on the keypad as shown: A B C D E F A = 2 G H I J K L M N O B = 22 C = 222 P Q R S T U V W X Y Z O P E R...
-
Page 72: Do Not Disturb
Do Not Disturb To transfer a call using Directory Dialing while on a call: 1. Press the TRANS button. 2. Dial the Directory Dial Code [680] on the dial pad, -or- Press the flexible button programmed for directory dialing. 3. Press digit associated with person’s name, when it displays, press SPEED to automatically dial destination station. - Page 73 Do Not Disturb To remove Do Not Disturb: Press preprogrammed DND button, -or- Use the Soft Key’s DND option, -or- Dial either [631] or [662]. The button LED will extinguish and DND is cancelled. To activate One-time Do Not Disturb: Press preprogrammed DND button while you are off-hook and connected to a CO line or intercom call.
-
Page 74: Executive Override
Executive Override Executive Override Use of this feature when the executive override warning tone is disabled may be a violation of Federal, State or Local Laws, and an invasion of privacy. Check applicable laws in your area before using this feature. Executive Override allows stations designated as “Executive”... -
Page 75: Flexible Button Programming
Flexible Button Programming Flexible Button Programming To program a flexible button (to use feature codes): 1. Press SPEED twice. 2. Press the button to be programmed (must be programmed in database as a flexible button). 3. Dial the desired code (refer to the “Default Numbering Plan”... -
Page 76: Group Listening
2.5 mm jack that is located on the left side of most Vodavi digital telephone models. The ON/OFF button on the digital telephone is used to initiate and end calls while using the headset. - Page 77 Headset Mode To activate Headset Mode: Dial [634] on the dial pad, -or- Press the preprogrammed HEADSET MODE button. -or- Use the Soft Key’s HEADSET option when in an idle condition. The LED will light steady. While Headset mode is active, the ON/OFF button activates the headset and disables speakerphone and intercom call announce operation at your station.
-
Page 78: Intercom
Intercom Intercom Using an Intercom Button To program a Flexible Button as an Intercom Button: 1. Press the SPEED button twice. 2. Press the desired flexible button to program. 3. Dial [645] on the dial pad. A confirmation tone will sound. If an error was made during entry, an error tone will sound. -
Page 79: Answering An Intercom Call
Intercom Answering an Intercom Call Depending on the selected intercom operating mode, answer the intercom call as indicated: Handsfree Mode (No LED) -- You will hear three bursts of tone and an announcement. Reply handsfree or lift the handset for privacy. Tone Mode (LED On) -- You will hear repeated bursts of intercom tone ringing and HOLD button slow flashes. -
Page 80: Intercom Calls
Intercom To use Intercom Transfer with DSS Buttons: 1. Receive or make an intercom call using a DSS button. 2. Press the TRANS button. An intercom dial tone will sound. 3. Press the DSS button where to transfer the call. 4. - Page 81 Intercom To answer an Intercom Call: In the T mode (LED On), you will hear repeated bursts of intercom tone ringing and the HOLD button slow flashes. Lift the handset or press the ON/OFF button to answer, -or- Press the H-T-P button to the H mode to reply. In the P mode (LED flashes), you will hear three bursts of tone and one-way announcement.
-
Page 82: Keyset Mode
Keyset Mode Keyset Mode This feature allows you to determine the mode and baud rate of the optional CTI Module connected to your phone. This setting is stored in back-up memory in the case of a power outage or system reset. When telephone is set to AT command mode, the following AT commands are supported: Command... -
Page 83: Last Number Redial
Last Number Redial At an idle station: 1. Dial the Keyset Mode code [648] on the dial pad, -or- Press the preprogrammed KEYSET MODE button, the following displays: I NAC TI V E 2400 M O DE = S AVE = H OL D B AU D= # 2. -
Page 84: Lcr Operation
LCR Operation The system automatically selects the original line used to place the call and redials the last number dialed. If that line is busy, the system will select another line from the same group and redial the number. If no lines are available in the same group, you will receive a busy tone and can queue for a line. -
Page 85: Loop Key
Loop Key To answer an LCR Queue Call Back: 1. When your telephone is signaled, answer the call. 2. The desired telephone number will automatically be redialed. Only one LCR Queue Call Back request may be initiated by a station. When a second request is made, the first request is cancelled. -
Page 86: Mailbox Buttons
Mailbox Buttons Mailbox Buttons To program a station’s mailbox on a flexible button: 1. Press the SPEED button twice. 2. Press the desired flexible button to be programmed. 3. Dial the mailbox feature access code (460-467 = voice mail location 1-8; 468 = remote voice mail location). Feature code 468 does not apply to Mach I systems. -
Page 87: Message Wait
Message Wait Message Wait Stations that are busy, unattended and ringing, or in DND can be left a message indication by other stations in the system. Up to five messages can be left at one keyset. Upon return to the station, the user can answer the message waiting indication of each party in sequential order. -
Page 88: Modem
Modem Voice Mail Modem Access You can program Vodavi voice mail systems (other than MiniVoice or PathFinder) using the telephone system modem. To access the voice mail system, you can either: Dial [498], ring directly to 498, be transferred to 498. -
Page 89: Telephone System Modem Access
Mute Telephone System Modem Access Feature code 499 is used for access to the telephone system modem. This modem allows remote telephone system programming via an SLT or externally by having a call transferred to extension 499. COs and DIDs (if applicable) can also be programmed to ring directly to extension 499. - Page 90 Name In Display 2. Use dial pad keys to enter your name (up to 7 characters). Other Codes A - 21 D - 31 D - 31 B - 22 E - 32 E - 32 1 = 1# 8 = 8# “...
-
Page 91: Night Service
Night Service Night Service To enter Night Service Mode, from an idle station: Press the preprogrammed NIGHT SERVICE flexible button [604]. The system is now in the Night Service Mode. To remove Night Service Mode: Press the preprogrammed NIGHT SERVICE flexible button [604] again. -
Page 92: Off-Hook Voice Over (Ohvo)
Off-Hook Voice Over (OHVO) Off-Hook Voice Over (OHVO) While off-hook on a call (CO or Intercom), this feature allows you to receive a voice announcement through the handset receiver without interrupting the existing call. You may then respond to the calling party using CAMP ON procedures to talk to the calling party, or use Silent Text Messaging to respond to the calling party via LCD Displays. - Page 93 Off-Hook Voice Over (OHVO) The calling OHVO station is not connected or able to hear the called station’s conversation (connection only allows calling station to transmit to the called station). The calling station is placed in a one-time DND mode upon initiating the Voice Over. One-Time DND cannot be toggled during the OHVO call.
-
Page 94: Outside Calls
Outside Calls Outside Calls Placing an Outside Line on Hold If Exclusive Hold Preference is programmed, press HOLD once for Exclusive Hold or twice for System Hold. -or- If System Hold Preference is programmed, press HOLD once for System Hold or twice for Exclusive Hold. Answering a Recall When an outside line has remained on hold for an extended period of time, you are reminded with a recalling ring. -
Page 95: Paging
Paging Paging If given the ability to make page announcements: 1. Lift the handset, or press the ON/OFF button. 2. Dial a three-digit paging code, -or- Press the preprogrammed PAGING flexible button. -or- Use the Soft Key’s ALLPG IN or ALLPG EX options when in an idle condition (versus paging codes 709 or 760). -
Page 96: Paging - Meet Me
Personalized Messages Paging - Meet Me To request another party meet you on a page: 1. Dial the desired three-digit paging code. 2. Request the party to meet you on the page. 3. Do not hang up; wait for the requested party to answer. To answer a Meet Me Page: 1. -
Page 97: Custom Messages
Personalized Messages To cancel a pre-assigned message: 1. Either dial the Personal Messages code [633] + [00], dial [662], or press the DND button. 2. Replace the handset. The DND button LED will extinguish. Custom Messages Each station can select from ten possible custom messages to display on the LCD of a key telephone calling that station. -
Page 98: Date And Time Entry Messages
Personalized Messages To use a unique custom message: 1. Dial [633] on the dial pad. -or- Press a preprogrammed PERSONAL MESSAGES button. 2. Dial a valid message number (18-20) for the desired custom message. To cancel a custom message: 1. Either dial the Personal Messages code [633] + [00], dial [662], or press the DND button. - Page 99 Personalized Messages 3. Enter the date/time on the dial pad as shown: Other Codes A - 21 D - 31 D - 31 B - 22 E - 32 E - 32 1 = 1# 8 = 8# “ = 01 * = *# C - 23 F - 33...
-
Page 100: Scrollable Canned Messages
Personalized Messages Scrollable Canned Messages The Scrollable Canned Message feature allows you to use a single digit [#] or [ ] to scroll through the canned messages and select one. When the desired message is displayed, pressing the hold button places that message on the station LCD. -
Page 101: Personal Messages Flexible Button
Personalized Messages To cancel the message: 1. Either dial the Personal Messages code [633] + [00], dial [662], or press the DND button. 2. Replace the handset. The DND button LED will extinguish. SINGLE LINE TELEPHONE Not applicable Personal Messages Flexible Button You can program the code [633] onto a flexible button to speed access to select and use messages. -
Page 102: Pbx/Centrex Codes On A Flex Button
PBX/Centrex Codes on a Flex Button PBX/Centrex Codes on a Flex Button For one-button access to Centrex or PBX features: 1. Program Centrex or PBX code into a Station or System Speed Dial bin, including hook-flash (FLASH key), [ ] , and [#] commands (refer to “Speed Dial”... -
Page 103: Save Number For Redial
Redial Save Number For Redial To save the last number you dialed: 1. After placing an outside call, keep the handset off-hook. 2. Press the SPEED button twice, -or- Use the Soft Key’s STORE NO option. Redial a Saved Number To dial a number that was saved for redial, either: Press the SPEED button, then press the [ ] key. -
Page 104: Ring Down / Hot Line / Off-Hook Preference
Ring Down / Hot Line / Off-Hook Preference To activate a redial: Press the preprogrammed REDIAL flexible button, -or- Press the ON/OFF button, -or- Lift the handset, the line will be seized and number is dialed. If you receive a busy/no answer, you may repeat the step to activate another redial. - Page 105 Ring Down / Hot Line / Off-Hook Preference While Off-Hook Preference is enabled, you may access internal intercom dial tone as follows: 1. Press the preprogrammed ICM button, -or- Dial your intercom number. (Do not lift the handset or press the ON/OFF button before dialing intercom number.) The LED will light steady and an intercom dial tone will sound.
-
Page 106: Ring Tone
Ring Tone Ring Tone To select a distinctive ring tone for a station: 1. Dial the Ring Tone program code [695] on the dial pad. The following message displays: E N TE R R I NG TO NE S 00-36 X X P R E S S S P E E D T O S AV E 2. -
Page 107: School Zone
School Zone School Zone Description The School Zone feature allows a person at a station(s) specified as an Administrator to control incoming calls for all stations specified as a Classroom. The Administrator controls the type of call forwarding and the call forwarding destination. Call forwarding types include All Call Forward, No Answer Call Forward, Busy Call Forward, and Busy / No Answer Call Forward. -
Page 108: Speakerphone
Speakerphone To view call forwarding status of Classroom telephones: 1. The Administrator uses a station assigned as an Administrator station and dials feature code [630] + [#]. A confirmation tone sounds and the LCD updates to show one of the following displays: C LA S S R O O M S TATU S CL A S S R O OM S TATU S B S Y F W D TO X XX X... -
Page 109: Speed Dial
Speed Dial The speakerphone will be activated. 3. Press the ON/OFF button to end the call. Speed Dial A keyset user can associate up to 20 frequently dialed numbers as Station Speed Numbers (9000 to 9019). Telephone numbers can be up to 24 digits including pauses, flash commands, pulse-to-tone switchover, and non-display characters. - Page 110 TRANS -- When used as the first entry in the speed bin, this inserts a non-display character causing numbers stored in the bin not to appear on the digital telephone’s display when bin is accessed. 5. Press the SPEED button.
-
Page 111: System Speed Dial Access
Station/Port Fixed Number To store speed dial numbers: 1. Lift the handset. 2. Dial [661] on the dial pad. 3. Dial the desired station speed number (9000-9019). 4. Dial the telephone number to store. 5. Briefly press and release the hookswitch. A confirmation tone will sound. -
Page 112: Station Relocate
Station Relocate Station Relocate The Station Relocation Feature allows you to dial a code followed by the old station number to bring all the station attributes including extension number, button mapping, speed dial, and class of service to the new location. 1. - Page 113 Text Messaging (Silent Response) While receiving a Camp On or OHVO call: The called party may press a preprogrammed Text Message button with a specific message [633+XX]. Example … [633] + [38] means a telephone calling the station receives the message WHO IS IT ? Code Text Message Code...
-
Page 114: Universal Day/Night Answer
Universal Day/Night Answer Universal Day/Night Answer Incoming CO lines can be programmed for Universal Day Answer (UDA) or Universal Night Answer (UNA). UDA/UNA assigned CO lines can also signal over the external page port(s). If External Day programming is enabled and the system is in the day mode, the assigned external page port(s) present a ringing signal. -
Page 115: Retrieving Voice Messages
Voice Mail 5. Replace the handset, or press the ON/OFF button. Retrieving Voice Messages To enter the Voice Mail system to check for messages: Either dial Voice Mail group number, press preprogrammed VM GROUP flexible button, press flashing MESSAGE WAIT button, or use the Soft Key’s VM1 option (group 440 only). -
Page 116: Voice Mail Group Button
Voice Mail Voice Mail Group Button To program a VM GROUP flexible button: 1. Press the SPEED button twice. 2. Press the desired flexible button to be programmed. 3. Dial a 3-digit VM Group number (440-447=VM groups 1-8). 4. Dial the VMID number. Voice Mail Group Access To access a VM Group: Dial VM Group number (440-447),... - Page 117 Voice Mail To make a VM RECORD flexible button: 1. Press the SPEED button twice. 2. Press the desired flexible button to be programmed. 3. Dial feature code [649] + [VVV] (where VVV = 440-447 for desired VM group. While on an internal or external call: 1.
-
Page 118: Volume Control
Volume Control Volume Control DIGITAL TELEPHONES The volume control on the Digital Key Telephone controls ringing, handset, and speakerphone volumes. It also affects the receive volume of the “Wanderer” cordless unit. Display Messages -- While using these function/features, Digital Key Telephones with LCDs display the following messages: Listening to Background SP EA K E R B G M [#########]... - Page 119 Volume Control SINGLE LINE TELEPHONE The volume control on the Single Line Telephone is located on the right side of the telephone. The slider switch options are HI for loud volume, LO for low volume, and OFF to turn the ringer off. Two-line models have a volume switch for each line.
-
Page 120: Worksheets
Worksheets Worksheets Flexible Button Programming Worksheet Speed Dial Bin Programming Worksheet BIN 9000 BIN 9010 BIN 9001 BIN 9011 BIN 9002 BIN 9012 BIN 9003 BIN 9013 BIN 9004 BIN 9014 BIN 9005 BIN 9015 BIN 9006 BIN 9016 BIN 9007 BIN 9017 BIN 9008 BIN 9018... -
Page 121: Default Numbering Plan
Default Numbering Plan Default Numbering Plan Function Code 911 Alert View/Delete (reqs btn) 608/608+FLASH Account Code (reqs btn) ACD Call Factor* (reqs btn) 580+[UUU]+[FFF] ACD Call Qualifier* 570+[YYY] ACD CIQ Display Btn* 579+[UUU] (specific ACD grp) (reqs btn) ACD Group* (group 1-16) 550-565 ACD Help* (digital reqs btn) ACD Member Status*... - Page 122 Default Numbering Plan Function Code Attnd Day/Night/Special (reqs btn) 631 (DND key) Attnd Directory List Programming Attnd Disable Outgoing CO Line 602+press CO line btn Attnd Override (reqs btn) Attnd Setting Time and Date 692+date & time Attnd Unavailable Attnd Voice Mail Alarm Clear Background Music (Ch 3=MPB2/MPBE) 632+[0, 1, 2, or 3] Call Back Call Coverage - Non-Ring (reqs btn)
- Page 123 Default Numbering Plan Function Code CO Line (Idle) Direct Access 88+[LLL] CO Line Grp Access Code (grp 0-23) 800-823 CO Line Grp Access Code (all grps) CO Line Queue CO Line Queue Cancel Conference (8 btn) (reqs btn) Dial-By-Name Directory Dial Do Not Disturb DTMF Receiver Test Executive Override...
- Page 124 Default Numbering Plan Function Code Page - Ext Zone All/1/2/3 760-762 (Mach I uses 761 only) (763=MPB2 or MPBE) Page - Internal Zones 1-8, All 701-709 Page - Meet Me (Answer) Personal Messages 633+[ZZ] Release Button (reqs btn) Repeat Redial Ring Down / Hot Line / Off-Hook Pref 691+[BB] Ring Tone...
- Page 125 Default Numbering Plan Function Code Universal Day/Night Answer Voice Mail Group (grp 1-8) 440-447 VM One Touch Record (reqs btn) 649+[VVV] VM Pse/Res Rec (Dig VM) (reqs btn) Voice Mailbox Btn (reqs btn) 460-467+[VMID] Voice MB Btn - Remote (reqs btn) 468+[VMID] (N/A for Mach I...
- Page 126 » » » » » » » » N O T E S » » » » » » »...
- Page 128 2002 Vodavi Technology, Inc. © VODAVI is a registered trademark of Vodavi Technology, Inc. P/N: IN3152-00...
Need help?
Do you have a question about the Digital telephone and is the answer not in the manual?
Questions and answers