Table of Contents
Advertisement
Advertisement
Table of Contents

Related Manuals for Pride Mobility Jazzy 1113


Summary of Contents for Pride Mobility Jazzy 1113
- Page 1 Owner’s Manual Exeter, PA St. Catharines, ON 1-800-800-8586 www.pridemobility.com...
- Page 2 Performing a prohibited action can cause injury to personnel and/or damage to equipment (black symbol with red circle and red slash). Copyright © 2006 Pride Mobility Products Corp. INFMANU1801/Rev K/July 2006 www.pridemobility.com Jazzy 1113 ATS...
- Page 3 This owner’s manual is compiled from the latest specifications and product information available at the time of publication. We reserve the right to make changes as they become necessary. Any changes to our products may cause slight variations between the illustrations and explanations in this manual and the product you have purchased. Jazzy 1113 ATS www.pridemobility.com...
- Page 4 I N T R O D U C T I O N SAFETY WELCOME to Pride Mobility Products Corporation (Pride). The power chair you have purchased combines state-of- the-art components with safety, comfort, and styling in mind. We are confident that these design features will provide you with the conveniences you expect during your daily activities.
- Page 5 These message boards invite you to communicate with other Pride customers as well as Pride represen- tatives who are available to assist you with any questions or concerns you may have. My Authorized Pride Provider: Name:_____________________________________________________________________________________ Address:___________________________________________________________________________________ Phone Number:______________________________________________________________________________ Purchase Date:_______________________________________________________________________________ Jazzy 1113 ATS www.pridemobility.com...
- Page 6 ! Check all controller connections to the electronics tray. Make sure they are secured properly. ! Check the brakes. See VIII. “Care and Maintenance.” ! Check battery charge. See VI. “Batteries and Charging.” NOTE: If you discover a problem, contact your authorized Pride Provider for assistance. www.pridemobility.com Jazzy 1113 ATS...
- Page 7 Doing so may result in personal injury and/or damage to your power chair. WARNING! Never travel down an incline backwards. This may result in personal injury. Jazzy 1113 ATS www.pridemobility.com...
- Page 8 ! Reduce your power chair’s speed when driving on uneven terrain and/or soft surfaces. ! Avoid tall grass that can entangle the running gear. ! Avoid loosely packed gravel and sand. ! If you feel unsure about a driving surface, avoid that surface. www.pridemobility.com Jazzy 1113 ATS...
- Page 9 Power chairs are not designed to travel up or down stairs or escalators. Always use an elevator. WARNING! Never use your power chair to negotiate steps or escalators. You may cause injury to yourself and to others and/or damage your power chair. Jazzy 1113 ATS www.pridemobility.com...
- Page 10 ! If you are in the doorway of an elevator when the door(s) begin to close, push on the rubber door edge or allow the rubber door edge to contact the power chair and the door will reopen. ! Use care that pocketbooks, packages, or power chair accessories do not become caught in elevator doors. www.pridemobility.com Jazzy 1113 ATS...
- Page 11 This may cause your power chair to tip, possibly resulting in personal injury. WARNING! Prevent personal injury! Keep your hands away from the tires when driving. Be aware that loose fitting clothing can become caught in drive tires. Jazzy 1113 ATS www.pridemobility.com...
- Page 12 Removable Parts WARNING! Do not attempt to lift or move a power chair by any of its removable parts. Personal injury and/ or damage to the power chair may result. www.pridemobility.com Jazzy 1113 ATS...
- Page 13 NOTE: For further information on EMI/RFI, visit the Resource Center on www.pridemobility.com. If unin- tended motion or brake release occurs, turn your power chair off as soon as it is safe to do so. Call Pride at 800- 424-8205 to report the incident. Jazzy 1113 ATS www.pridemobility.com...
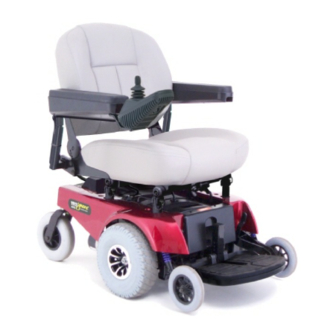
- Page 14 See figures 5, 6, and 7. SEAT BACK ARMRESTS SEAT ASSEMBLY CONTROLLER SEAT BASE BODY SHROUD FREEWHEEL LEVERS POWER BASE ASSEMBLY CASTER WHEEL FOOT RIGGING (FOOT PLATFORM SHOWN) DRIVE WHEEL ANTI-TIP WHEELS Figure 5. The Jazzy 1113 ATS www.pridemobility.com Jazzy 1113 ATS...
- Page 15 ¹Varies with user weight, terrain type, battery amp hour rating (AH), battery charge, battery condition, and tire condition. ²Due to manufacturing tolerances and continued product improvement, this specification can be subject to variance of (+ or – ) 3%. ³AGM or Gel-Cell type recommended. NOTE: All specifications subject to change without notice. Jazzy 1113 ATS www.pridemobility.com...
- Page 16 Battery Connectors (Quick-Connectors): These provide a connection between the battery boxes and the electronics tray. Motor Connectors: These provide a connection between the motors and the electronics tray. AMMETER CONTROLLER CONNECTOR MAIN CIRCUIT BREAKER (VSI SHOWN) CHARGER POWER CORD RECEPTACLE Figure 6. Power Base Rear View - Electronics Tray www.pridemobility.com Jazzy 1113 ATS...
- Page 17 WARNING! In freewheel mode, the braking system is disengaged. Only engage the freewheel mode when on a level surface. Failure to comply could result in injury and/or damage to your product. Jazzy 1113 ATS www.pridemobility.com...
- Page 18 As the chair slows down, the front anti-tip wheels will automatically drop toward the ground. This will reduce the forward tip that is typically encountered with center-wheel drive chairs. ATS SPRING Figure 10. ATS System www.pridemobility.com Jazzy 1113 ATS...
-
Page 19: Initial Assembly
7. Secure the controller cable to the armrest receiver with one or more wire ties. SEAT LATCH SAFETY REAR TRAPEZE BAR REAR EXTRUSION FRONT TRAPEZE BAR FRONT EXTRUSION Figure 11. Universal Mounting System Figure 12. Seat Latch Safety Jazzy 1113 ATS www.pridemobility.com... - Page 20 See III. “Your Power Chair.” LEFT POWER BASE FRAME ASSEMBLY BATTERY WELL FRAME FRONT FRAME BATTERY BOXES RIGHT POWER BASE FOOT PLATFORM FRAME ASSEMBLY Figure 13. Jazzy 1113 ATS Component Assemblies www.pridemobility.com Jazzy 1113 ATS...
- Page 21 I V . D I S A S S E M B L Y A N D A S S E M B L Y BALL DETENT SEAT TOWER Figure 14. Seat Installation/Removal Jazzy 1113 ATS www.pridemobility.com...
- Page 22 13. Carefully let the power base frame assembly tilt to a resting position. 14. Repeat steps 9-13 for the other power base frame assembly. www.pridemobility.com Jazzy 1113 ATS...
- Page 23 12. Reconnect the left and right motor connectors. Be certain to match the left connector to the left motor and the right connector to the right motor. The connectors are labeled left and right. Figure 18. Power Base Frame Removal/ Installation Jazzy 1113 ATS www.pridemobility.com...
- Page 24 WARNING! Do not place the controller harness so that it can be pinched in the seat frame or the power base frame. Figure 19. Frame Assembly Position LOCATING PINS BATTERY WELL FRAME Figure 20. Connect Battery Well Frame www.pridemobility.com Jazzy 1113 ATS...
-
Page 25: Comfort Adjustments
12. Reinstall the seat and secure the trapeze bars. 13. Connect the controller harness connector to the electronics tray To change the seat angle: Raise or lower only one set of seat towers (front or rear). Jazzy 1113 ATS www.pridemobility.com... - Page 26 Figure 23. Seatback and Armrest Adjustments 2. Set the seatback at the desired angle. 3. Reinstall the screws to both seat hinges and tighten. Armrest Width Adjustment You can change each armrest’s width independently of the other. www.pridemobility.com Jazzy 1113 ATS...
- Page 27 1. Remove the hardware from the foot platform bracket. See figure 25. Figure 26. Foot Platform Angle Adjustment 2. Raise or lower the foot platform to the desired height. 3. Reinstall the hardware into the foot platform bracket and tighten. Jazzy 1113 ATS www.pridemobility.com...
- Page 28 1. Remove the two adjustment screws from the side of each leg rest extension. 2. Slide the leg rest up or down to the desired length. 3. Reinstall the two adjustment screws. Figure 29. Heavy Duty Drop-In Leg Rests www.pridemobility.com Jazzy 1113 ATS...
- Page 29 2. Tilt the foot plate to the desired position. 3. Tighten the hardware. To change foot plate angle (D): 1. Turn the setscrew clockwise to decrease the angle. SETSCREW LOCATION 2. Turn the setscrew counterclockwise to increase the angle. Figure 30. Multi-Axis Foot Plate Jazzy 1113 ATS www.pridemobility.com...
- Page 30 Failure to do so may result in personal injury. PROHIBITED! Do not remove the anti-tip wheels. NUT AND BOLT ANTI-TIP ADJUSTMENT BOLT ANTI-TIP WHEEL Figure 31. Anti-Tip Adjustment www.pridemobility.com Jazzy 1113 ATS...
-
Page 31: Batteries And Charging
WARNING! Prevent injury and/or equipment damage! If the off-board battery charger is equipped with cooling slots, then do not attempt to insert objects through these slots. WARNING! Prevent injury and/or equipment damage! Do not allow unsupervised children to play near the power chair while the batteries are charging. Jazzy 1113 ATS www.pridemobility.com... - Page 32 3. Give the batteries another full charge of 8 to 14 hours and operate your power chair again. The batteries will now perform at over 90% of their potential. 4. After four or five charging cycles, the batteries will top off at 100% charge and last for an extended period. www.pridemobility.com Jazzy 1113 ATS...
- Page 33 We recommend deep-cycle batteries that are sealed and maintenance free. Both AGM and Gel-Cell are deep-cycle batteries that are similar in performance. WARNING! Corrosive chemicals contained in batteries. Use only AGM or Gel-Cell batteries to reduce the risk of leakage or explosive conditions. Jazzy 1113 ATS www.pridemobility.com...
- Page 34 What about shipping? If you wish to use a freight company to ship your power chair to your final destination, repack your power chair in the original shipping container and ship the batteries in separate boxes. www.pridemobility.com Jazzy 1113 ATS...
- Page 35 Unless the joystick is damaged, this action should stop your power chair. Keypad The keypad is located in front of the joystick. It contains keys necessary to operate your power chair. See figure 33. Jazzy 1113 ATS www.pridemobility.com...
- Page 36 If your power chair was programmed with a drive profile, contact your authorized Pride Provider for more information. NOTE: We recommend that the first few times you operate your power chair, you set the speed to the slowest setting until you become familiar with your new power chair. www.pridemobility.com Jazzy 1113 ATS...
- Page 37 NOTE: Changes to the programming can only be made by the manufacturer, an authorized representative of the manufacturer, or an authorized Pride Provider. Controller Connector This connects the VSI to the power chair’s batteries, motors, and motor brakes. Jazzy 1113 ATS www.pridemobility.com...
- Page 38 The parking brakes have a bad connection. Check the parking brake and motor connections. Make sure the controller connections are secure. An excessive voltage has been applied to the controller. This is usually caused by a poor battery connection. Check the battery connections. www.pridemobility.com Jazzy 1113 ATS...
- Page 39 The keypad is located directly in front of the joystick. It contains keys that you will use to control your power chair. See figure 35. On/Off Key The on/off key turns the system on and off. Jazzy 1113 ATS www.pridemobility.com...
- Page 40 The right/left turn indicator keys toggle either the left or right turn indicators. Press once to turn on and press again to turn off. You can also turn off the selected indicator by pressing the opposite indicator key or the hazard key. www.pridemobility.com Jazzy 1113 ATS...
- Page 41 Typically, the power module is mounted to the power base. The power module provides a power interface for the joystick module. It routes the battery power to the motors and other powered accessories such as lights and power seats. Jazzy 1113 ATS www.pridemobility.com...
- Page 42 Right Motor Wiring Fault Check right motor wiring. Right Motor Disconnected Check right motor wiring. Left Motor Wiring Fault Check left motor wiring. Left Motor Disconnected Check left motor wiring. Low Battery Voltage Check batteries/battery wiring. www.pridemobility.com Jazzy 1113 ATS...
- Page 43 If this has happened and all the segments on the battery condition meter are flashing, you may have set a fault code. See “Europa Error Codes.” Jazzy 1113 ATS www.pridemobility.com...
- Page 44 3. Hold the magnetic key on or near the key symbol again to unlock the system. When the key symbol stops flashing, you may turn on the power chair. NOTE: If you turn on the power chair while it is locked and do not unlock it after one minute, the power chair will automatically turn off itself. www.pridemobility.com Jazzy 1113 ATS...
- Page 45 You may use an off-board charger to charge the power chair batteries through the 3-pin socket located on the front of the Europa. See figure 36. If you use an off-board charger, the charger current should not exceed 8 amps. Contact your authorized Pride Provider for more information. Jazzy 1113 ATS www.pridemobility.com...
- Page 46 The controller must be turned off and then on again even if the source of the fault is removed. If you cannot resolve the problem, contact your authorized Pride Provider. www.pridemobility.com Jazzy 1113 ATS...
- Page 47 WARNING! If your power chair begins to move in an unexpected manner, immediately release the joystick. Unless the joystick is damaged, this action should stop your power chair. Figure 38. Microdrive Controller with Joystick Interface Module Jazzy 1113 ATS www.pridemobility.com...
- Page 48 NOTE: When a toggle switch is set to “J/S,” the joystick has control of a particular func- tion. When the toggle switch is set to “Local,” control of this function is disabled at the joy- stick. Figure 39. Microdrive Display Pad www.pridemobility.com Jazzy 1113 ATS...
- Page 49 Error codes are displayed as a number of flashing lights. For instance, if the first light is flashing rapidly, the battery voltage is nearly depleted. The following table identifies the individual error codes, probable causes, and possible solutions. If you get one of these error codes, contact your authorized Pride Provider. Jazzy 1113 ATS www.pridemobility.com...
- Page 50 Right Motor Wiring Fault Check right motor wiring. Right Motor Disconnected Check right motor wiring. Left Motor Wiring Fault Check left motor wiring. Left Motor Disconnected Check left motor wiring. Low Battery Voltage Check batteries/battery wiring. www.pridemobility.com Jazzy 1113 ATS...
-
Page 51: Care And Maintenance
M A I N T E N A N C E CARE AND MAINTENANCE Your Jazzy 1113 ATS is a sophisticated power chair. Like any motorized vehicle, it requires routine maintenance checks. You can perform some of these checks, but others require assistance from your authorized Pride Provider. Preventive maintenance is very important. - Page 52 Your power chair should be stored in a dry place, free from temperature extremes. When storing, disconnect the batteries from the power chair. See VI. “Batteries and Charging.” WARNING! If you fail to store the unit properly, the frame can rust and the electronics can be damaged. www.pridemobility.com Jazzy 1113 ATS...
- Page 53 2. Set the power chair up on blocks. 3. If you are changing a pneumatic tire, completely deflate it before removing the wheel. 4. Remove the drive wheel nut and washer from the axle. See figure 40. Jazzy 1113 ATS www.pridemobility.com...
- Page 54 11. Place the battery boxes into the battery well on the power base and refasten the straps. 12. Plug in the quick-connectors. 13. Reinstall the seat. 14. Plug the controller connector(s) into the power base. 15. Charge the batteries. www.pridemobility.com Jazzy 1113 ATS...
- Page 55 Disconnect both batteries before load testing and follow the directions that come with the load tester. If either one of the batteries fails the load test, replace both of them. If your power chair still does not power up, contact your authorized Pride Provider. Jazzy 1113 ATS www.pridemobility.com...
- Page 56 Pride to be defective in material and/or workmanship: ! Bearings and bushings ! Plastic components, except body The battery is covered by a separate six-month warranty, provided by the battery manufacturer. The batteries are not warranted by Pride. www.pridemobility.com Jazzy 1113 ATS...
- Page 57 ! Circumstances beyond the control of Pride ! Labor, service calls, shipping, and other charges incurred for repair of the product, unless specifically authorized, IN ADVANCE, by Pride Mobility Products Corporation ! Repairs and/or modifications made to any part without specific consent from Pride...
- Page 58 N O T E S www.pridemobility.com Jazzy 1113 ATS...
- Page 59 Quality Control-Jazzy 1113 ATS Thank you for making the Pride Jazzy 1113 ATS your choice in power chairs. We have thoroughly inspected your Jazzy 1113 ATS. The following checkmarks indicate that it has been test driven and inspected. Inclusion of all Parts...
Need help?
Do you have a question about the Jazzy 1113 and is the answer not in the manual?
Questions and answers
what size axle key does jazzy 1113 ats take and how many?