
Subscribe to Our Youtube Channel
Related Manuals for Kramer VM-1120


Summary of Contents for Kramer VM-1120
-
Page 1: User Manual
Kramer Electronics, Ltd. Preliminary USER MANUAL Model: VM-1120 1:10 Balanced Stereo Audio Distributor... -
Page 2: Table Of Contents
Figure 5: 2x1:5 Stereo DA Configuration Figure 6: Using the Selector Button Tables Table 1: Front Panel VM-1120 1:10 Balanced Stereo Audio Distributor Features Table 2: Rear Panel VM-1120 1:10 Balanced Stereo Audio Distributor Features Table 3: VM-1120 Technical Specifications... -
Page 3: Introduction
2 We recommend that you use only the power cord supplied with this device 3 Download up-to-date Kramer user manuals from our Web site at http://www.kramerelectronics.com 4 The complete list of Kramer cables is on our Web site at http://www.kramerelectronics.com... -
Page 4: Quick Start
Getting Started Quick Start This quick start chart summarizes the basic setup and operation steps. KRAMER: SIMPLE CREATIVE TECHNOLOGY... -
Page 5: Overview
A high-power discrete buffering system providing excellent performance You can configure your VM-1120 as a mono DA (2x1:10 or 1:20) or as a stereo DA (2x1:5 or 1:10). Achieving the best performance means: Connecting only good quality connection cables, thus avoiding... -
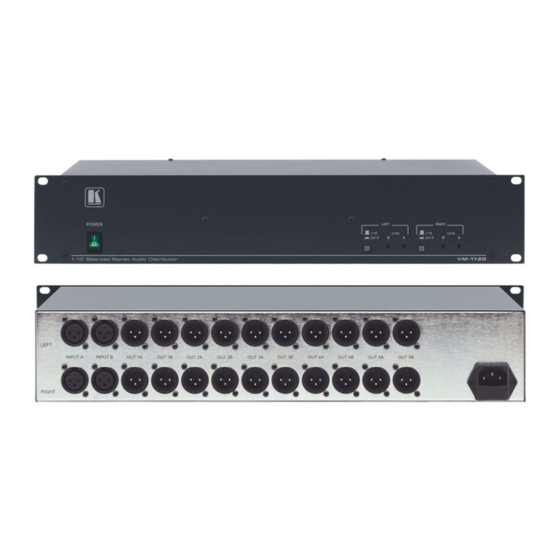
Page 6: Figure 1: Vm-1120 1:10 Balanced Stereo Audio Distributor
Your Balanced Stereo Audio Distributor Figure 1: VM-1120 1:10 Balanced Stereo Audio Distributor KRAMER: SIMPLE CREATIVE TECHNOLOGY... -
Page 7: Table 1: Front Panel Vm-1120 1:10 Balanced Stereo Audio Distributor Features
Your Balanced Stereo Audio Distributor Table 1: Front Panel VM-1120 1:10 Balanced Stereo Audio Distributor Features Feature Function Power LED Illuminates when the unit is powered on 1:10 / 2x1:5 Button Push in to select 2x1:5 , release to select 1:10... -
Page 8: Installing The Vm-1120 In A Rack
Installing the VM-1120 in a Rack Installing the VM-1120 in a Rack This section describes how to install the VM-1120 in a rack. Before Installing in a rack How to Rack Mount Before installing in a rack, be sure that the environment is... -
Page 9: Connecting A 1:20 Mono Da
3. Release the LEFT and RIGHT selector buttons 1:10/2x1:5 to select 1:10. 4. Connect the power cord to the electricity supply. 5. Switch on the VM-1120. The audio input(s) is/are distributed to the audio outputs. Figure 2: 1:20 Mono DA Configuration... -
Page 10: Connecting A 2X1:10 Mono Da
5. Release the LEFT and RIGHT selector buttons 1:10/2x1:5 to select 1:10. 6. Connect the power cord to the electricity supply. 7. Switch on the VM-1120. The audio input(s) is/are distributed to the audio outputs. Figure 3: 2x1:10 Mono DA Configuration... -
Page 11: Connecting A 1:10 Stereo Da
3. Release the LEFT and RIGHT selector buttons 1:10/2x1:5 to select 1:10. 4. Connect the power cord to the electricity supply. 5. Switch on the VM-1120. The audio input(s) is/are distributed to the audio outputs. Figure 4: 1:10 Stereo DA Configuration... -
Page 12: Connecting A 2X1:5 Stereo Da
5. Push IN the LEFT and RIGHT selector buttons 1:10/2x1:5 to select 2x1:5. 6. Connect the power cord to the electricity supply. 7. Switch on the VM-1120. The audio input(s) is/are distributed to the audio outputs. Figure 5: 2x1:5 Stereo DA Configuration... -
Page 13: Setting The Vm-1120
Figure 6 illustrates how the selector button works when two inputs are connected to one channel. Figure 6: Using the Selector Button Note the following when using the VM-1120: The left and right channels are not connected. Left inputs only distribute to left outputs and right inputs only distribute to right outputs Only the “A”... -
Page 14: Technical Specifications
Technical Specifications Technical Specifications The VM-1120 technical specifications are shown in Table 3: Table 3: VM-1120 Technical Specifications INPUTS: 4 balanced audio +4dBu/50k on XLR (F) connectors OUTPUTS: 20 balanced audio +4dBu/50 on XLR (M) connectors MAX. OUTPUT LEVEL: >26dBu BANDWIDTH (-3dB): >100kHz... - Page 15 EXCLUSION OF DAMAGES The liability of Kramer for any effective products is limited to the repair or replacement of the product at our option. Kramer shall not be liable for: 1. Damage to other property caused by defects in this product, damages based upon inconvenience, loss of use of the product, loss of time, commercial loss;...
- Page 16 For the latest information on our products and a list of Kramer distributors, visit our Web site: www.kramerelectronics.com where updates to this user manual may be found. We welcome your questions, comments and feedback. Safety Warning: Disconnect the unit from the power supply before opening/servicing.
Need help?
Do you have a question about the VM-1120 and is the answer not in the manual?
Questions and answers