Table of Contents
Advertisement
Quick Links
Advertisement
Table of Contents

Related Manuals for Nady Systems ENCORE 2


Summary of Contents for Nady Systems ENCORE 2
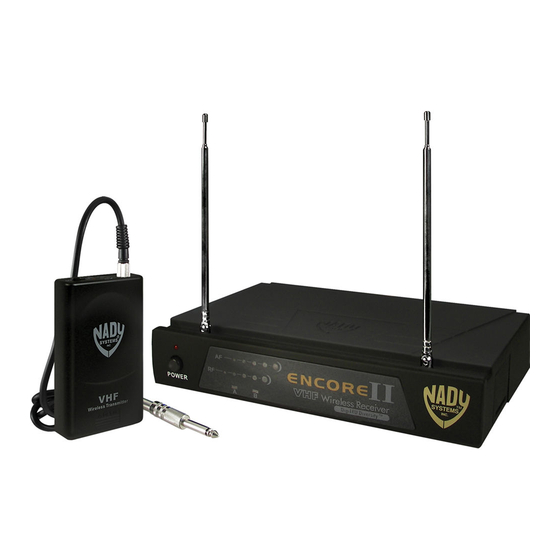
- Page 1 VHF Wireless Microphone System DigiTRU Diversity ™...
-
Page 2: Table Of Contents
WARRANTY ....................15 INTRODUCTION Thank you for choosing the Nady Encore II diversity wireless microphone system, we know you will be very pleased with its performance and features. The Encore II is loaded with top professional operating features and is the best performance and price value available in VHF dual receiver wireless systems. -
Page 3: System Features
• RF and AF 5-LED displays for monitoring incoming signal strength and audio level • Balanced XLR and unbalanced adjustable 1/4” jack outputs • Mute (squelch) adjust control • Externally powered by AC/DC power adapter • Unique snap-out panel locking tabs for single receiver or dual receiver (side‑by‑side) optional rack mounting WHT HANDHELD MIC TRANSMITTER • Features the Nady DM -10D unidirectional neodymium dynamic cartridge for optimum true sound, maximum feedback rejection and minimal handling noise • OFF/STANDBY/ON switch allows convenient audio muting with the transmitter “ON” • Low battery LED indicator flashes once for unit “ON”; lights steady for low battery alert WGT & WLT BODYPACK TRANSMITTERS • Choice of instrument (WGT) or headworn/lavalier microphone (WLT) bodypack transmitter • OFF/STANDBY/ON switch allows convenient audio muting with the... -
Page 4: Encore Ii Receiver
ENCORE II RECEIVER 1. Rackmounting the Receiver There are two options available for rackmounting the Encore II receiver: singly or side‑by‑side with another Encore Series receiver. Single mounting: Remove the receiver SIDE MOUNT CLIP (1) from each side of the receiver (as shown) and slide in the optional ERM-12 RACK EARS (9). Side-by-side double mounting: After removing the SIDE MOUNT CLIPS (1) from both Encore receivers, join the two receivers with the EJC-2 JOINING CLIP (10) and attach the ERM-22 RACK EARS (12) as shown. - Page 5 5. Connecting the Audio Output The Encore II receiver provides both a fixed mic level BALANCED AUDIO OUTPUT XLR (14) and an adjustable line level UNBALANCED AUDIO OUTPUT 1/4” JACK (13). The level from the UNBALANCED OUTPUT is controlled by the rear panel VOLUME CONTROL (6). (Note: As when making any connection, make sure the amplifier or mixing board volume is at the minimum level before plugging in the receiver to avoid possible sound system damage.
- Page 6 POWER 12-15V VOLUME MUTE UNBALANCED OUT DC INPUT BALANCED OUT...
-
Page 7: Wht Handheld Microphone Transmitter
WHT HANDHELD MICROPHONE TRANSMITTER 1. Unscrew the BATTERY COMPARTMENT COVER (17) and remove, exposing the BATTERY HOLDER (18). Insert a fresh 9V ALKALINE BATTERY (19), observing the correct polarity as marked, and screw the cover back on to the microphone. Make sure the cover is screwed on completely. -
Page 9: Wlt Lavalier/Lapel Or Headworn Microphone Bodypack Transmitter
WLT LAVALIER/LAPEL OR HEADWORN MICROPHONE BODYPACK TRANSMITTER 1. Snap open the BATTERY COMPARTMENT (22) and insert a fresh 9V BATTERY (23), observing the correct polarity. Close the compartment. 2. The WLT is provided with a 3.5 mm LOCKING JACK (24) for connecting the microphone. - Page 10 Opening Battery Compartment...
-
Page 11: Wgt Instrument Bodypack Transmitter
WGT INSTRUMENT BODYPACK TRANSMITTER 1. Snap open the BATTERY COMPARTMENT (30) and insert a fresh 9V BATTERY (31), observing the correct polarity. Close the compartment. The WGT is provided with a 3.5 mm LOCKING JACK (32) for connecting the INSTRUMENT CABLE (35). To secure the connection, turn the metal slip ring on the plug clockwise to thread it on to the jack. To unplug, reverse the process. Slip the transmitter into a pocket or clip on to your clothes or instrument strap. - Page 12 Opening Battery Compartment...
-
Page 13: Specifications
1.75” x 7.5” x 8.1” (4.4 x 19 x 20.7 cm) Weight 1.6 lbs (.73 kg) Power Requirements 12V @ 400mA, nominal, AC/DC adapter supplied Antenna 11.2” (28.5 cm), single telescopic TRANSMITTERS Audio Inputs • WHT Nady DM-10D neodymium dynamic cartridge • WLT/WGT 3.5mm mono locking jack for connecting to omni or unidirectional lavalier mic or unidirectional head worn mic, with phantom power (WLT); or connecting to instrument cable (WGT) Controls • WHT OFF/STANDBY/ON switch • WLT/WGT OFF/STANDBY/ON switch, input level adjust LED Indicator Unit “ON” (single flash), Low Battery Alert (steady) -
Page 14: Service Information
Make sure the R/A Number is clearly marked on the outside of the package that you are returning. If your unit is out of warranty, please enclose a cashier’s check or money order (or pay by credit card) per instructions by the Nady Service Department. Ship your unit prepaid to: Nady Systems, Service Department, 6701 Shellmound Street, Emeryville, CA 94608. Include a brief description of the problem you are experiencing. For service of a unit under warranty, please follow the instructions in the following section. -
Page 15: Warranty
Nady Systems, Inc. for repair. The warranty is null and void if any Nady serial number has been removed or defaced. How To Obtain Service: 1) If factory service is required, please contact our Service Department at (510) 652-2411 for a return authorization (R/A) number. - Page 16 Nady Wireless Systems are type accepted under FCC rules parts 90, 74 and 15. The device complies with RSS-210 of Industry & Science Canada. Operation is subject to the following two conditions: (1) this device may not cause harmful interference and (2) this device must accept any interference received, including interference that may cause undesired operation. 6701 Shellmound Street | Emeryville, CA USA 94608 T 510.652.2411 | F 510.652.5075 | www.nady.com...
Need help?
Do you have a question about the ENCORE 2 and is the answer not in the manual?
Questions and answers