Table of Contents
Advertisement
Advertisement
Table of Contents

Related Manuals for Amano TCX-21


Summary of Contents for Amano TCX-21
- Page 1 ® AMANO TCX-21 Electronic Time Clock Operation Manual...
-
Page 2: Proprietary Notice
This document contains proprietary information and such information may not be reproduced in whole or part without the written permission from Amano Cincinnati, Inc., 140 Harrison Ave., Roseland, New Jersey, 07068. Amano Cincinnati, Inc. reserves the right to make equipment changes and improvements, which may not be reflected in this document. -
Page 3: Specifications
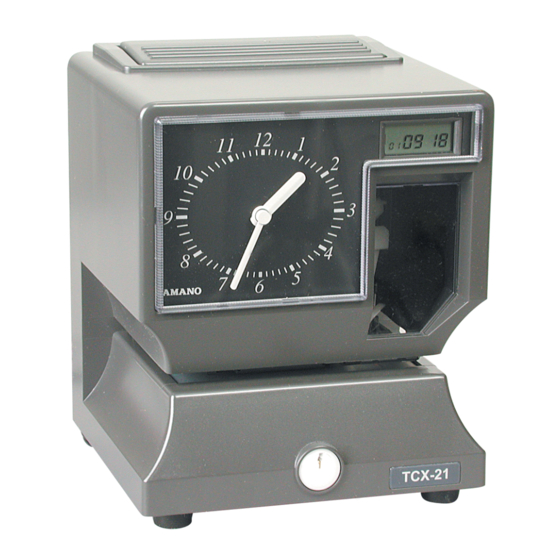
6 1/4” (159 mm) deep Weight: 3.196 Kg (7 lbs.) Environment: Indoor use only; dust-free environment. Keep out of direct sunlight. External View Print Button Analog Clock LCD Display Print Window Printer Platen and Margin Adjustment Cover Lock Amano TCX-21 Operation Manual... -
Page 4: Internal View
4. Remove the spacer between the Ribbon Cartridge and the Printer Carriage Tab. 5. Reinstall the cover of your unit. Internal View Program Buttons LCD Display Analog Reset Clock Button Ribbon Cartridge Card Stopper Card Stopper Adjustment Screw Printer Platen Amano TCX-21 Operation Manual... -
Page 5: Power Connection
Hang the clock on the screw using the teardrop mounting hole. Secure the clock to the wall by inserting screws through the bottom two mounting holes. 7. Reconnect the power cord to the power source. 8. Re-install the cover and secure. Amano TCX-21 Operation Manual... -
Page 6: Make A Test Print
1. Make sure that there is power to the TCX-21 (Refer to Page 3). 2. Insert a piece of paper, or time card into the TCX-21. The clock will automatically print YEAR, MONTH, DATE and TIME with AM or PM. -
Page 7: Entering The Program Mode
Programming Menu. The Main Programming Menu consists of the Following: Menu Code Menu Function Sets the date Cloc Sets the clock time Disable/Enable Daylight Saving Time Sets the print style using Quick Print Set-Up Codes Accesses Other Options Menu Amano TCX-21 Operation Manual... -
Page 8: Setting The Year, Month And Date
ENTER button. 5. When the display flashes the correct time, press the ENTER button. 6. When the display flashes P2 CLoc, press the CHANGE button to move to the Daylight Saving Time On/Off Setting. Amano TCX-21 Operation Manual... - Page 9 4 Digit Year, Month, Date, 24Hr., 60th/Hr. Right Side Print Pr-7 3. When the display flashes the correct setting, press the ENTER button. 4. When the display flashes P4 Prnt, press the CHANGE button to move to the Other Options menu. Amano TCX-21 Operation Manual...
- Page 10 2. Press the CHANGE button until the desired number appears in the first position. Press the ENTER button. 3. Press the CHANGE button until the desired number appears in the second position. Press the ENTER button. Amano TCX-21 Operation Manual...
- Page 11 Left Side Printing 5840 DATE, MONTH, 24H, 100th Left Side Printing 5680 DATE, MONTH, YEAR, 24H, 60th Left Side Printing 5530 MONTH, DATE, 12H, 60th Left Side Printing 5630 MONTH, DATE, 24H, 60th Left Side Printing Amano TCX-21 Operation Manual...
- Page 12 4. Continue to assign codes until you have finished. 5. Press the CHANGE button until the En code flashes, then press the ENTER button. 6. When the display flashes II Prnt, press the CHANGE button to move to the Language Setting. Amano TCX-21 Operation Manual...
- Page 13 SPCE SY-1 YEAr SPCE month SPCE dAtE YEAR,MONTH,DATE,SYMBOL2 95 APR13 SENT SPCE SY-2 YEAr SPCE month SPCE dAtE YEAR,MONTH, DATE,SYMBOL3 95 APR13 FAX’D SPCE SY-3 YEAr SPCE month SPCE dAtE YEAR,MONTH, DATE,SYMBOL4 95 APR13 PAID SPCE SY-4 Amano TCX-21 Operation Manual...
-
Page 14: Setting The Language
3. When the display flashes I2 LAn9, press the CHANGE button to move to the Print Direction. Please refer to the table below for Language selections. English Spanish French Portuguese LI En9 L2 SPn L3 Frn L4 Pt9 Amano TCX-21 Operation Manual... -
Page 15: Setting The Auto Print
2. When the display flashes OFF or on, press the CHANGE button to toggle between off and on. Press the ENTER button to select. 3. When the display flashes I5 2ErO, press the CHANGE button to move to the Begin Daylight Saving Time setting. Amano TCX-21 Operation Manual... - Page 16 1. When the display flashes 17 EdLt, press the ENTER button. 2. Press the CHANGE button until the correct year appears, then press the ENTER button. 3. Press the CHANGE button until the correct month appears, then press the ENTER button. Amano TCX-21 Operation Manual...
- Page 17 7. To clear the memory and reset the defaults, press the CHANGE button until the 3 appears, then press the ENTER button. Press the CHANGE button until the 2 appears, then press the ENTER button. 8. When the display flashes 32, press the ENTER button. Amano TCX-21 Operation Manual...
-
Page 18: Exit Program Mode
Press the PROGRAM button and the display will show the current date. The clock hands will reset to the current time. Note: The TCX-21 uses a Lithium battery to maintain the user settings incase of a power failure. If a power failure occurs and the Lithium battery is dead, the time clock settings may revert to default settings (i.e., DST Begin and... -
Page 19: Error Messages
Also, check to see that the ribbon cables are in good condition. After clearing any jams, restore the power and press the RESET button. Contact your Amano Cincinnati representative for assistance. - Page 20 AJR-305503 Copyright ©2007 Amano Cincinnati, Inc. 1/07/0...
Need help?
Do you have a question about the TCX-21 and is the answer not in the manual?
Questions and answers