Table of Contents

Related Manuals for Radio Shack 15-310


Summary of Contents for Radio Shack 15-310
- Page 1 15-310 User’s Guide Big Button Universal Remote Control Thank you for purchasing your Big Button Universal Remote Control from RadioShack. Please read this user’s guide before installing, setting up, and using your new remote control.
-
Page 2: Install The Batteries
Package Contents Code List Remote control Features • Operates up to three devices • Large easy-to-see buttons Install the Batteries 1. Remove the battery cover. 2. Insert two AAA batteries (not included) by matching the polarity symbols (+ / –) marked inside. 3. Replace the battery cover. -
Page 3: Remote Buttons
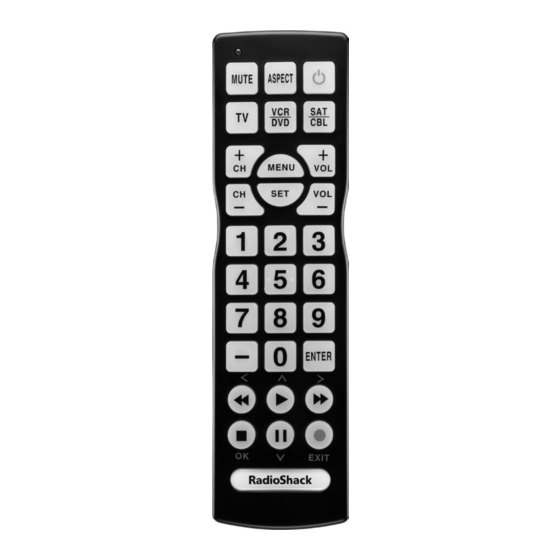
Red LED MUTE Turn off the sound MENU • D isplay the menu for the selected device • I n menus, activate and deactivates the alternative function of the multi-function keys. Activate setup for the remote CH +/– Select the next or previous channel Directly enter channels – Access subchannels on a TV or receiver... - Page 4 ASPECT Change viewing options (4:3 or 16:9) Turn on or off a selected device Device Keys Select a device to control VOL +/– Adjust the volume ENTER Press to enter the channel number Multi-function keys • C ontrol your VCR or DVD player • I n menus, the keys stand for left (), up (), right (), OK (), down () and exit () • K eys return to their original function if no keys are press for 10 sec.
-
Page 5: Brand Code Setup
Setup Your universal remote can operate a TV, VCR, DVD, cable or satellite. Set up your universal remote in one of three ways: • Brand Code Setup: Directly enter the device code from the Code List. Try each code until you find one that works for your device. • Auto Code Search: Your universal remote automatically goes through all the device codes. (This method can take up to 45 minutes to search all the codes for the 3 devices.) • Manual Code Search: Manually goes through each code for your device one by one at the touch of the G button. Note: Keep your remote pointed at the device that you want to program throughout setup. Brand Code Setup 1. Power on the device that you want to control. - Page 6 The red LED lights and stays lit, indicating that the remote is in setup mode. Release both buttons. Note: Do not hold down the keys for longer than three seconds or the remote enters auto search mode. 4. Enter the first 3-digit code for your device and brand. Pause briefly between each digit to make sure the remote receives all inputs. The red LED flashes when input is received, then turns off if you entered the right code. If the red LED stays lit, enter the next code for your device and brand. Repeat for all possible codes until the red LED turns off. 5. Verify the setup by testing the remote control’s buttons and functions. If some of your device’s functions do not respond to the remote, repeat steps 3-5 with another code. Notes: • If you want to quit during device setup, press the device key or wait 10 seconds for the remote to exit setup automatically.
-
Page 7: Auto Code Search
Auto Code Search Auto Code Search automatically sends device codes to the device that you want to control. 1. Power on the device that you want to control. For VCRs and DVD players, you must insert a tape or disc. 2. On your universal remote, press and hold SET, then press and hold a device key (TV, VCR/DVD or STB/ CBL). Continue to hold down both keys for more than three seconds. The red LED flashes and the universal remote starts searching. Release both buttons. 3. When the device responds in any way (switches off, play, pause, volume change, channel changes), press any key other than SET within two seconds to confirm the code. The red LED will stop flashing. 4. Verify the setup by testing various keys and functions. Press G on your universal remote to turn on the device if it turned off in step 3. If some of your device’s functions do not respond to the remote, repeat steps 2-4. Notes: • Because Auto Code Search requires you to stop the search, you must remain with the device during the process. • To stop searching, press any key (except SET). The red LED light turns off and the search stops. -
Page 8: Manual Code Search
Manual Code Search Manual Code Search sends codes to the device you want to control one by one at the touch of the G button. 1. Power on the device that you want to control. For VCRs and DVD players, you must insert a tape or disc. 2. On the universal remote, press and hold SET, then press a device key (TV, VCR/DVD or STB/CBL). The red LED lights up and stays lit, indicating the remote is in setting mode. Release both buttons. Note: Do not hold down the keys for longer than three seconds or the remote enters auto search mode. 3. Press G on the universal remote. The universal remote enters manual code search mode and the red LED flashes. 4. Press G repeatedly on your universal remote until the device turns off. (Each press of the G key sends a different code to your device.) When the device turns off, the code is correct. Press the device key on your universal remote within 10... -
Page 9: Check Current Brand Code
6. Verify the setup by testing various keys and functions. If some of your device’s functions do not respond to the remote, repeat steps 2-6. Notes: • During a search, you can press SET to change search direction from forward to backward or vice versa. • If no keys are pressed in 10 seconds, search stops. Operation Check Current Brand Code For future reference and to save time if you ever need to set up your remote again, retrieve and write down your device codes for each device key on your universal remote. Complete the following steps to check the code number for a specific device. The red LED on your universal remote will flash to indicate the codes. 1. Press the device key on your universal remote. 2. To check the first digit, press and hold SET, then press numerical key 1. The red LED will flash repeatedly to indicate the first digit. (once for 1, twice for 2, etc. If the red LED does not flash, this indicates that the first digit is “0.”) 3. To check the second digit, press and hold SET, then press 2. The red LED will flash repeatedly to indicate the second digit. -
Page 10: Lock Device
4. To check the third digit, press and hold SET, then press 3. The red LED will flash repeatedly to indicate the third digit. Lock Device Lock the device code in your remote so it doesn’t get changed or deleted unintentionally. To lock in the code for your current device: 1. Press the device key that you want to lock on your universal remote. 2. Hold down SET, then press 7. The red LED blinks twice. The code for the current device is now locked and cannot be overwritten. 3. To unlock the current device key, press and hold SET, then press 8. The red LED blinks twice. Note: • The locked devices cannot be changed until you unlock the current device key or reset your remote. • To unlock a code other than the current one, press that device key before following step 3. -
Page 11: Lock Volume And Mute
Lock Volume and Mute You can lock the volume and mute functions so they work only with one device. For example, if you’ve locked the volume and mute functions to the TV device key on your universal remote, you can only control TV volume, even if you are in STB/CBL or VCR/DVD modes. To lock the volume and mute functions: 1. Press the device key on your universal remote. 2. Hold down SET, then press 5. The red LED blinks twice. The volume and mute keys are now locked to the current device. To unlock the volume and mute functions: Hold down SET, then press 6. The red LED blinks twice. Reset Your Universal Remote To restore your remote to factory settings, press and hold down SET and then press 0 until the red LED blinks three times. Additional Information Battery Notes • Dispose of batteries promptly and properly. Do not burn or bury them. -
Page 12: Troubleshooting
• Do not mix old and new batteries, different types of batteries (alkaline, or rechargeable), or rechargeable batteries of different capacities. • If you do not plan to use the remote for more than one week, remove the battery. Batteries can leak chemicals that can damage electronic parts. Troubleshooting Problem Solution I press SET and the Press and hold SET, then press the appropriate key appropriate key. at the same time The remote will not enter the desired but the remote still mode if buttons are pressed in the doesn’t work. wrong order. I have tried all the Use Manual Search or Auto Search codes under my to find the proper codes. - Page 13 Problem Solution I can’t get the remote • TVs and other devices may power to pair with my off differently. Make sure you know device how yours powers off so you can press the appropriate key at the correct time. Otherwise, the remote will not pair with the device and you will have to try again. • Try all the 3-digit device codes one by one under the same brand until all or most keys work properly. • Write down all the code numbers that work with your device, then try each until you find the best code. The device recog- • After testing and confirming the first nized a code, but not recognized code and the features all features work do not work as expected, start the search again to find a more compatible code. • When searching for a more compatible code, the device will power off/on each time it recognizes a code. Ignore unwanted codes by waiting for the device to power off/ on the second (or third, fourth, etc.) time, before pressing a button to confirm the code. • Try all the 3-digit device codes one by one under the same brand until all or most keys work properly. •...
-
Page 14: Specifications
Specifications Supported Equipment ....TV/DVD/STB/VCR/CBL Power ............2 AAA batteries Battery life ..........up to 120,000 hrs Specifications are subject to change and improvement without notice. Actual product may vary from the images found in this document. FCC Information This equipment has been tested and found to comply with the limits for a Class B digital device, pursuant to Part 15 of the FCC Rules. These limits are designed to provide reasonable protection against harmful interference in a residential installation. This equipment generates, uses, and can radiate radio frequency energy and, if not installed and used in accordance with the instructions, may cause harmful interference to radio communications. However, there is no guarantee that interference will not occur in a particular installation. If this equipment does cause harmful interference to radio or television reception, which can be determined by turning the equipment off and on, the user is encouraged to try to correct the interference by one or more of the following measures: • Reorient or relocate the receiving antenna. • Increase the separation between the equipment and receiver. • Connect the equipment into an outlet on a circuit different from that to which the receiver is connected. • Consult your local RadioShack store or an experienced radio/TV techni- cian for help. If you cannot eliminate the interference, the FCC requires that you stop using your equipment. Changes or modifications not expressly approved by RadioShack may cause interference and void the user’s authority to operate the equipment. This device complies with Part 15 of the FCC rules. Operation is subject to the following two conditions: (1) This device may not cause harmful interference, and (2) This device must accept any interference received, including interference that may cause undesired operation. -
Page 15: Limited Warranty
Limited Warranty RadioShack warrants this product against defects in materials and workmanship under normal use by the original purchaser for ninety (90) days after the date of purchase from a RadioShack-owned store or an authorized RadioShack franchisee or dealer. RADIOSHACK MAKES NO OTHER EXPRESS WARRANTIES. This warranty does not cover: (a) damage or failure caused by or attribut- able to abuse, misuse, failure to follow instructions, improper installation or maintenance, alteration, accident, Acts of God (such as floods or light- ning), or excess voltage or current; (b) improper or incorrectly performed repairs by persons who are not a RadioShack Authorized Service Facility; (c) consumables such as fuses or batteries; (d) ordinary wear and tear or cosmetic damage; (e) transportation, shipping or insurance costs; (f) costs of product removal, installation, set-up service, adjustment or reinstalla- tion; and (g) claims by persons other than the original purchaser. Should a problem occur that is covered by this warranty, take the product and the RadioShack sales receipt as proof of purchase date to any RadioShack store in the U.S. RadioShack will, at its option, unless otherwise provided by law: (a) repair the product without charge for parts and labor; (b) replace the product with the same or a comparable product; or (c) refund the purchase price. All replaced parts and products, and products on which a refund is made, become the property of RadioShack. New or reconditioned parts and products may be used in the performance of warranty service. Repaired or replaced parts and products are warranted for the remainder of the original warranty period. You will be charged for repair or replacement of the product made after the expiration of the warranty period. RADIOSHACK EXPRESSLY DISCLAIMS ALL WARRANTIES AND CONDI- TIONS NOT STATED IN THIS LIMITED WARRANTY. ANY IMPLIED WARRANTIES THAT MAY BE IMPOSED BY LAW, INCLUDING THE IMPLIED WARRANTY OF MERCHANTABILITY AND, IF APPLICABLE, THE IMPLIED WARRANTY OF FITNESS FOR A PARTICULAR PURPOSE, SHALL EXPIRE ON THE EXPIRATION OF THE STATED WARRANTY PERIOD. EXCEPT AS DESCRIBED ABOVE, RADIOSHACK SHALL HAVE NO LIABILITY OR RESPONSIBILITY TO THE PURCHASER OF THE PRODUCT OR ANY OTHER PERSON OR ENTITY WITH RESPECT TO ANY... - Page 16 LIABILITY, LOSS OR DAMAGE CAUSED DIRECTLY OR INDIRECTLY BY USE OR PERFORMANCE OF THE PRODUCT OR ARISING OUT OF ANY BREACH OF THIS WARRANTY, INCLUDING, BUT NOT LIMITED TO, ANY DAMAGES RESULTING FROM INCONVENIENCE AND ANY LOSS OF TIME, DATA, PROPERTY, REVENUE, OR PROFIT AND ANY INDIRECT, SPECIAL, INCIDENTAL, OR CONSEQUENTIAL DAMAGES, EVEN IF RADIOSHACK HAS BEEN ADVISED OF THE POSSIBILITY OF SUCH DAMAGES. Some states do not allow limitations on how long an implied war- ranty lasts or the exclusion or limitation of incidental or consequential damages, so the above limitations or exclusions may not apply to you. This warranty gives you specific legal rights, and you may also have other rights which vary from state to state. You may contact RadioShack at: RadioShack Customer Relations 300 RadioShack Circle, Fort Worth, TX 76102 04/08 www.RadioShack.com Protect the environment by recyling used electronics. Go to E-CyclingCentral.com to find an electronic recycling center near you. ©2010. RadioShack Corporation. All rights reserved. RadioShack and RadioShack.com Printed 07A10 are trademarks used by RadioShack Corporation. in China 15-310...
Need help?
Do you have a question about the 15-310 and is the answer not in the manual?
Questions and answers